Unauthorized Access
Unauthorized visitors are users who, for instance, try to view content on your website without logging in or subscribing. By managing content access, you can control what these visitors see, or alternatively, whether they can stay on the page. This, in turn, helps you protect your valuable content and, moreover, encourages non-members to register or log in.
Redirect Unauthorized Visitors to a Specific URL
You can enable unauthorized redirection to redirect users to a specified page instead of displaying the standard unauthorized message.
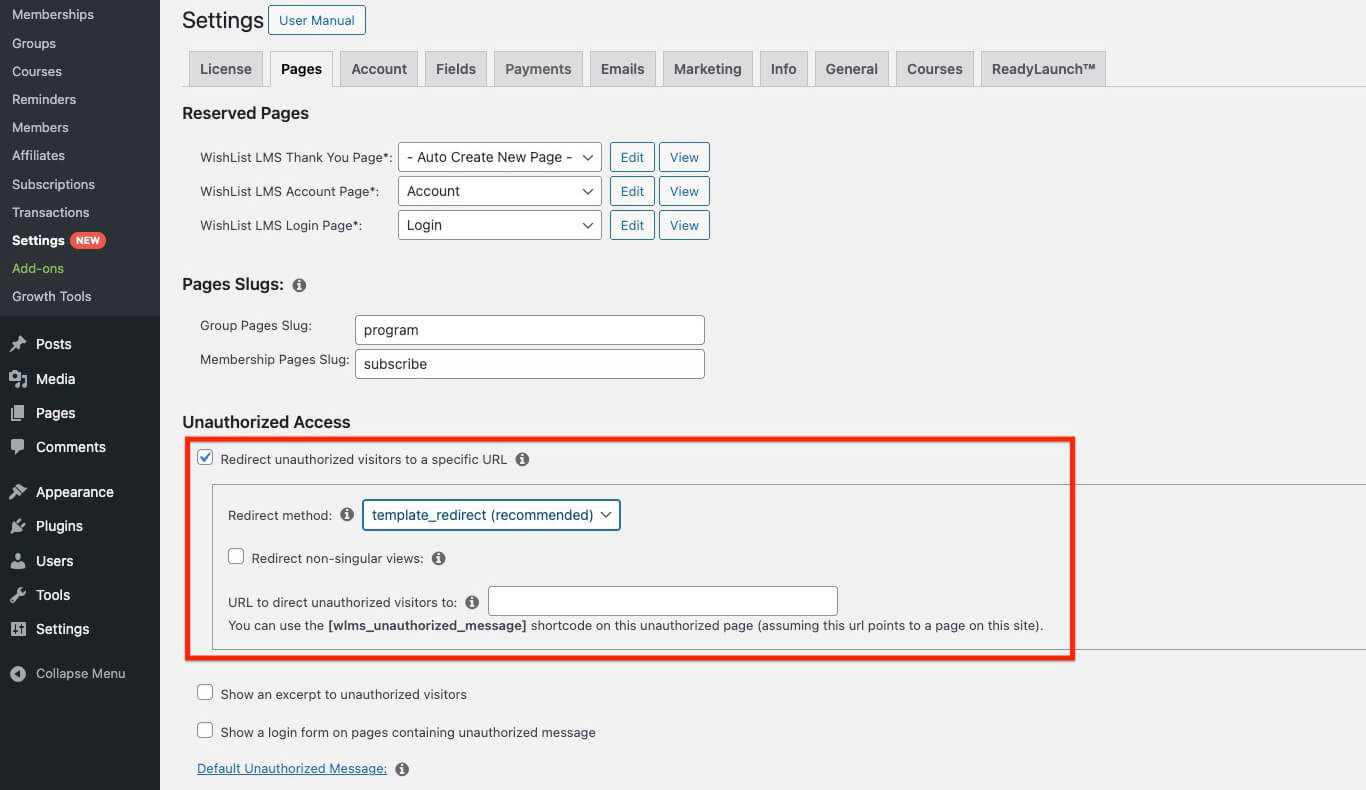
This option includes several settings:
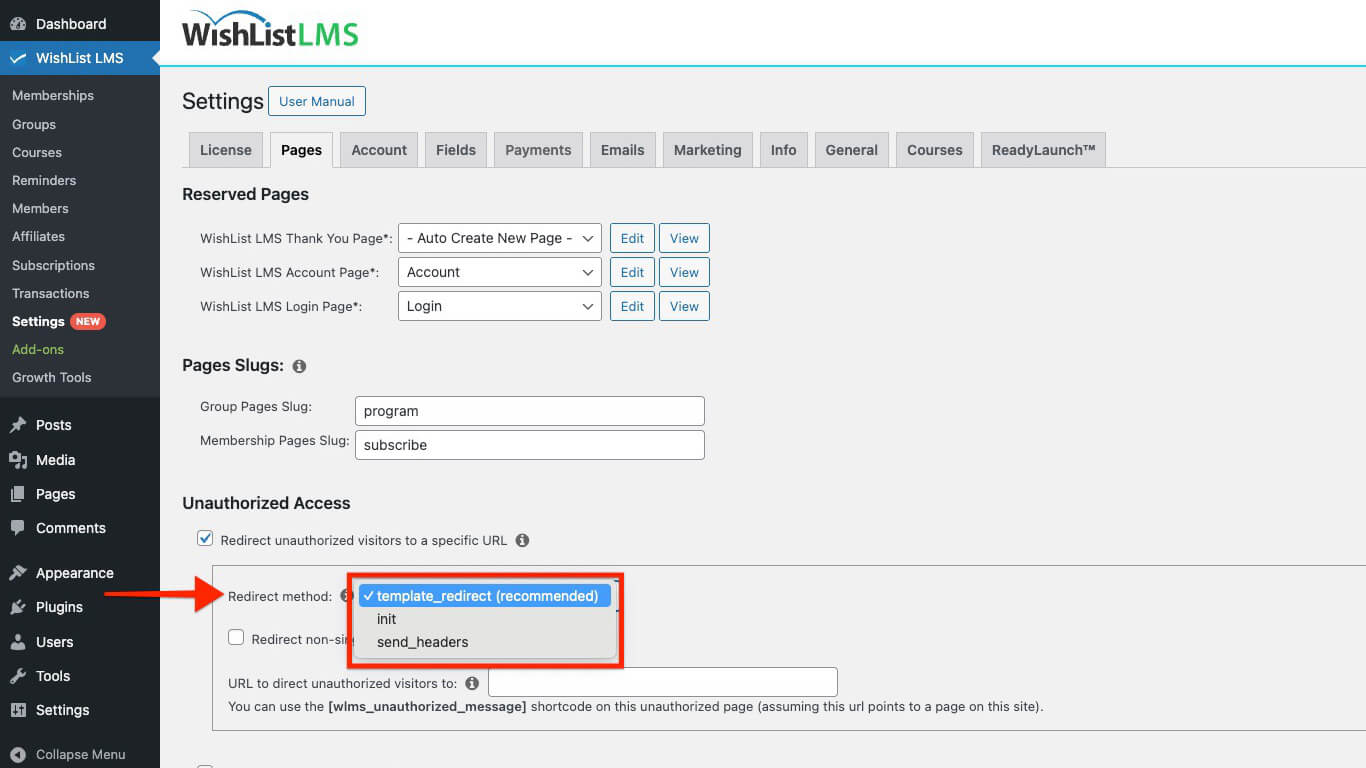
- Redirect Method:
- template_redirect (recommended)
- init
- send_headers
- Redirect Non-Singular Views: This option stops unauthorized members from seeing non-singular views. Specifically, these include blog, category, or archive pages. Furthermore, this restriction applies particularly if any post on those pages is protected.
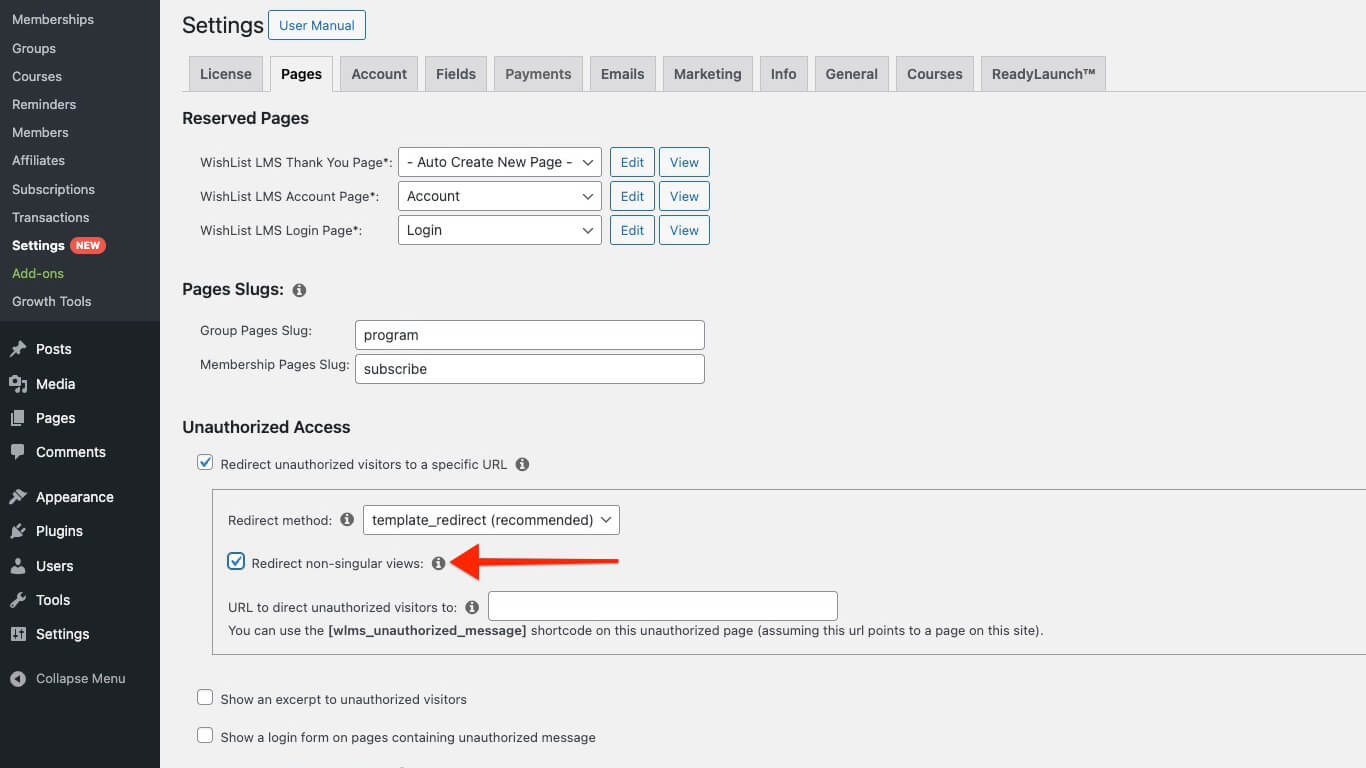
- URL to Direct Unauthorized Visitors: Visitors trying to access unauthorized content will, therefore, be redirected to this URL. If the page is on the same domain; you can use a slug for the page, for example: “/unauthorized/”.

You can use the
shortcode on the selected unauthorized page. This is applicable if the URL points to a page on the same website.
Show an Excerpt
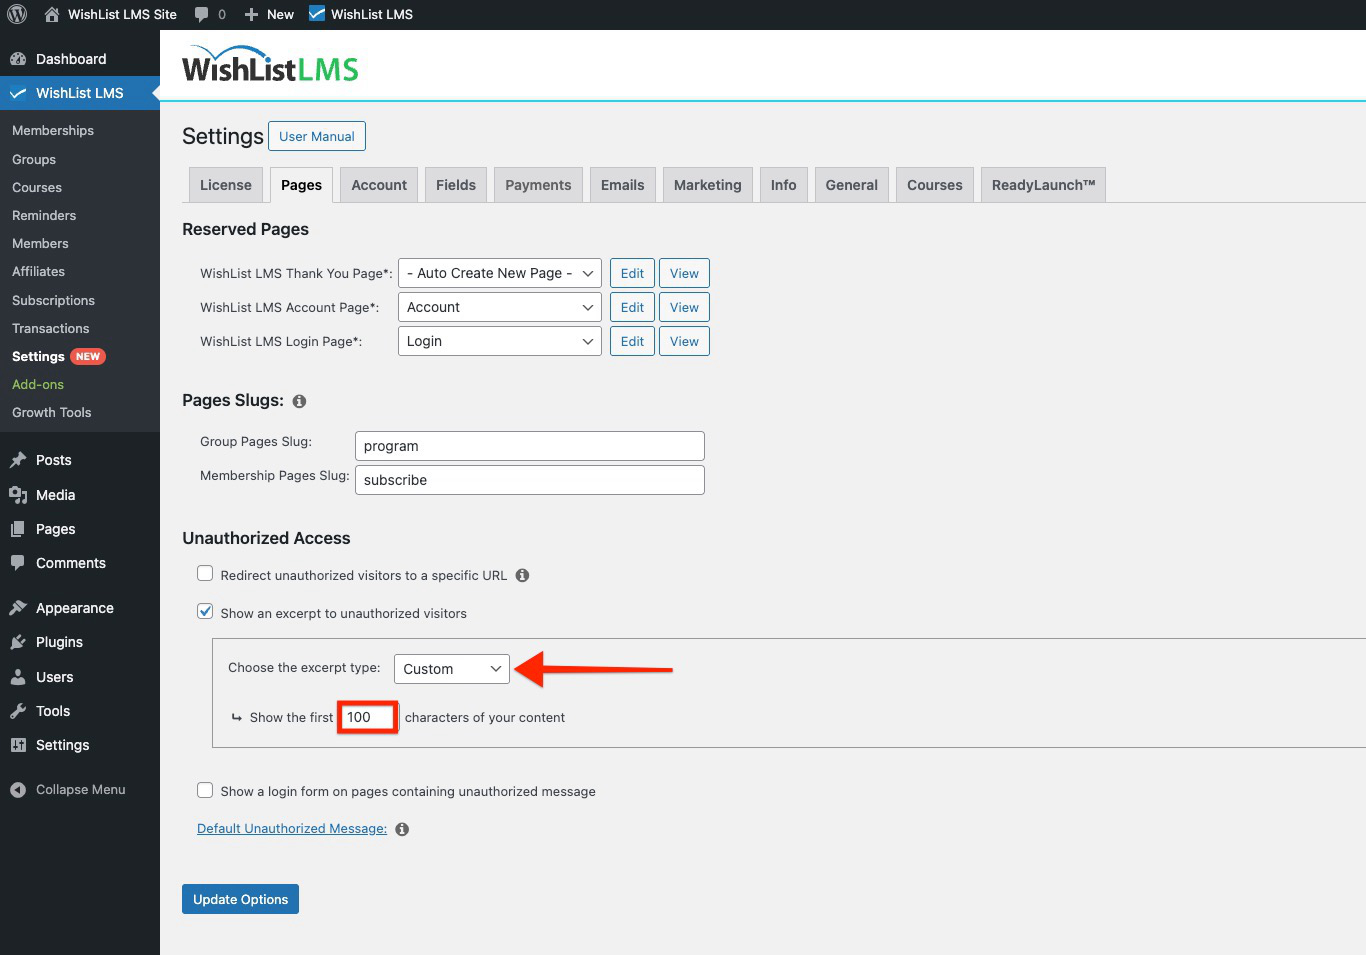
Enable the Show an excerpt to unauthorized visitors option to display an excerpt on protected pages for unauthorized visitors.
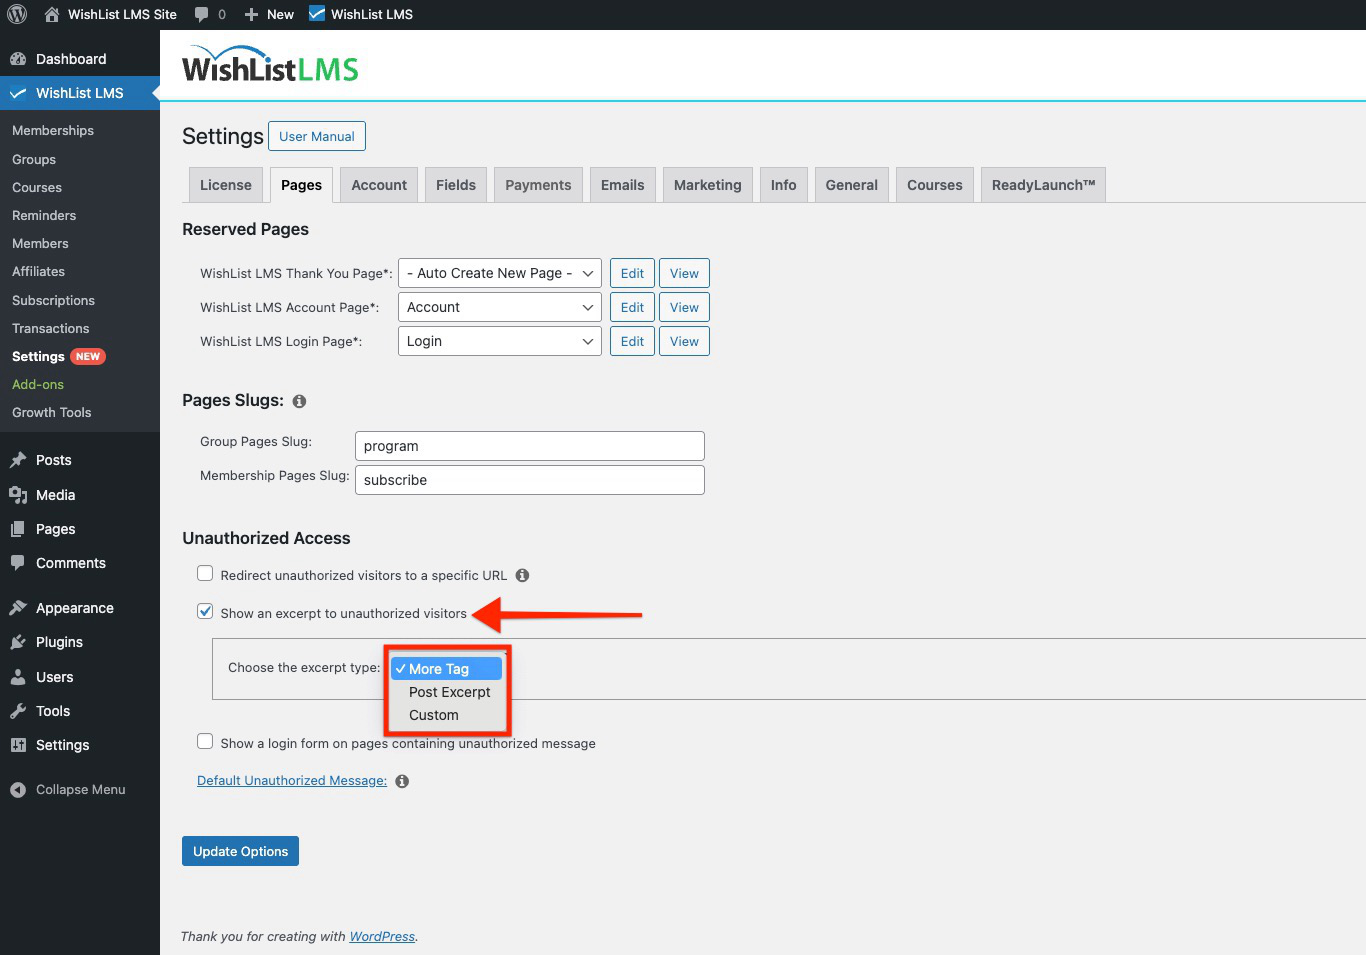
Here, you can choose one of the following options:
- More Tag: This option displays only the content before the “Read More” tag on protected pages. It prompts unauthorized visitors to log in or subscribe. This allows them to view the full content;
- Post Excerpt: This option allows users to preview the initial content of a post. Specifically, the default WordPress excerpt limit is 55 words; as a result, this gives a quick look before reading more.
- Custom: This feature lets you adjust the number of characters displayed to unauthorized users. For instance, you can configure it to show 150 characters from the beginning of the content shown.
Choosing the “Custom” option enables you to manage the character count displayed to users. This offers more flexibility than the default 55-word post excerpt. Custom excerpts display plain text, with all HTML tags removed.
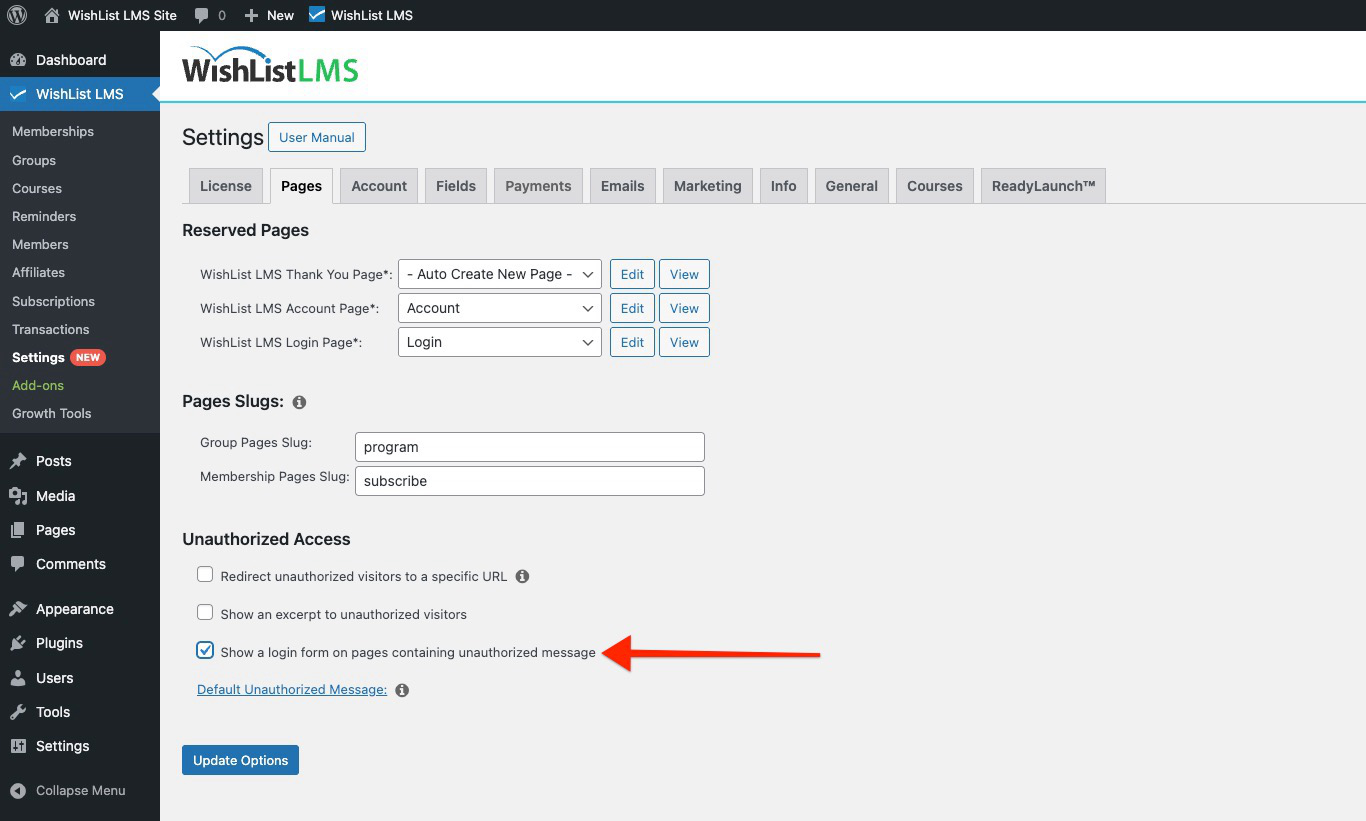
Show a Login Form
Select the Show a Login Form on Pages Containing Unauthorized Content option to show a login form on unauthorized content pages, prompting users to log in before accessing restricted material.
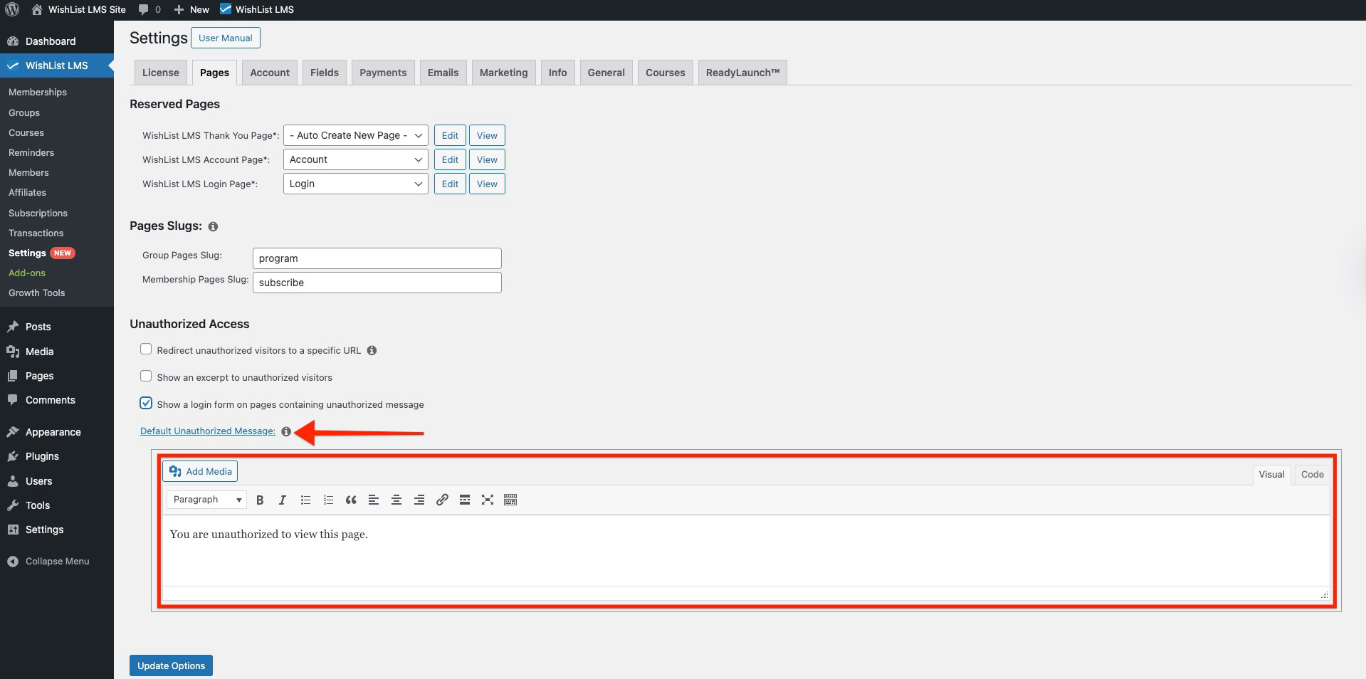
Edit the Default Unauthorized Message
To update the default message displayed to unauthorized visitors, click the “Default Unauthorized Message” link. Then, you will see the editor where you can change the message as needed. Hence, this allows you to customize the experience for visitors who do not have access.
Group and Membership Page Slugs
In WishList LMS, you can define slugs for your group pricing page and membership registration pages. Specifically, slugs are the part of a URL that identifies a particular page or post. For example, in these URLs:
https://yourdomain.com/register/basicmembership, “register” is the slug;https://yourdomain.com/plans/lifetime, “plans” is the slug.
You can customize these default slugs to custom ones.
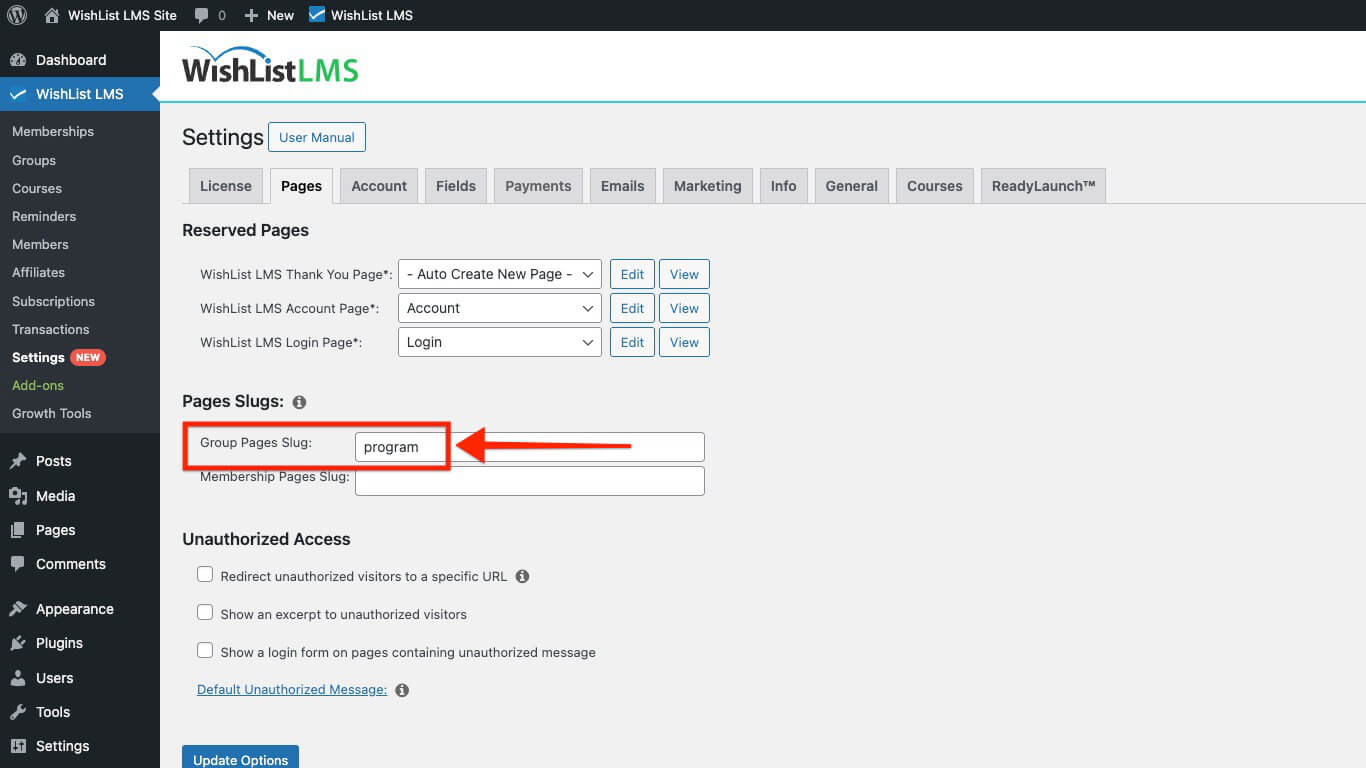
Group Pages Slug
The text you add to this field will replace the default slug for all your WishList LMS group pricing pages. Hence, if you enter “program” as your slug, and your group’s name is “Lifetime”, the group URL would be https://yourdomain.com/programme/lifetime.
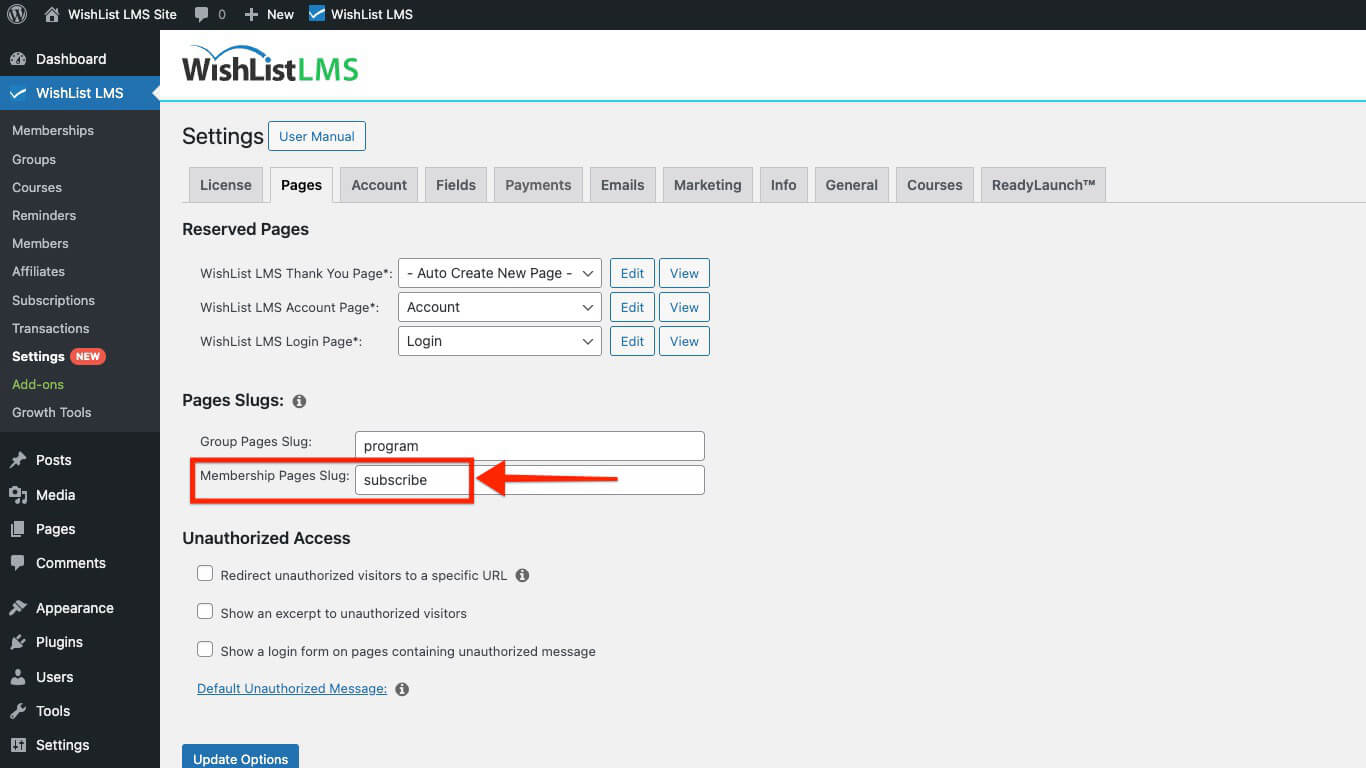
Membership Pages Slug
Similarly to Groups, the text you set here will become the slug for all your WishList LMS Membership Registration pages. If you set “subscribe” as a custom slug and name the membership “Gold”, the URL will become https://yourdomain.com/subscribe/gold/.
Unauthorized Access
Unauthorized visitors are users who, for instance, try to view content on your website without logging in or subscribing. By managing content access, you can control what these visitors see, or alternatively, whether they can stay on the page. This, in turn, helps you protect your valuable content and, moreover, encourages non-members to register or log in.
Redirect Unauthorized Visitors to a Specific URL
You can enable unauthorized redirection to redirect users to a specified page instead of displaying the standard unauthorized message.
This option includes several settings:
- Redirect Method:
- template_redirect (recommended)
- init
- send_headers
- Redirect Non-Singular Views: This option stops unauthorized members from seeing non-singular views. Specifically, these include blog, category, or archive pages. Furthermore, this restriction applies particularly if any post on those pages is protected.
- URL to Direct Unauthorized Visitors: Visitors trying to access unauthorized content will, therefore, be redirected to this URL. If the page is on the same domain; you can use a slug for the page, for example: “/unauthorized/”.
You can use the
shortcode on the selected unauthorized page. This is applicable if the URL points to a page on the same website.
Show an Excerpt
Enable the Show an excerpt to unauthorized visitors option to display an excerpt on protected pages for unauthorized visitors.
Here, you can choose one of the following options:
- More Tag: This option displays only the content before the “Read More” tag on protected pages. It prompts unauthorized visitors to log in or subscribe. This allows them to view the full content;
- Post Excerpt: This option allows users to preview the initial content of a post. Specifically, the default WordPress excerpt limit is 55 words; as a result, this gives a quick look before reading more.
- Custom: This feature lets you adjust the number of characters displayed to unauthorized users. For instance, you can configure it to show 150 characters from the beginning of the content shown.
Choosing the “Custom” option enables you to manage the character count displayed to users. This offers more flexibility than the default 55-word post excerpt. Custom excerpts display plain text, with all HTML tags removed.
Show a Login Form
Select the Show a Login Form on Pages Containing Unauthorized Content option to show a login form on unauthorized content pages, prompting users to log in before accessing restricted material.
Edit the Default Unauthorized Message
To update the default message displayed to unauthorized visitors, click the “Default Unauthorized Message” link. Then, you will see the editor where you can change the message as needed. Hence, this allows you to customize the experience for visitors who do not have access.
Assigning an Existing Custom Page as a Reserved Page
To select an alternative page, whether custom or existing, as the WishList LMS reserved page(s), follow these steps:
- Navigate to Dashboard > WishList LMS > Settings > Pages tab.
- Proceed to the Reserved Pages section.
- Click the WishList LMS Login Page drop-down menu. Select the existing page from your site that you wish to use as a login page.
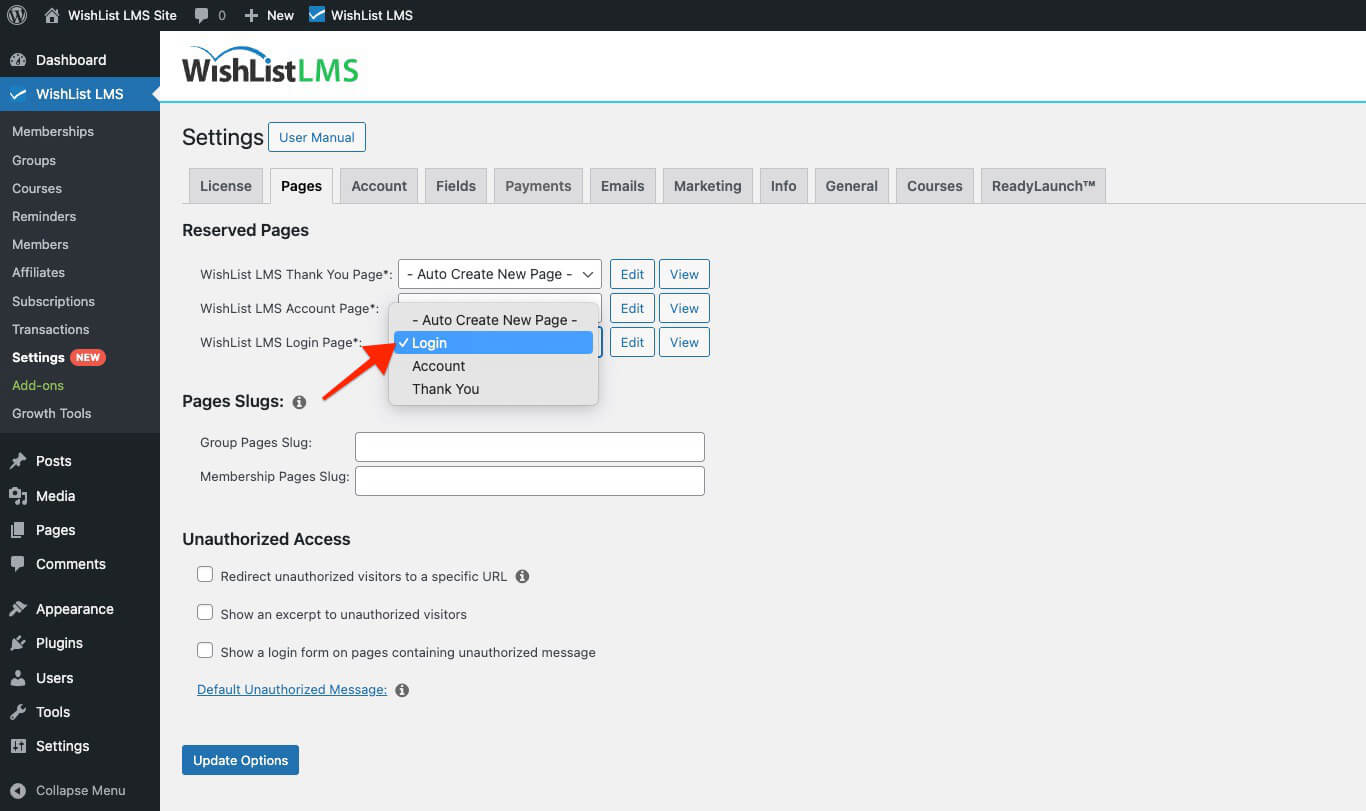
- Click the Update Options button at the bottom of the page to apply your selection.
Group and Membership Page Slugs
In WishList LMS, you can define slugs for your group pricing page and membership registration pages. Specifically, slugs are the part of a URL that identifies a particular page or post. For example, in these URLs:
https://yourdomain.com/register/basicmembership, “register” is the slug;https://yourdomain.com/plans/lifetime, “plans” is the slug.
You can customize these default slugs to custom ones.
Group Pages Slug
The text you add to this field will replace the default slug for all your WishList LMS group pricing pages. Hence, if you enter “program” as your slug, and your group’s name is “Lifetime”, the group URL would be https://yourdomain.com/programme/lifetime.
Membership Pages Slug
Similarly to Groups, the text you set here will become the slug for all your WishList LMS Membership Registration pages. If you set “subscribe” as a custom slug and name the membership “Gold”, the URL will become https://yourdomain.com/subscribe/gold/.
Unauthorized Access
Unauthorized visitors are users who, for instance, try to view content on your website without logging in or subscribing. By managing content access, you can control what these visitors see, or alternatively, whether they can stay on the page. This, in turn, helps you protect your valuable content and, moreover, encourages non-members to register or log in.
Redirect Unauthorized Visitors to a Specific URL
You can enable unauthorized redirection to redirect users to a specified page instead of displaying the standard unauthorized message.
This option includes several settings:
- Redirect Method:
- template_redirect (recommended)
- init
- send_headers
- Redirect Non-Singular Views: This option stops unauthorized members from seeing non-singular views. Specifically, these include blog, category, or archive pages. Furthermore, this restriction applies particularly if any post on those pages is protected.
- URL to Direct Unauthorized Visitors: Visitors trying to access unauthorized content will, therefore, be redirected to this URL. If the page is on the same domain; you can use a slug for the page, for example: “/unauthorized/”.
You can use the
shortcode on the selected unauthorized page. This is applicable if the URL points to a page on the same website.
Show an Excerpt
Enable the Show an excerpt to unauthorized visitors option to display an excerpt on protected pages for unauthorized visitors.
Here, you can choose one of the following options:
- More Tag: This option displays only the content before the “Read More” tag on protected pages. It prompts unauthorized visitors to log in or subscribe. This allows them to view the full content;
- Post Excerpt: This option allows users to preview the initial content of a post. Specifically, the default WordPress excerpt limit is 55 words; as a result, this gives a quick look before reading more.
- Custom: This feature lets you adjust the number of characters displayed to unauthorized users. For instance, you can configure it to show 150 characters from the beginning of the content shown.
Choosing the “Custom” option enables you to manage the character count displayed to users. This offers more flexibility than the default 55-word post excerpt. Custom excerpts display plain text, with all HTML tags removed.
Show a Login Form
Select the Show a Login Form on Pages Containing Unauthorized Content option to show a login form on unauthorized content pages, prompting users to log in before accessing restricted material.
Edit the Default Unauthorized Message
To update the default message displayed to unauthorized visitors, click the “Default Unauthorized Message” link. Then, you will see the editor where you can change the message as needed. Hence, this allows you to customize the experience for visitors who do not have access.
Upon updating the settings, the WishList LMS will automatically create and configure the page for you.
Assigning an Existing Custom Page as a Reserved Page
To select an alternative page, whether custom or existing, as the WishList LMS reserved page(s), follow these steps:
- Navigate to Dashboard > WishList LMS > Settings > Pages tab.
- Proceed to the Reserved Pages section.
- Click the WishList LMS Login Page drop-down menu. Select the existing page from your site that you wish to use as a login page.
- Click the Update Options button at the bottom of the page to apply your selection.
Group and Membership Page Slugs
In WishList LMS, you can define slugs for your group pricing page and membership registration pages. Specifically, slugs are the part of a URL that identifies a particular page or post. For example, in these URLs:
https://yourdomain.com/register/basicmembership, “register” is the slug;https://yourdomain.com/plans/lifetime, “plans” is the slug.
You can customize these default slugs to custom ones.
Group Pages Slug
The text you add to this field will replace the default slug for all your WishList LMS group pricing pages. Hence, if you enter “program” as your slug, and your group’s name is “Lifetime”, the group URL would be https://yourdomain.com/programme/lifetime.
Membership Pages Slug
Similarly to Groups, the text you set here will become the slug for all your WishList LMS Membership Registration pages. If you set “subscribe” as a custom slug and name the membership “Gold”, the URL will become https://yourdomain.com/subscribe/gold/.
Unauthorized Access
Unauthorized visitors are users who, for instance, try to view content on your website without logging in or subscribing. By managing content access, you can control what these visitors see, or alternatively, whether they can stay on the page. This, in turn, helps you protect your valuable content and, moreover, encourages non-members to register or log in.
Redirect Unauthorized Visitors to a Specific URL
You can enable unauthorized redirection to redirect users to a specified page instead of displaying the standard unauthorized message.
This option includes several settings:
- Redirect Method:
- template_redirect (recommended)
- init
- send_headers
- Redirect Non-Singular Views: This option stops unauthorized members from seeing non-singular views. Specifically, these include blog, category, or archive pages. Furthermore, this restriction applies particularly if any post on those pages is protected.
- URL to Direct Unauthorized Visitors: Visitors trying to access unauthorized content will, therefore, be redirected to this URL. If the page is on the same domain; you can use a slug for the page, for example: “/unauthorized/”.
You can use the
shortcode on the selected unauthorized page. This is applicable if the URL points to a page on the same website.
Show an Excerpt
Enable the Show an excerpt to unauthorized visitors option to display an excerpt on protected pages for unauthorized visitors.
Here, you can choose one of the following options:
- More Tag: This option displays only the content before the “Read More” tag on protected pages. It prompts unauthorized visitors to log in or subscribe. This allows them to view the full content;
- Post Excerpt: This option allows users to preview the initial content of a post. Specifically, the default WordPress excerpt limit is 55 words; as a result, this gives a quick look before reading more.
- Custom: This feature lets you adjust the number of characters displayed to unauthorized users. For instance, you can configure it to show 150 characters from the beginning of the content shown.
Choosing the “Custom” option enables you to manage the character count displayed to users. This offers more flexibility than the default 55-word post excerpt. Custom excerpts display plain text, with all HTML tags removed.
Show a Login Form
Select the Show a Login Form on Pages Containing Unauthorized Content option to show a login form on unauthorized content pages, prompting users to log in before accessing restricted material.
Edit the Default Unauthorized Message
To update the default message displayed to unauthorized visitors, click the “Default Unauthorized Message” link. Then, you will see the editor where you can change the message as needed. Hence, this allows you to customize the experience for visitors who do not have access.
Upon updating the settings, the WishList LMS will automatically create and configure the page for you.
Assigning an Existing Custom Page as a Reserved Page
To select an alternative page, whether custom or existing, as the WishList LMS reserved page(s), follow these steps:
- Navigate to Dashboard > WishList LMS > Settings > Pages tab.
- Proceed to the Reserved Pages section.
- Click the WishList LMS Login Page drop-down menu. Select the existing page from your site that you wish to use as a login page.
- Click the Update Options button at the bottom of the page to apply your selection.
Group and Membership Page Slugs
In WishList LMS, you can define slugs for your group pricing page and membership registration pages. Specifically, slugs are the part of a URL that identifies a particular page or post. For example, in these URLs:
https://yourdomain.com/register/basicmembership, “register” is the slug;https://yourdomain.com/plans/lifetime, “plans” is the slug.
You can customize these default slugs to custom ones.
Group Pages Slug
The text you add to this field will replace the default slug for all your WishList LMS group pricing pages. Hence, if you enter “program” as your slug, and your group’s name is “Lifetime”, the group URL would be https://yourdomain.com/programme/lifetime.
Membership Pages Slug
Similarly to Groups, the text you set here will become the slug for all your WishList LMS Membership Registration pages. If you set “subscribe” as a custom slug and name the membership “Gold”, the URL will become https://yourdomain.com/subscribe/gold/.
Unauthorized Access
Unauthorized visitors are users who, for instance, try to view content on your website without logging in or subscribing. By managing content access, you can control what these visitors see, or alternatively, whether they can stay on the page. This, in turn, helps you protect your valuable content and, moreover, encourages non-members to register or log in.
Redirect Unauthorized Visitors to a Specific URL
You can enable unauthorized redirection to redirect users to a specified page instead of displaying the standard unauthorized message.
This option includes several settings:
- Redirect Method:
- template_redirect (recommended)
- init
- send_headers
- Redirect Non-Singular Views: This option stops unauthorized members from seeing non-singular views. Specifically, these include blog, category, or archive pages. Furthermore, this restriction applies particularly if any post on those pages is protected.
- URL to Direct Unauthorized Visitors: Visitors trying to access unauthorized content will, therefore, be redirected to this URL. If the page is on the same domain; you can use a slug for the page, for example: “/unauthorized/”.
You can use the
shortcode on the selected unauthorized page. This is applicable if the URL points to a page on the same website.
Show an Excerpt
Enable the Show an excerpt to unauthorized visitors option to display an excerpt on protected pages for unauthorized visitors.
Here, you can choose one of the following options:
- More Tag: This option displays only the content before the “Read More” tag on protected pages. It prompts unauthorized visitors to log in or subscribe. This allows them to view the full content;
- Post Excerpt: This option allows users to preview the initial content of a post. Specifically, the default WordPress excerpt limit is 55 words; as a result, this gives a quick look before reading more.
- Custom: This feature lets you adjust the number of characters displayed to unauthorized users. For instance, you can configure it to show 150 characters from the beginning of the content shown.
Choosing the “Custom” option enables you to manage the character count displayed to users. This offers more flexibility than the default 55-word post excerpt. Custom excerpts display plain text, with all HTML tags removed.
Show a Login Form
Select the Show a Login Form on Pages Containing Unauthorized Content option to show a login form on unauthorized content pages, prompting users to log in before accessing restricted material.
Edit the Default Unauthorized Message
To update the default message displayed to unauthorized visitors, click the “Default Unauthorized Message” link. Then, you will see the editor where you can change the message as needed. Hence, this allows you to customize the experience for visitors who do not have access.
Upon updating the settings, the WishList LMS will automatically create and configure the page for you.
Assigning an Existing Custom Page as a Reserved Page
To select an alternative page, whether custom or existing, as the WishList LMS reserved page(s), follow these steps:
- Navigate to Dashboard > WishList LMS > Settings > Pages tab.
- Proceed to the Reserved Pages section.
- Click the WishList LMS Login Page drop-down menu. Select the existing page from your site that you wish to use as a login page.
- Click the Update Options button at the bottom of the page to apply your selection.
Group and Membership Page Slugs
In WishList LMS, you can define slugs for your group pricing page and membership registration pages. Specifically, slugs are the part of a URL that identifies a particular page or post. For example, in these URLs:
https://yourdomain.com/register/basicmembership, “register” is the slug;https://yourdomain.com/plans/lifetime, “plans” is the slug.
You can customize these default slugs to custom ones.
Group Pages Slug
The text you add to this field will replace the default slug for all your WishList LMS group pricing pages. Hence, if you enter “program” as your slug, and your group’s name is “Lifetime”, the group URL would be https://yourdomain.com/programme/lifetime.
Membership Pages Slug
Similarly to Groups, the text you set here will become the slug for all your WishList LMS Membership Registration pages. If you set “subscribe” as a custom slug and name the membership “Gold”, the URL will become https://yourdomain.com/subscribe/gold/.
Unauthorized Access
Unauthorized visitors are users who, for instance, try to view content on your website without logging in or subscribing. By managing content access, you can control what these visitors see, or alternatively, whether they can stay on the page. This, in turn, helps you protect your valuable content and, moreover, encourages non-members to register or log in.
Redirect Unauthorized Visitors to a Specific URL
You can enable unauthorized redirection to redirect users to a specified page instead of displaying the standard unauthorized message.
This option includes several settings:
- Redirect Method:
- template_redirect (recommended)
- init
- send_headers
- Redirect Non-Singular Views: This option stops unauthorized members from seeing non-singular views. Specifically, these include blog, category, or archive pages. Furthermore, this restriction applies particularly if any post on those pages is protected.
- URL to Direct Unauthorized Visitors: Visitors trying to access unauthorized content will, therefore, be redirected to this URL. If the page is on the same domain; you can use a slug for the page, for example: “/unauthorized/”.
You can use the
shortcode on the selected unauthorized page. This is applicable if the URL points to a page on the same website.
Show an Excerpt
Enable the Show an excerpt to unauthorized visitors option to display an excerpt on protected pages for unauthorized visitors.
Here, you can choose one of the following options:
- More Tag: This option displays only the content before the “Read More” tag on protected pages. It prompts unauthorized visitors to log in or subscribe. This allows them to view the full content;
- Post Excerpt: This option allows users to preview the initial content of a post. Specifically, the default WordPress excerpt limit is 55 words; as a result, this gives a quick look before reading more.
- Custom: This feature lets you adjust the number of characters displayed to unauthorized users. For instance, you can configure it to show 150 characters from the beginning of the content shown.
Choosing the “Custom” option enables you to manage the character count displayed to users. This offers more flexibility than the default 55-word post excerpt. Custom excerpts display plain text, with all HTML tags removed.
Show a Login Form
Select the Show a Login Form on Pages Containing Unauthorized Content option to show a login form on unauthorized content pages, prompting users to log in before accessing restricted material.
Edit the Default Unauthorized Message
To update the default message displayed to unauthorized visitors, click the “Default Unauthorized Message” link. Then, you will see the editor where you can change the message as needed. Hence, this allows you to customize the experience for visitors who do not have access.
Upon updating the settings, the WishList LMS will automatically create and configure the page for you.
Assigning an Existing Custom Page as a Reserved Page
To select an alternative page, whether custom or existing, as the WishList LMS reserved page(s), follow these steps:
- Navigate to Dashboard > WishList LMS > Settings > Pages tab.
- Proceed to the Reserved Pages section.
- Click the WishList LMS Login Page drop-down menu. Select the existing page from your site that you wish to use as a login page.
- Click the Update Options button at the bottom of the page to apply your selection.
Group and Membership Page Slugs
In WishList LMS, you can define slugs for your group pricing page and membership registration pages. Specifically, slugs are the part of a URL that identifies a particular page or post. For example, in these URLs:
https://yourdomain.com/register/basicmembership, “register” is the slug;https://yourdomain.com/plans/lifetime, “plans” is the slug.
You can customize these default slugs to custom ones.
Group Pages Slug
The text you add to this field will replace the default slug for all your WishList LMS group pricing pages. Hence, if you enter “program” as your slug, and your group’s name is “Lifetime”, the group URL would be https://yourdomain.com/programme/lifetime.
Membership Pages Slug
Similarly to Groups, the text you set here will become the slug for all your WishList LMS Membership Registration pages. If you set “subscribe” as a custom slug and name the membership “Gold”, the URL will become https://yourdomain.com/subscribe/gold/.
Unauthorized Access
Unauthorized visitors are users who, for instance, try to view content on your website without logging in or subscribing. By managing content access, you can control what these visitors see, or alternatively, whether they can stay on the page. This, in turn, helps you protect your valuable content and, moreover, encourages non-members to register or log in.
Redirect Unauthorized Visitors to a Specific URL
You can enable unauthorized redirection to redirect users to a specified page instead of displaying the standard unauthorized message.
This option includes several settings:
- Redirect Method:
- template_redirect (recommended)
- init
- send_headers
- Redirect Non-Singular Views: This option stops unauthorized members from seeing non-singular views. Specifically, these include blog, category, or archive pages. Furthermore, this restriction applies particularly if any post on those pages is protected.
- URL to Direct Unauthorized Visitors: Visitors trying to access unauthorized content will, therefore, be redirected to this URL. If the page is on the same domain; you can use a slug for the page, for example: “/unauthorized/”.
You can use the
shortcode on the selected unauthorized page. This is applicable if the URL points to a page on the same website.
Show an Excerpt
Enable the Show an excerpt to unauthorized visitors option to display an excerpt on protected pages for unauthorized visitors.
Here, you can choose one of the following options:
- More Tag: This option displays only the content before the “Read More” tag on protected pages. It prompts unauthorized visitors to log in or subscribe. This allows them to view the full content;
- Post Excerpt: This option allows users to preview the initial content of a post. Specifically, the default WordPress excerpt limit is 55 words; as a result, this gives a quick look before reading more.
- Custom: This feature lets you adjust the number of characters displayed to unauthorized users. For instance, you can configure it to show 150 characters from the beginning of the content shown.
Choosing the “Custom” option enables you to manage the character count displayed to users. This offers more flexibility than the default 55-word post excerpt. Custom excerpts display plain text, with all HTML tags removed.
Show a Login Form
Select the Show a Login Form on Pages Containing Unauthorized Content option to show a login form on unauthorized content pages, prompting users to log in before accessing restricted material.
Edit the Default Unauthorized Message
To update the default message displayed to unauthorized visitors, click the “Default Unauthorized Message” link. Then, you will see the editor where you can change the message as needed. Hence, this allows you to customize the experience for visitors who do not have access.
Upon updating the settings, the WishList LMS will automatically create and configure the page for you.
Assigning an Existing Custom Page as a Reserved Page
To select an alternative page, whether custom or existing, as the WishList LMS reserved page(s), follow these steps:
- Navigate to Dashboard > WishList LMS > Settings > Pages tab.
- Proceed to the Reserved Pages section.
- Click the WishList LMS Login Page drop-down menu. Select the existing page from your site that you wish to use as a login page.
- Click the Update Options button at the bottom of the page to apply your selection.
Group and Membership Page Slugs
In WishList LMS, you can define slugs for your group pricing page and membership registration pages. Specifically, slugs are the part of a URL that identifies a particular page or post. For example, in these URLs:
https://yourdomain.com/register/basicmembership, “register” is the slug;https://yourdomain.com/plans/lifetime, “plans” is the slug.
You can customize these default slugs to custom ones.
Group Pages Slug
The text you add to this field will replace the default slug for all your WishList LMS group pricing pages. Hence, if you enter “program” as your slug, and your group’s name is “Lifetime”, the group URL would be https://yourdomain.com/programme/lifetime.
Membership Pages Slug
Similarly to Groups, the text you set here will become the slug for all your WishList LMS Membership Registration pages. If you set “subscribe” as a custom slug and name the membership “Gold”, the URL will become https://yourdomain.com/subscribe/gold/.
Unauthorized Access
Unauthorized visitors are users who, for instance, try to view content on your website without logging in or subscribing. By managing content access, you can control what these visitors see, or alternatively, whether they can stay on the page. This, in turn, helps you protect your valuable content and, moreover, encourages non-members to register or log in.
Redirect Unauthorized Visitors to a Specific URL
You can enable unauthorized redirection to redirect users to a specified page instead of displaying the standard unauthorized message.
This option includes several settings:
- Redirect Method:
- template_redirect (recommended)
- init
- send_headers
- Redirect Non-Singular Views: This option stops unauthorized members from seeing non-singular views. Specifically, these include blog, category, or archive pages. Furthermore, this restriction applies particularly if any post on those pages is protected.
- URL to Direct Unauthorized Visitors: Visitors trying to access unauthorized content will, therefore, be redirected to this URL. If the page is on the same domain; you can use a slug for the page, for example: “/unauthorized/”.
You can use the
shortcode on the selected unauthorized page. This is applicable if the URL points to a page on the same website.
Show an Excerpt
Enable the Show an excerpt to unauthorized visitors option to display an excerpt on protected pages for unauthorized visitors.
Here, you can choose one of the following options:
- More Tag: This option displays only the content before the “Read More” tag on protected pages. It prompts unauthorized visitors to log in or subscribe. This allows them to view the full content;
- Post Excerpt: This option allows users to preview the initial content of a post. Specifically, the default WordPress excerpt limit is 55 words; as a result, this gives a quick look before reading more.
- Custom: This feature lets you adjust the number of characters displayed to unauthorized users. For instance, you can configure it to show 150 characters from the beginning of the content shown.
Choosing the “Custom” option enables you to manage the character count displayed to users. This offers more flexibility than the default 55-word post excerpt. Custom excerpts display plain text, with all HTML tags removed.
Show a Login Form
Select the Show a Login Form on Pages Containing Unauthorized Content option to show a login form on unauthorized content pages, prompting users to log in before accessing restricted material.
Edit the Default Unauthorized Message
To update the default message displayed to unauthorized visitors, click the “Default Unauthorized Message” link. Then, you will see the editor where you can change the message as needed. Hence, this allows you to customize the experience for visitors who do not have access.
Upon updating the settings, the WishList LMS will automatically create and configure the page for you.
Assigning an Existing Custom Page as a Reserved Page
To select an alternative page, whether custom or existing, as the WishList LMS reserved page(s), follow these steps:
- Navigate to Dashboard > WishList LMS > Settings > Pages tab.
- Proceed to the Reserved Pages section.
- Click the WishList LMS Login Page drop-down menu. Select the existing page from your site that you wish to use as a login page.
- Click the Update Options button at the bottom of the page to apply your selection.
Group and Membership Page Slugs
In WishList LMS, you can define slugs for your group pricing page and membership registration pages. Specifically, slugs are the part of a URL that identifies a particular page or post. For example, in these URLs:
https://yourdomain.com/register/basicmembership, “register” is the slug;https://yourdomain.com/plans/lifetime, “plans” is the slug.
You can customize these default slugs to custom ones.
Group Pages Slug
The text you add to this field will replace the default slug for all your WishList LMS group pricing pages. Hence, if you enter “program” as your slug, and your group’s name is “Lifetime”, the group URL would be https://yourdomain.com/programme/lifetime.
Membership Pages Slug
Similarly to Groups, the text you set here will become the slug for all your WishList LMS Membership Registration pages. If you set “subscribe” as a custom slug and name the membership “Gold”, the URL will become https://yourdomain.com/subscribe/gold/.
Unauthorized Access
Unauthorized visitors are users who, for instance, try to view content on your website without logging in or subscribing. By managing content access, you can control what these visitors see, or alternatively, whether they can stay on the page. This, in turn, helps you protect your valuable content and, moreover, encourages non-members to register or log in.
Redirect Unauthorized Visitors to a Specific URL
You can enable unauthorized redirection to redirect users to a specified page instead of displaying the standard unauthorized message.
This option includes several settings:
- Redirect Method:
- template_redirect (recommended)
- init
- send_headers
- Redirect Non-Singular Views: This option stops unauthorized members from seeing non-singular views. Specifically, these include blog, category, or archive pages. Furthermore, this restriction applies particularly if any post on those pages is protected.
- URL to Direct Unauthorized Visitors: Visitors trying to access unauthorized content will, therefore, be redirected to this URL. If the page is on the same domain; you can use a slug for the page, for example: “/unauthorized/”.
You can use the
shortcode on the selected unauthorized page. This is applicable if the URL points to a page on the same website.
Show an Excerpt
Enable the Show an excerpt to unauthorized visitors option to display an excerpt on protected pages for unauthorized visitors.
Here, you can choose one of the following options:
- More Tag: This option displays only the content before the “Read More” tag on protected pages. It prompts unauthorized visitors to log in or subscribe. This allows them to view the full content;
- Post Excerpt: This option allows users to preview the initial content of a post. Specifically, the default WordPress excerpt limit is 55 words; as a result, this gives a quick look before reading more.
- Custom: This feature lets you adjust the number of characters displayed to unauthorized users. For instance, you can configure it to show 150 characters from the beginning of the content shown.
Choosing the “Custom” option enables you to manage the character count displayed to users. This offers more flexibility than the default 55-word post excerpt. Custom excerpts display plain text, with all HTML tags removed.
Show a Login Form
Select the Show a Login Form on Pages Containing Unauthorized Content option to show a login form on unauthorized content pages, prompting users to log in before accessing restricted material.
Edit the Default Unauthorized Message
To update the default message displayed to unauthorized visitors, click the “Default Unauthorized Message” link. Then, you will see the editor where you can change the message as needed. Hence, this allows you to customize the experience for visitors who do not have access.
Upon updating the settings, the WishList LMS will automatically create and configure the page for you.
Assigning an Existing Custom Page as a Reserved Page
To select an alternative page, whether custom or existing, as the WishList LMS reserved page(s), follow these steps:
- Navigate to Dashboard > WishList LMS > Settings > Pages tab.
- Proceed to the Reserved Pages section.
- Click the WishList LMS Login Page drop-down menu. Select the existing page from your site that you wish to use as a login page.
- Click the Update Options button at the bottom of the page to apply your selection.
Group and Membership Page Slugs
In WishList LMS, you can define slugs for your group pricing page and membership registration pages. Specifically, slugs are the part of a URL that identifies a particular page or post. For example, in these URLs:
https://yourdomain.com/register/basicmembership, “register” is the slug;https://yourdomain.com/plans/lifetime, “plans” is the slug.
You can customize these default slugs to custom ones.
Group Pages Slug
The text you add to this field will replace the default slug for all your WishList LMS group pricing pages. Hence, if you enter “program” as your slug, and your group’s name is “Lifetime”, the group URL would be https://yourdomain.com/programme/lifetime.
Membership Pages Slug
Similarly to Groups, the text you set here will become the slug for all your WishList LMS Membership Registration pages. If you set “subscribe” as a custom slug and name the membership “Gold”, the URL will become https://yourdomain.com/subscribe/gold/.
Unauthorized Access
Unauthorized visitors are users who, for instance, try to view content on your website without logging in or subscribing. By managing content access, you can control what these visitors see, or alternatively, whether they can stay on the page. This, in turn, helps you protect your valuable content and, moreover, encourages non-members to register or log in.
Redirect Unauthorized Visitors to a Specific URL
You can enable unauthorized redirection to redirect users to a specified page instead of displaying the standard unauthorized message.
This option includes several settings:
- Redirect Method:
- template_redirect (recommended)
- init
- send_headers
- Redirect Non-Singular Views: This option stops unauthorized members from seeing non-singular views. Specifically, these include blog, category, or archive pages. Furthermore, this restriction applies particularly if any post on those pages is protected.
- URL to Direct Unauthorized Visitors: Visitors trying to access unauthorized content will, therefore, be redirected to this URL. If the page is on the same domain; you can use a slug for the page, for example: “/unauthorized/”.
You can use the
shortcode on the selected unauthorized page. This is applicable if the URL points to a page on the same website.
Show an Excerpt
Enable the Show an excerpt to unauthorized visitors option to display an excerpt on protected pages for unauthorized visitors.
Here, you can choose one of the following options:
- More Tag: This option displays only the content before the “Read More” tag on protected pages. It prompts unauthorized visitors to log in or subscribe. This allows them to view the full content;
- Post Excerpt: This option allows users to preview the initial content of a post. Specifically, the default WordPress excerpt limit is 55 words; as a result, this gives a quick look before reading more.
- Custom: This feature lets you adjust the number of characters displayed to unauthorized users. For instance, you can configure it to show 150 characters from the beginning of the content shown.
Choosing the “Custom” option enables you to manage the character count displayed to users. This offers more flexibility than the default 55-word post excerpt. Custom excerpts display plain text, with all HTML tags removed.
Show a Login Form
Select the Show a Login Form on Pages Containing Unauthorized Content option to show a login form on unauthorized content pages, prompting users to log in before accessing restricted material.
Edit the Default Unauthorized Message
To update the default message displayed to unauthorized visitors, click the “Default Unauthorized Message” link. Then, you will see the editor where you can change the message as needed. Hence, this allows you to customize the experience for visitors who do not have access.
Upon updating the settings, the WishList LMS will automatically create and configure the page for you.
Assigning an Existing Custom Page as a Reserved Page
To select an alternative page, whether custom or existing, as the WishList LMS reserved page(s), follow these steps:
- Navigate to Dashboard > WishList LMS > Settings > Pages tab.
- Proceed to the Reserved Pages section.
- Click the WishList LMS Login Page drop-down menu. Select the existing page from your site that you wish to use as a login page.
- Click the Update Options button at the bottom of the page to apply your selection.
Group and Membership Page Slugs
In WishList LMS, you can define slugs for your group pricing page and membership registration pages. Specifically, slugs are the part of a URL that identifies a particular page or post. For example, in these URLs:
https://yourdomain.com/register/basicmembership, “register” is the slug;https://yourdomain.com/plans/lifetime, “plans” is the slug.
You can customize these default slugs to custom ones.
Group Pages Slug
The text you add to this field will replace the default slug for all your WishList LMS group pricing pages. Hence, if you enter “program” as your slug, and your group’s name is “Lifetime”, the group URL would be https://yourdomain.com/programme/lifetime.
Membership Pages Slug
Similarly to Groups, the text you set here will become the slug for all your WishList LMS Membership Registration pages. If you set “subscribe” as a custom slug and name the membership “Gold”, the URL will become https://yourdomain.com/subscribe/gold/.
Unauthorized Access
Unauthorized visitors are users who, for instance, try to view content on your website without logging in or subscribing. By managing content access, you can control what these visitors see, or alternatively, whether they can stay on the page. This, in turn, helps you protect your valuable content and, moreover, encourages non-members to register or log in.
Redirect Unauthorized Visitors to a Specific URL
You can enable unauthorized redirection to redirect users to a specified page instead of displaying the standard unauthorized message.
This option includes several settings:
- Redirect Method:
- template_redirect (recommended)
- init
- send_headers
- Redirect Non-Singular Views: This option stops unauthorized members from seeing non-singular views. Specifically, these include blog, category, or archive pages. Furthermore, this restriction applies particularly if any post on those pages is protected.
- URL to Direct Unauthorized Visitors: Visitors trying to access unauthorized content will, therefore, be redirected to this URL. If the page is on the same domain; you can use a slug for the page, for example: “/unauthorized/”.
You can use the
shortcode on the selected unauthorized page. This is applicable if the URL points to a page on the same website.
Show an Excerpt
Enable the Show an excerpt to unauthorized visitors option to display an excerpt on protected pages for unauthorized visitors.
Here, you can choose one of the following options:
- More Tag: This option displays only the content before the “Read More” tag on protected pages. It prompts unauthorized visitors to log in or subscribe. This allows them to view the full content;
- Post Excerpt: This option allows users to preview the initial content of a post. Specifically, the default WordPress excerpt limit is 55 words; as a result, this gives a quick look before reading more.
- Custom: This feature lets you adjust the number of characters displayed to unauthorized users. For instance, you can configure it to show 150 characters from the beginning of the content shown.
Choosing the “Custom” option enables you to manage the character count displayed to users. This offers more flexibility than the default 55-word post excerpt. Custom excerpts display plain text, with all HTML tags removed.
Show a Login Form
Select the Show a Login Form on Pages Containing Unauthorized Content option to show a login form on unauthorized content pages, prompting users to log in before accessing restricted material.
Edit the Default Unauthorized Message
To update the default message displayed to unauthorized visitors, click the “Default Unauthorized Message” link. Then, you will see the editor where you can change the message as needed. Hence, this allows you to customize the experience for visitors who do not have access.
Upon updating the settings, the WishList LMS will automatically create and configure the page for you.
Assigning an Existing Custom Page as a Reserved Page
To select an alternative page, whether custom or existing, as the WishList LMS reserved page(s), follow these steps:
- Navigate to Dashboard > WishList LMS > Settings > Pages tab.
- Proceed to the Reserved Pages section.
- Click the WishList LMS Login Page drop-down menu. Select the existing page from your site that you wish to use as a login page.
- Click the Update Options button at the bottom of the page to apply your selection.
Group and Membership Page Slugs
In WishList LMS, you can define slugs for your group pricing page and membership registration pages. Specifically, slugs are the part of a URL that identifies a particular page or post. For example, in these URLs:
https://yourdomain.com/register/basicmembership, “register” is the slug;https://yourdomain.com/plans/lifetime, “plans” is the slug.
You can customize these default slugs to custom ones.
Group Pages Slug
The text you add to this field will replace the default slug for all your WishList LMS group pricing pages. Hence, if you enter “program” as your slug, and your group’s name is “Lifetime”, the group URL would be https://yourdomain.com/programme/lifetime.
Membership Pages Slug
Similarly to Groups, the text you set here will become the slug for all your WishList LMS Membership Registration pages. If you set “subscribe” as a custom slug and name the membership “Gold”, the URL will become https://yourdomain.com/subscribe/gold/.
Unauthorized Access
Unauthorized visitors are users who, for instance, try to view content on your website without logging in or subscribing. By managing content access, you can control what these visitors see, or alternatively, whether they can stay on the page. This, in turn, helps you protect your valuable content and, moreover, encourages non-members to register or log in.
Redirect Unauthorized Visitors to a Specific URL
You can enable unauthorized redirection to redirect users to a specified page instead of displaying the standard unauthorized message.
This option includes several settings:
- Redirect Method:
- template_redirect (recommended)
- init
- send_headers
- Redirect Non-Singular Views: This option stops unauthorized members from seeing non-singular views. Specifically, these include blog, category, or archive pages. Furthermore, this restriction applies particularly if any post on those pages is protected.
- URL to Direct Unauthorized Visitors: Visitors trying to access unauthorized content will, therefore, be redirected to this URL. If the page is on the same domain; you can use a slug for the page, for example: “/unauthorized/”.
You can use the
shortcode on the selected unauthorized page. This is applicable if the URL points to a page on the same website.
Show an Excerpt
Enable the Show an excerpt to unauthorized visitors option to display an excerpt on protected pages for unauthorized visitors.
Here, you can choose one of the following options:
- More Tag: This option displays only the content before the “Read More” tag on protected pages. It prompts unauthorized visitors to log in or subscribe. This allows them to view the full content;
- Post Excerpt: This option allows users to preview the initial content of a post. Specifically, the default WordPress excerpt limit is 55 words; as a result, this gives a quick look before reading more.
- Custom: This feature lets you adjust the number of characters displayed to unauthorized users. For instance, you can configure it to show 150 characters from the beginning of the content shown.
Choosing the “Custom” option enables you to manage the character count displayed to users. This offers more flexibility than the default 55-word post excerpt. Custom excerpts display plain text, with all HTML tags removed.
Show a Login Form
Select the Show a Login Form on Pages Containing Unauthorized Content option to show a login form on unauthorized content pages, prompting users to log in before accessing restricted material.
Edit the Default Unauthorized Message
To update the default message displayed to unauthorized visitors, click the “Default Unauthorized Message” link. Then, you will see the editor where you can change the message as needed. Hence, this allows you to customize the experience for visitors who do not have access.
Assigning an Existing Custom Page as a Reserved Page
To select an alternative page, whether custom or existing, as the WishList LMS reserved page(s), follow these steps:
- Navigate to Dashboard > WishList LMS > Settings > Pages tab.
- Proceed to the Reserved Pages section.
- Click the WishList LMS Login Page drop-down menu. Select the existing page from your site that you wish to use as a login page.
- Click the Update Options button at the bottom of the page to apply your selection.
Group and Membership Page Slugs
In WishList LMS, you can define slugs for your group pricing page and membership registration pages. Specifically, slugs are the part of a URL that identifies a particular page or post. For example, in these URLs:
https://yourdomain.com/register/basicmembership, “register” is the slug;https://yourdomain.com/plans/lifetime, “plans” is the slug.
You can customize these default slugs to custom ones.
Group Pages Slug
The text you add to this field will replace the default slug for all your WishList LMS group pricing pages. Hence, if you enter “program” as your slug, and your group’s name is “Lifetime”, the group URL would be https://yourdomain.com/programme/lifetime.
Membership Pages Slug
Similarly to Groups, the text you set here will become the slug for all your WishList LMS Membership Registration pages. If you set “subscribe” as a custom slug and name the membership “Gold”, the URL will become https://yourdomain.com/subscribe/gold/.
Unauthorized Access
Unauthorized visitors are users who, for instance, try to view content on your website without logging in or subscribing. By managing content access, you can control what these visitors see, or alternatively, whether they can stay on the page. This, in turn, helps you protect your valuable content and, moreover, encourages non-members to register or log in.
Redirect Unauthorized Visitors to a Specific URL
You can enable unauthorized redirection to redirect users to a specified page instead of displaying the standard unauthorized message.
This option includes several settings:
- Redirect Method:
- template_redirect (recommended)
- init
- send_headers
- Redirect Non-Singular Views: This option stops unauthorized members from seeing non-singular views. Specifically, these include blog, category, or archive pages. Furthermore, this restriction applies particularly if any post on those pages is protected.
- URL to Direct Unauthorized Visitors: Visitors trying to access unauthorized content will, therefore, be redirected to this URL. If the page is on the same domain; you can use a slug for the page, for example: “/unauthorized/”.
You can use the
shortcode on the selected unauthorized page. This is applicable if the URL points to a page on the same website.
Show an Excerpt
Enable the Show an excerpt to unauthorized visitors option to display an excerpt on protected pages for unauthorized visitors.
Here, you can choose one of the following options:
- More Tag: This option displays only the content before the “Read More” tag on protected pages. It prompts unauthorized visitors to log in or subscribe. This allows them to view the full content;
- Post Excerpt: This option allows users to preview the initial content of a post. Specifically, the default WordPress excerpt limit is 55 words; as a result, this gives a quick look before reading more.
- Custom: This feature lets you adjust the number of characters displayed to unauthorized users. For instance, you can configure it to show 150 characters from the beginning of the content shown.
Choosing the “Custom” option enables you to manage the character count displayed to users. This offers more flexibility than the default 55-word post excerpt. Custom excerpts display plain text, with all HTML tags removed.
Show a Login Form
Select the Show a Login Form on Pages Containing Unauthorized Content option to show a login form on unauthorized content pages, prompting users to log in before accessing restricted material.
Edit the Default Unauthorized Message
To update the default message displayed to unauthorized visitors, click the “Default Unauthorized Message” link. Then, you will see the editor where you can change the message as needed. Hence, this allows you to customize the experience for visitors who do not have access.
Upon updating the settings, the WishList LMS will automatically create and configure the page for you.
Assigning an Existing Custom Page as a Reserved Page
To select an alternative page, whether custom or existing, as the WishList LMS reserved page(s), follow these steps:
- Navigate to Dashboard > WishList LMS > Settings > Pages tab.
- Proceed to the Reserved Pages section.
- Click the WishList LMS Login Page drop-down menu. Select the existing page from your site that you wish to use as a login page.
- Click the Update Options button at the bottom of the page to apply your selection.
Group and Membership Page Slugs
In WishList LMS, you can define slugs for your group pricing page and membership registration pages. Specifically, slugs are the part of a URL that identifies a particular page or post. For example, in these URLs:
https://yourdomain.com/register/basicmembership, “register” is the slug;https://yourdomain.com/plans/lifetime, “plans” is the slug.
You can customize these default slugs to custom ones.
Group Pages Slug
The text you add to this field will replace the default slug for all your WishList LMS group pricing pages. Hence, if you enter “program” as your slug, and your group’s name is “Lifetime”, the group URL would be https://yourdomain.com/programme/lifetime.
Membership Pages Slug
Similarly to Groups, the text you set here will become the slug for all your WishList LMS Membership Registration pages. If you set “subscribe” as a custom slug and name the membership “Gold”, the URL will become https://yourdomain.com/subscribe/gold/.
Unauthorized Access
Unauthorized visitors are users who, for instance, try to view content on your website without logging in or subscribing. By managing content access, you can control what these visitors see, or alternatively, whether they can stay on the page. This, in turn, helps you protect your valuable content and, moreover, encourages non-members to register or log in.
Redirect Unauthorized Visitors to a Specific URL
You can enable unauthorized redirection to redirect users to a specified page instead of displaying the standard unauthorized message.
This option includes several settings:
- Redirect Method:
- template_redirect (recommended)
- init
- send_headers
- Redirect Non-Singular Views: This option stops unauthorized members from seeing non-singular views. Specifically, these include blog, category, or archive pages. Furthermore, this restriction applies particularly if any post on those pages is protected.
- URL to Direct Unauthorized Visitors: Visitors trying to access unauthorized content will, therefore, be redirected to this URL. If the page is on the same domain; you can use a slug for the page, for example: “/unauthorized/”.
You can use the
shortcode on the selected unauthorized page. This is applicable if the URL points to a page on the same website.
Show an Excerpt
Enable the Show an excerpt to unauthorized visitors option to display an excerpt on protected pages for unauthorized visitors.
Here, you can choose one of the following options:
- More Tag: This option displays only the content before the “Read More” tag on protected pages. It prompts unauthorized visitors to log in or subscribe. This allows them to view the full content;
- Post Excerpt: This option allows users to preview the initial content of a post. Specifically, the default WordPress excerpt limit is 55 words; as a result, this gives a quick look before reading more.
- Custom: This feature lets you adjust the number of characters displayed to unauthorized users. For instance, you can configure it to show 150 characters from the beginning of the content shown.
Choosing the “Custom” option enables you to manage the character count displayed to users. This offers more flexibility than the default 55-word post excerpt. Custom excerpts display plain text, with all HTML tags removed.
Show a Login Form
Select the Show a Login Form on Pages Containing Unauthorized Content option to show a login form on unauthorized content pages, prompting users to log in before accessing restricted material.
Edit the Default Unauthorized Message
To update the default message displayed to unauthorized visitors, click the “Default Unauthorized Message” link. Then, you will see the editor where you can change the message as needed. Hence, this allows you to customize the experience for visitors who do not have access.
Assigning an Existing Custom Page as a Reserved Page
To select an alternative page, whether custom or existing, as the WishList LMS reserved page(s), follow these steps:
- Navigate to Dashboard > WishList LMS > Settings > Pages tab.
- Proceed to the Reserved Pages section.
- Click the WishList LMS Login Page drop-down menu. Select the existing page from your site that you wish to use as a login page.
- Click the Update Options button at the bottom of the page to apply your selection.
Group and Membership Page Slugs
In WishList LMS, you can define slugs for your group pricing page and membership registration pages. Specifically, slugs are the part of a URL that identifies a particular page or post. For example, in these URLs:
https://yourdomain.com/register/basicmembership, “register” is the slug;https://yourdomain.com/plans/lifetime, “plans” is the slug.
You can customize these default slugs to custom ones.
Group Pages Slug
The text you add to this field will replace the default slug for all your WishList LMS group pricing pages. Hence, if you enter “program” as your slug, and your group’s name is “Lifetime”, the group URL would be https://yourdomain.com/programme/lifetime.
Membership Pages Slug
Similarly to Groups, the text you set here will become the slug for all your WishList LMS Membership Registration pages. If you set “subscribe” as a custom slug and name the membership “Gold”, the URL will become https://yourdomain.com/subscribe/gold/.
Unauthorized Access
Unauthorized visitors are users who, for instance, try to view content on your website without logging in or subscribing. By managing content access, you can control what these visitors see, or alternatively, whether they can stay on the page. This, in turn, helps you protect your valuable content and, moreover, encourages non-members to register or log in.
Redirect Unauthorized Visitors to a Specific URL
You can enable unauthorized redirection to redirect users to a specified page instead of displaying the standard unauthorized message.
This option includes several settings:
- Redirect Method:
- template_redirect (recommended)
- init
- send_headers
- Redirect Non-Singular Views: This option stops unauthorized members from seeing non-singular views. Specifically, these include blog, category, or archive pages. Furthermore, this restriction applies particularly if any post on those pages is protected.
- URL to Direct Unauthorized Visitors: Visitors trying to access unauthorized content will, therefore, be redirected to this URL. If the page is on the same domain; you can use a slug for the page, for example: “/unauthorized/”.
You can use the
shortcode on the selected unauthorized page. This is applicable if the URL points to a page on the same website.
Show an Excerpt
Enable the Show an excerpt to unauthorized visitors option to display an excerpt on protected pages for unauthorized visitors.
Here, you can choose one of the following options:
- More Tag: This option displays only the content before the “Read More” tag on protected pages. It prompts unauthorized visitors to log in or subscribe. This allows them to view the full content;
- Post Excerpt: This option allows users to preview the initial content of a post. Specifically, the default WordPress excerpt limit is 55 words; as a result, this gives a quick look before reading more.
- Custom: This feature lets you adjust the number of characters displayed to unauthorized users. For instance, you can configure it to show 150 characters from the beginning of the content shown.
Choosing the “Custom” option enables you to manage the character count displayed to users. This offers more flexibility than the default 55-word post excerpt. Custom excerpts display plain text, with all HTML tags removed.
Show a Login Form
Select the Show a Login Form on Pages Containing Unauthorized Content option to show a login form on unauthorized content pages, prompting users to log in before accessing restricted material.
Edit the Default Unauthorized Message
To update the default message displayed to unauthorized visitors, click the “Default Unauthorized Message” link. Then, you will see the editor where you can change the message as needed. Hence, this allows you to customize the experience for visitors who do not have access.
Upon updating the settings, the WishList LMS will automatically create and configure the page for you.
Assigning an Existing Custom Page as a Reserved Page
To select an alternative page, whether custom or existing, as the WishList LMS reserved page(s), follow these steps:
- Navigate to Dashboard > WishList LMS > Settings > Pages tab.
- Proceed to the Reserved Pages section.
- Click the WishList LMS Login Page drop-down menu. Select the existing page from your site that you wish to use as a login page.
- Click the Update Options button at the bottom of the page to apply your selection.
Group and Membership Page Slugs
In WishList LMS, you can define slugs for your group pricing page and membership registration pages. Specifically, slugs are the part of a URL that identifies a particular page or post. For example, in these URLs:
https://yourdomain.com/register/basicmembership, “register” is the slug;https://yourdomain.com/plans/lifetime, “plans” is the slug.
You can customize these default slugs to custom ones.
Group Pages Slug
The text you add to this field will replace the default slug for all your WishList LMS group pricing pages. Hence, if you enter “program” as your slug, and your group’s name is “Lifetime”, the group URL would be https://yourdomain.com/programme/lifetime.
Membership Pages Slug
Similarly to Groups, the text you set here will become the slug for all your WishList LMS Membership Registration pages. If you set “subscribe” as a custom slug and name the membership “Gold”, the URL will become https://yourdomain.com/subscribe/gold/.
Unauthorized Access
Unauthorized visitors are users who, for instance, try to view content on your website without logging in or subscribing. By managing content access, you can control what these visitors see, or alternatively, whether they can stay on the page. This, in turn, helps you protect your valuable content and, moreover, encourages non-members to register or log in.
Redirect Unauthorized Visitors to a Specific URL
You can enable unauthorized redirection to redirect users to a specified page instead of displaying the standard unauthorized message.
This option includes several settings:
- Redirect Method:
- template_redirect (recommended)
- init
- send_headers
- Redirect Non-Singular Views: This option stops unauthorized members from seeing non-singular views. Specifically, these include blog, category, or archive pages. Furthermore, this restriction applies particularly if any post on those pages is protected.
- URL to Direct Unauthorized Visitors: Visitors trying to access unauthorized content will, therefore, be redirected to this URL. If the page is on the same domain; you can use a slug for the page, for example: “/unauthorized/”.
You can use the
shortcode on the selected unauthorized page. This is applicable if the URL points to a page on the same website.
Show an Excerpt
Enable the Show an excerpt to unauthorized visitors option to display an excerpt on protected pages for unauthorized visitors.
Here, you can choose one of the following options:
- More Tag: This option displays only the content before the “Read More” tag on protected pages. It prompts unauthorized visitors to log in or subscribe. This allows them to view the full content;
- Post Excerpt: This option allows users to preview the initial content of a post. Specifically, the default WordPress excerpt limit is 55 words; as a result, this gives a quick look before reading more.
- Custom: This feature lets you adjust the number of characters displayed to unauthorized users. For instance, you can configure it to show 150 characters from the beginning of the content shown.
Choosing the “Custom” option enables you to manage the character count displayed to users. This offers more flexibility than the default 55-word post excerpt. Custom excerpts display plain text, with all HTML tags removed.
Show a Login Form
Select the Show a Login Form on Pages Containing Unauthorized Content option to show a login form on unauthorized content pages, prompting users to log in before accessing restricted material.
Edit the Default Unauthorized Message
To update the default message displayed to unauthorized visitors, click the “Default Unauthorized Message” link. Then, you will see the editor where you can change the message as needed. Hence, this allows you to customize the experience for visitors who do not have access.
Assigning an Existing Custom Page as a Reserved Page
To select an alternative page, whether custom or existing, as the WishList LMS reserved page(s), follow these steps:
- Navigate to Dashboard > WishList LMS > Settings > Pages tab.
- Proceed to the Reserved Pages section.
- Click the WishList LMS Login Page drop-down menu. Select the existing page from your site that you wish to use as a login page.
- Click the Update Options button at the bottom of the page to apply your selection.
Group and Membership Page Slugs
In WishList LMS, you can define slugs for your group pricing page and membership registration pages. Specifically, slugs are the part of a URL that identifies a particular page or post. For example, in these URLs:
https://yourdomain.com/register/basicmembership, “register” is the slug;https://yourdomain.com/plans/lifetime, “plans” is the slug.
You can customize these default slugs to custom ones.
Group Pages Slug
The text you add to this field will replace the default slug for all your WishList LMS group pricing pages. Hence, if you enter “program” as your slug, and your group’s name is “Lifetime”, the group URL would be https://yourdomain.com/programme/lifetime.
Membership Pages Slug
Similarly to Groups, the text you set here will become the slug for all your WishList LMS Membership Registration pages. If you set “subscribe” as a custom slug and name the membership “Gold”, the URL will become https://yourdomain.com/subscribe/gold/.
Unauthorized Access
Unauthorized visitors are users who, for instance, try to view content on your website without logging in or subscribing. By managing content access, you can control what these visitors see, or alternatively, whether they can stay on the page. This, in turn, helps you protect your valuable content and, moreover, encourages non-members to register or log in.
Redirect Unauthorized Visitors to a Specific URL
You can enable unauthorized redirection to redirect users to a specified page instead of displaying the standard unauthorized message.
This option includes several settings:
- Redirect Method:
- template_redirect (recommended)
- init
- send_headers
- Redirect Non-Singular Views: This option stops unauthorized members from seeing non-singular views. Specifically, these include blog, category, or archive pages. Furthermore, this restriction applies particularly if any post on those pages is protected.
- URL to Direct Unauthorized Visitors: Visitors trying to access unauthorized content will, therefore, be redirected to this URL. If the page is on the same domain; you can use a slug for the page, for example: “/unauthorized/”.
You can use the
shortcode on the selected unauthorized page. This is applicable if the URL points to a page on the same website.
Show an Excerpt
Enable the Show an excerpt to unauthorized visitors option to display an excerpt on protected pages for unauthorized visitors.
Here, you can choose one of the following options:
- More Tag: This option displays only the content before the “Read More” tag on protected pages. It prompts unauthorized visitors to log in or subscribe. This allows them to view the full content;
- Post Excerpt: This option allows users to preview the initial content of a post. Specifically, the default WordPress excerpt limit is 55 words; as a result, this gives a quick look before reading more.
- Custom: This feature lets you adjust the number of characters displayed to unauthorized users. For instance, you can configure it to show 150 characters from the beginning of the content shown.
Choosing the “Custom” option enables you to manage the character count displayed to users. This offers more flexibility than the default 55-word post excerpt. Custom excerpts display plain text, with all HTML tags removed.
Show a Login Form
Select the Show a Login Form on Pages Containing Unauthorized Content option to show a login form on unauthorized content pages, prompting users to log in before accessing restricted material.
Edit the Default Unauthorized Message
To update the default message displayed to unauthorized visitors, click the “Default Unauthorized Message” link. Then, you will see the editor where you can change the message as needed. Hence, this allows you to customize the experience for visitors who do not have access.
Upon updating the settings, the WishList LMS will automatically create and configure the page for you.
Assigning an Existing Custom Page as a Reserved Page
To select an alternative page, whether custom or existing, as the WishList LMS reserved page(s), follow these steps:
- Navigate to Dashboard > WishList LMS > Settings > Pages tab.
- Proceed to the Reserved Pages section.
- Click the WishList LMS Login Page drop-down menu. Select the existing page from your site that you wish to use as a login page.
- Click the Update Options button at the bottom of the page to apply your selection.
Group and Membership Page Slugs
In WishList LMS, you can define slugs for your group pricing page and membership registration pages. Specifically, slugs are the part of a URL that identifies a particular page or post. For example, in these URLs:
https://yourdomain.com/register/basicmembership, “register” is the slug;https://yourdomain.com/plans/lifetime, “plans” is the slug.
You can customize these default slugs to custom ones.
Group Pages Slug
The text you add to this field will replace the default slug for all your WishList LMS group pricing pages. Hence, if you enter “program” as your slug, and your group’s name is “Lifetime”, the group URL would be https://yourdomain.com/programme/lifetime.
Membership Pages Slug
Similarly to Groups, the text you set here will become the slug for all your WishList LMS Membership Registration pages. If you set “subscribe” as a custom slug and name the membership “Gold”, the URL will become https://yourdomain.com/subscribe/gold/.
Unauthorized Access
Unauthorized visitors are users who, for instance, try to view content on your website without logging in or subscribing. By managing content access, you can control what these visitors see, or alternatively, whether they can stay on the page. This, in turn, helps you protect your valuable content and, moreover, encourages non-members to register or log in.
Redirect Unauthorized Visitors to a Specific URL
You can enable unauthorized redirection to redirect users to a specified page instead of displaying the standard unauthorized message.
This option includes several settings:
- Redirect Method:
- template_redirect (recommended)
- init
- send_headers
- Redirect Non-Singular Views: This option stops unauthorized members from seeing non-singular views. Specifically, these include blog, category, or archive pages. Furthermore, this restriction applies particularly if any post on those pages is protected.
- URL to Direct Unauthorized Visitors: Visitors trying to access unauthorized content will, therefore, be redirected to this URL. If the page is on the same domain; you can use a slug for the page, for example: “/unauthorized/”.
You can use the
shortcode on the selected unauthorized page. This is applicable if the URL points to a page on the same website.
Show an Excerpt
Enable the Show an excerpt to unauthorized visitors option to display an excerpt on protected pages for unauthorized visitors.
Here, you can choose one of the following options:
- More Tag: This option displays only the content before the “Read More” tag on protected pages. It prompts unauthorized visitors to log in or subscribe. This allows them to view the full content;
- Post Excerpt: This option allows users to preview the initial content of a post. Specifically, the default WordPress excerpt limit is 55 words; as a result, this gives a quick look before reading more.
- Custom: This feature lets you adjust the number of characters displayed to unauthorized users. For instance, you can configure it to show 150 characters from the beginning of the content shown.
Choosing the “Custom” option enables you to manage the character count displayed to users. This offers more flexibility than the default 55-word post excerpt. Custom excerpts display plain text, with all HTML tags removed.
Show a Login Form
Select the Show a Login Form on Pages Containing Unauthorized Content option to show a login form on unauthorized content pages, prompting users to log in before accessing restricted material.
Edit the Default Unauthorized Message
To update the default message displayed to unauthorized visitors, click the “Default Unauthorized Message” link. Then, you will see the editor where you can change the message as needed. Hence, this allows you to customize the experience for visitors who do not have access.
Group and Membership Page Slugs
In WishList LMS, you can define slugs for your group pricing page and membership registration pages. Specifically, slugs are the part of a URL that identifies a particular page or post. For example, in these URLs:
https://yourdomain.com/register/basicmembership, “register” is the slug;https://yourdomain.com/plans/lifetime, “plans” is the slug.
You can customize these default slugs to custom ones.
Group Pages Slug
The text you add to this field will replace the default slug for all your WishList LMS group pricing pages. Hence, if you enter “program” as your slug, and your group’s name is “Lifetime”, the group URL would be https://yourdomain.com/programme/lifetime.
Membership Pages Slug
Similarly to Groups, the text you set here will become the slug for all your WishList LMS Membership Registration pages. If you set “subscribe” as a custom slug and name the membership “Gold”, the URL will become https://yourdomain.com/subscribe/gold/.
Unauthorized Access
Unauthorized visitors are users who, for instance, try to view content on your website without logging in or subscribing. By managing content access, you can control what these visitors see, or alternatively, whether they can stay on the page. This, in turn, helps you protect your valuable content and, moreover, encourages non-members to register or log in.
Redirect Unauthorized Visitors to a Specific URL
You can enable unauthorized redirection to redirect users to a specified page instead of displaying the standard unauthorized message.
This option includes several settings:
- Redirect Method:
- template_redirect (recommended)
- init
- send_headers
- Redirect Non-Singular Views: This option stops unauthorized members from seeing non-singular views. Specifically, these include blog, category, or archive pages. Furthermore, this restriction applies particularly if any post on those pages is protected.
- URL to Direct Unauthorized Visitors: Visitors trying to access unauthorized content will, therefore, be redirected to this URL. If the page is on the same domain; you can use a slug for the page, for example: “/unauthorized/”.
You can use the
shortcode on the selected unauthorized page. This is applicable if the URL points to a page on the same website.
Show an Excerpt
Enable the Show an excerpt to unauthorized visitors option to display an excerpt on protected pages for unauthorized visitors.
Here, you can choose one of the following options:
- More Tag: This option displays only the content before the “Read More” tag on protected pages. It prompts unauthorized visitors to log in or subscribe. This allows them to view the full content;
- Post Excerpt: This option allows users to preview the initial content of a post. Specifically, the default WordPress excerpt limit is 55 words; as a result, this gives a quick look before reading more.
- Custom: This feature lets you adjust the number of characters displayed to unauthorized users. For instance, you can configure it to show 150 characters from the beginning of the content shown.
Choosing the “Custom” option enables you to manage the character count displayed to users. This offers more flexibility than the default 55-word post excerpt. Custom excerpts display plain text, with all HTML tags removed.
Show a Login Form
Select the Show a Login Form on Pages Containing Unauthorized Content option to show a login form on unauthorized content pages, prompting users to log in before accessing restricted material.
Edit the Default Unauthorized Message
To update the default message displayed to unauthorized visitors, click the “Default Unauthorized Message” link. Then, you will see the editor where you can change the message as needed. Hence, this allows you to customize the experience for visitors who do not have access.
Assigning an Existing Custom Page as a Reserved Page
To select an alternative page, whether custom or existing, as the WishList LMS reserved page(s), follow these steps:
- Navigate to Dashboard > WishList LMS > Settings > Pages tab.
- Proceed to the Reserved Pages section.
- Click the WishList LMS Login Page drop-down menu. Select the existing page from your site that you wish to use as a login page.
- Click the Update Options button at the bottom of the page to apply your selection.
Group and Membership Page Slugs
In WishList LMS, you can define slugs for your group pricing page and membership registration pages. Specifically, slugs are the part of a URL that identifies a particular page or post. For example, in these URLs:
https://yourdomain.com/register/basicmembership, “register” is the slug;https://yourdomain.com/plans/lifetime, “plans” is the slug.
You can customize these default slugs to custom ones.
Group Pages Slug
The text you add to this field will replace the default slug for all your WishList LMS group pricing pages. Hence, if you enter “program” as your slug, and your group’s name is “Lifetime”, the group URL would be https://yourdomain.com/programme/lifetime.
Membership Pages Slug
Similarly to Groups, the text you set here will become the slug for all your WishList LMS Membership Registration pages. If you set “subscribe” as a custom slug and name the membership “Gold”, the URL will become https://yourdomain.com/subscribe/gold/.
Unauthorized Access
Unauthorized visitors are users who, for instance, try to view content on your website without logging in or subscribing. By managing content access, you can control what these visitors see, or alternatively, whether they can stay on the page. This, in turn, helps you protect your valuable content and, moreover, encourages non-members to register or log in.
Redirect Unauthorized Visitors to a Specific URL
You can enable unauthorized redirection to redirect users to a specified page instead of displaying the standard unauthorized message.
This option includes several settings:
- Redirect Method:
- template_redirect (recommended)
- init
- send_headers
- Redirect Non-Singular Views: This option stops unauthorized members from seeing non-singular views. Specifically, these include blog, category, or archive pages. Furthermore, this restriction applies particularly if any post on those pages is protected.
- URL to Direct Unauthorized Visitors: Visitors trying to access unauthorized content will, therefore, be redirected to this URL. If the page is on the same domain; you can use a slug for the page, for example: “/unauthorized/”.
You can use the
shortcode on the selected unauthorized page. This is applicable if the URL points to a page on the same website.
Show an Excerpt
Enable the Show an excerpt to unauthorized visitors option to display an excerpt on protected pages for unauthorized visitors.
Here, you can choose one of the following options:
- More Tag: This option displays only the content before the “Read More” tag on protected pages. It prompts unauthorized visitors to log in or subscribe. This allows them to view the full content;
- Post Excerpt: This option allows users to preview the initial content of a post. Specifically, the default WordPress excerpt limit is 55 words; as a result, this gives a quick look before reading more.
- Custom: This feature lets you adjust the number of characters displayed to unauthorized users. For instance, you can configure it to show 150 characters from the beginning of the content shown.
Choosing the “Custom” option enables you to manage the character count displayed to users. This offers more flexibility than the default 55-word post excerpt. Custom excerpts display plain text, with all HTML tags removed.
Show a Login Form
Select the Show a Login Form on Pages Containing Unauthorized Content option to show a login form on unauthorized content pages, prompting users to log in before accessing restricted material.
Edit the Default Unauthorized Message
To update the default message displayed to unauthorized visitors, click the “Default Unauthorized Message” link. Then, you will see the editor where you can change the message as needed. Hence, this allows you to customize the experience for visitors who do not have access.
Upon updating the settings, the WishList LMS will automatically create and configure the page for you.
Assigning an Existing Custom Page as a Reserved Page
To select an alternative page, whether custom or existing, as the WishList LMS reserved page(s), follow these steps:
- Navigate to Dashboard > WishList LMS > Settings > Pages tab.
- Proceed to the Reserved Pages section.
- Click the WishList LMS Login Page drop-down menu. Select the existing page from your site that you wish to use as a login page.
- Click the Update Options button at the bottom of the page to apply your selection.
Group and Membership Page Slugs
In WishList LMS, you can define slugs for your group pricing page and membership registration pages. Specifically, slugs are the part of a URL that identifies a particular page or post. For example, in these URLs:
https://yourdomain.com/register/basicmembership, “register” is the slug;https://yourdomain.com/plans/lifetime, “plans” is the slug.
You can customize these default slugs to custom ones.
Group Pages Slug
The text you add to this field will replace the default slug for all your WishList LMS group pricing pages. Hence, if you enter “program” as your slug, and your group’s name is “Lifetime”, the group URL would be https://yourdomain.com/programme/lifetime.
Membership Pages Slug
Similarly to Groups, the text you set here will become the slug for all your WishList LMS Membership Registration pages. If you set “subscribe” as a custom slug and name the membership “Gold”, the URL will become https://yourdomain.com/subscribe/gold/.
Unauthorized Access
Unauthorized visitors are users who, for instance, try to view content on your website without logging in or subscribing. By managing content access, you can control what these visitors see, or alternatively, whether they can stay on the page. This, in turn, helps you protect your valuable content and, moreover, encourages non-members to register or log in.
Redirect Unauthorized Visitors to a Specific URL
You can enable unauthorized redirection to redirect users to a specified page instead of displaying the standard unauthorized message.
This option includes several settings:
- Redirect Method:
- template_redirect (recommended)
- init
- send_headers
- Redirect Non-Singular Views: This option stops unauthorized members from seeing non-singular views. Specifically, these include blog, category, or archive pages. Furthermore, this restriction applies particularly if any post on those pages is protected.
- URL to Direct Unauthorized Visitors: Visitors trying to access unauthorized content will, therefore, be redirected to this URL. If the page is on the same domain; you can use a slug for the page, for example: “/unauthorized/”.
You can use the
shortcode on the selected unauthorized page. This is applicable if the URL points to a page on the same website.
Show an Excerpt
Enable the Show an excerpt to unauthorized visitors option to display an excerpt on protected pages for unauthorized visitors.
Here, you can choose one of the following options:
- More Tag: This option displays only the content before the “Read More” tag on protected pages. It prompts unauthorized visitors to log in or subscribe. This allows them to view the full content;
- Post Excerpt: This option allows users to preview the initial content of a post. Specifically, the default WordPress excerpt limit is 55 words; as a result, this gives a quick look before reading more.
- Custom: This feature lets you adjust the number of characters displayed to unauthorized users. For instance, you can configure it to show 150 characters from the beginning of the content shown.
Choosing the “Custom” option enables you to manage the character count displayed to users. This offers more flexibility than the default 55-word post excerpt. Custom excerpts display plain text, with all HTML tags removed.
Show a Login Form
Select the Show a Login Form on Pages Containing Unauthorized Content option to show a login form on unauthorized content pages, prompting users to log in before accessing restricted material.
Edit the Default Unauthorized Message
To update the default message displayed to unauthorized visitors, click the “Default Unauthorized Message” link. Then, you will see the editor where you can change the message as needed. Hence, this allows you to customize the experience for visitors who do not have access.
Group and Membership Page Slugs
In WishList LMS, you can define slugs for your group pricing page and membership registration pages. Specifically, slugs are the part of a URL that identifies a particular page or post. For example, in these URLs:
https://yourdomain.com/register/basicmembership, “register” is the slug;https://yourdomain.com/plans/lifetime, “plans” is the slug.
You can customize these default slugs to custom ones.
Group Pages Slug
The text you add to this field will replace the default slug for all your WishList LMS group pricing pages. Hence, if you enter “program” as your slug, and your group’s name is “Lifetime”, the group URL would be https://yourdomain.com/programme/lifetime.
Membership Pages Slug
Similarly to Groups, the text you set here will become the slug for all your WishList LMS Membership Registration pages. If you set “subscribe” as a custom slug and name the membership “Gold”, the URL will become https://yourdomain.com/subscribe/gold/.
Unauthorized Access
Unauthorized visitors are users who, for instance, try to view content on your website without logging in or subscribing. By managing content access, you can control what these visitors see, or alternatively, whether they can stay on the page. This, in turn, helps you protect your valuable content and, moreover, encourages non-members to register or log in.
Redirect Unauthorized Visitors to a Specific URL
You can enable unauthorized redirection to redirect users to a specified page instead of displaying the standard unauthorized message.
This option includes several settings:
- Redirect Method:
- template_redirect (recommended)
- init
- send_headers
- Redirect Non-Singular Views: This option stops unauthorized members from seeing non-singular views. Specifically, these include blog, category, or archive pages. Furthermore, this restriction applies particularly if any post on those pages is protected.
- URL to Direct Unauthorized Visitors: Visitors trying to access unauthorized content will, therefore, be redirected to this URL. If the page is on the same domain; you can use a slug for the page, for example: “/unauthorized/”.
You can use the
shortcode on the selected unauthorized page. This is applicable if the URL points to a page on the same website.
Show an Excerpt
Enable the Show an excerpt to unauthorized visitors option to display an excerpt on protected pages for unauthorized visitors.
Here, you can choose one of the following options:
- More Tag: This option displays only the content before the “Read More” tag on protected pages. It prompts unauthorized visitors to log in or subscribe. This allows them to view the full content;
- Post Excerpt: This option allows users to preview the initial content of a post. Specifically, the default WordPress excerpt limit is 55 words; as a result, this gives a quick look before reading more.
- Custom: This feature lets you adjust the number of characters displayed to unauthorized users. For instance, you can configure it to show 150 characters from the beginning of the content shown.
Choosing the “Custom” option enables you to manage the character count displayed to users. This offers more flexibility than the default 55-word post excerpt. Custom excerpts display plain text, with all HTML tags removed.
Show a Login Form
Select the Show a Login Form on Pages Containing Unauthorized Content option to show a login form on unauthorized content pages, prompting users to log in before accessing restricted material.
Edit the Default Unauthorized Message
To update the default message displayed to unauthorized visitors, click the “Default Unauthorized Message” link. Then, you will see the editor where you can change the message as needed. Hence, this allows you to customize the experience for visitors who do not have access.
Assigning an Existing Custom Page as a Reserved Page
To select an alternative page, whether custom or existing, as the WishList LMS reserved page(s), follow these steps:
- Navigate to Dashboard > WishList LMS > Settings > Pages tab.
- Proceed to the Reserved Pages section.
- Click the WishList LMS Login Page drop-down menu. Select the existing page from your site that you wish to use as a login page.
- Click the Update Options button at the bottom of the page to apply your selection.
Group and Membership Page Slugs
In WishList LMS, you can define slugs for your group pricing page and membership registration pages. Specifically, slugs are the part of a URL that identifies a particular page or post. For example, in these URLs:
https://yourdomain.com/register/basicmembership, “register” is the slug;https://yourdomain.com/plans/lifetime, “plans” is the slug.
You can customize these default slugs to custom ones.
Group Pages Slug
The text you add to this field will replace the default slug for all your WishList LMS group pricing pages. Hence, if you enter “program” as your slug, and your group’s name is “Lifetime”, the group URL would be https://yourdomain.com/programme/lifetime.
Membership Pages Slug
Similarly to Groups, the text you set here will become the slug for all your WishList LMS Membership Registration pages. If you set “subscribe” as a custom slug and name the membership “Gold”, the URL will become https://yourdomain.com/subscribe/gold/.
Unauthorized Access
Unauthorized visitors are users who, for instance, try to view content on your website without logging in or subscribing. By managing content access, you can control what these visitors see, or alternatively, whether they can stay on the page. This, in turn, helps you protect your valuable content and, moreover, encourages non-members to register or log in.
Redirect Unauthorized Visitors to a Specific URL
You can enable unauthorized redirection to redirect users to a specified page instead of displaying the standard unauthorized message.
This option includes several settings:
- Redirect Method:
- template_redirect (recommended)
- init
- send_headers
- Redirect Non-Singular Views: This option stops unauthorized members from seeing non-singular views. Specifically, these include blog, category, or archive pages. Furthermore, this restriction applies particularly if any post on those pages is protected.
- URL to Direct Unauthorized Visitors: Visitors trying to access unauthorized content will, therefore, be redirected to this URL. If the page is on the same domain; you can use a slug for the page, for example: “/unauthorized/”.
You can use the
shortcode on the selected unauthorized page. This is applicable if the URL points to a page on the same website.
Show an Excerpt
Enable the Show an excerpt to unauthorized visitors option to display an excerpt on protected pages for unauthorized visitors.
Here, you can choose one of the following options:
- More Tag: This option displays only the content before the “Read More” tag on protected pages. It prompts unauthorized visitors to log in or subscribe. This allows them to view the full content;
- Post Excerpt: This option allows users to preview the initial content of a post. Specifically, the default WordPress excerpt limit is 55 words; as a result, this gives a quick look before reading more.
- Custom: This feature lets you adjust the number of characters displayed to unauthorized users. For instance, you can configure it to show 150 characters from the beginning of the content shown.
Choosing the “Custom” option enables you to manage the character count displayed to users. This offers more flexibility than the default 55-word post excerpt. Custom excerpts display plain text, with all HTML tags removed.
Show a Login Form
Select the Show a Login Form on Pages Containing Unauthorized Content option to show a login form on unauthorized content pages, prompting users to log in before accessing restricted material.
Edit the Default Unauthorized Message
To update the default message displayed to unauthorized visitors, click the “Default Unauthorized Message” link. Then, you will see the editor where you can change the message as needed. Hence, this allows you to customize the experience for visitors who do not have access.
Upon updating the settings, the WishList LMS will automatically create and configure the page for you.
Assigning an Existing Custom Page as a Reserved Page
To select an alternative page, whether custom or existing, as the WishList LMS reserved page(s), follow these steps:
- Navigate to Dashboard > WishList LMS > Settings > Pages tab.
- Proceed to the Reserved Pages section.
- Click the WishList LMS Login Page drop-down menu. Select the existing page from your site that you wish to use as a login page.
- Click the Update Options button at the bottom of the page to apply your selection.
Group and Membership Page Slugs
In WishList LMS, you can define slugs for your group pricing page and membership registration pages. Specifically, slugs are the part of a URL that identifies a particular page or post. For example, in these URLs:
https://yourdomain.com/register/basicmembership, “register” is the slug;https://yourdomain.com/plans/lifetime, “plans” is the slug.
You can customize these default slugs to custom ones.
Group Pages Slug
The text you add to this field will replace the default slug for all your WishList LMS group pricing pages. Hence, if you enter “program” as your slug, and your group’s name is “Lifetime”, the group URL would be https://yourdomain.com/programme/lifetime.
Membership Pages Slug
Similarly to Groups, the text you set here will become the slug for all your WishList LMS Membership Registration pages. If you set “subscribe” as a custom slug and name the membership “Gold”, the URL will become https://yourdomain.com/subscribe/gold/.
Unauthorized Access
Unauthorized visitors are users who, for instance, try to view content on your website without logging in or subscribing. By managing content access, you can control what these visitors see, or alternatively, whether they can stay on the page. This, in turn, helps you protect your valuable content and, moreover, encourages non-members to register or log in.
Redirect Unauthorized Visitors to a Specific URL
You can enable unauthorized redirection to redirect users to a specified page instead of displaying the standard unauthorized message.
This option includes several settings:
- Redirect Method:
- template_redirect (recommended)
- init
- send_headers
- Redirect Non-Singular Views: This option stops unauthorized members from seeing non-singular views. Specifically, these include blog, category, or archive pages. Furthermore, this restriction applies particularly if any post on those pages is protected.
- URL to Direct Unauthorized Visitors: Visitors trying to access unauthorized content will, therefore, be redirected to this URL. If the page is on the same domain; you can use a slug for the page, for example: “/unauthorized/”.
You can use the
shortcode on the selected unauthorized page. This is applicable if the URL points to a page on the same website.
Show an Excerpt
Enable the Show an excerpt to unauthorized visitors option to display an excerpt on protected pages for unauthorized visitors.
Here, you can choose one of the following options:
- More Tag: This option displays only the content before the “Read More” tag on protected pages. It prompts unauthorized visitors to log in or subscribe. This allows them to view the full content;
- Post Excerpt: This option allows users to preview the initial content of a post. Specifically, the default WordPress excerpt limit is 55 words; as a result, this gives a quick look before reading more.
- Custom: This feature lets you adjust the number of characters displayed to unauthorized users. For instance, you can configure it to show 150 characters from the beginning of the content shown.
Choosing the “Custom” option enables you to manage the character count displayed to users. This offers more flexibility than the default 55-word post excerpt. Custom excerpts display plain text, with all HTML tags removed.
Show a Login Form
Select the Show a Login Form on Pages Containing Unauthorized Content option to show a login form on unauthorized content pages, prompting users to log in before accessing restricted material.
Edit the Default Unauthorized Message
To update the default message displayed to unauthorized visitors, click the “Default Unauthorized Message” link. Then, you will see the editor where you can change the message as needed. Hence, this allows you to customize the experience for visitors who do not have access.
Unauthorized Access
Unauthorized visitors are users who, for instance, try to view content on your website without logging in or subscribing. By managing content access, you can control what these visitors see, or alternatively, whether they can stay on the page. This, in turn, helps you protect your valuable content and, moreover, encourages non-members to register or log in.
Redirect Unauthorized Visitors to a Specific URL
You can enable unauthorized redirection to redirect users to a specified page instead of displaying the standard unauthorized message.
This option includes several settings:
- Redirect Method:
- template_redirect (recommended)
- init
- send_headers
- Redirect Non-Singular Views: This option stops unauthorized members from seeing non-singular views. Specifically, these include blog, category, or archive pages. Furthermore, this restriction applies particularly if any post on those pages is protected.
- URL to Direct Unauthorized Visitors: Visitors trying to access unauthorized content will, therefore, be redirected to this URL. If the page is on the same domain; you can use a slug for the page, for example: “/unauthorized/”.
You can use the
shortcode on the selected unauthorized page. This is applicable if the URL points to a page on the same website.
Show an Excerpt
Enable the Show an excerpt to unauthorized visitors option to display an excerpt on protected pages for unauthorized visitors.
Here, you can choose one of the following options:
- More Tag: This option displays only the content before the “Read More” tag on protected pages. It prompts unauthorized visitors to log in or subscribe. This allows them to view the full content;
- Post Excerpt: This option allows users to preview the initial content of a post. Specifically, the default WordPress excerpt limit is 55 words; as a result, this gives a quick look before reading more.
- Custom: This feature lets you adjust the number of characters displayed to unauthorized users. For instance, you can configure it to show 150 characters from the beginning of the content shown.
Choosing the “Custom” option enables you to manage the character count displayed to users. This offers more flexibility than the default 55-word post excerpt. Custom excerpts display plain text, with all HTML tags removed.
Show a Login Form
Select the Show a Login Form on Pages Containing Unauthorized Content option to show a login form on unauthorized content pages, prompting users to log in before accessing restricted material.
Edit the Default Unauthorized Message
To update the default message displayed to unauthorized visitors, click the “Default Unauthorized Message” link. Then, you will see the editor where you can change the message as needed. Hence, this allows you to customize the experience for visitors who do not have access.
Group and Membership Page Slugs
In WishList LMS, you can define slugs for your group pricing page and membership registration pages. Specifically, slugs are the part of a URL that identifies a particular page or post. For example, in these URLs:
https://yourdomain.com/register/basicmembership, “register” is the slug;https://yourdomain.com/plans/lifetime, “plans” is the slug.
You can customize these default slugs to custom ones.
Group Pages Slug
The text you add to this field will replace the default slug for all your WishList LMS group pricing pages. Hence, if you enter “program” as your slug, and your group’s name is “Lifetime”, the group URL would be https://yourdomain.com/programme/lifetime.
Membership Pages Slug
Similarly to Groups, the text you set here will become the slug for all your WishList LMS Membership Registration pages. If you set “subscribe” as a custom slug and name the membership “Gold”, the URL will become https://yourdomain.com/subscribe/gold/.
Unauthorized Access
Unauthorized visitors are users who, for instance, try to view content on your website without logging in or subscribing. By managing content access, you can control what these visitors see, or alternatively, whether they can stay on the page. This, in turn, helps you protect your valuable content and, moreover, encourages non-members to register or log in.
Redirect Unauthorized Visitors to a Specific URL
You can enable unauthorized redirection to redirect users to a specified page instead of displaying the standard unauthorized message.
This option includes several settings:
- Redirect Method:
- template_redirect (recommended)
- init
- send_headers
- Redirect Non-Singular Views: This option stops unauthorized members from seeing non-singular views. Specifically, these include blog, category, or archive pages. Furthermore, this restriction applies particularly if any post on those pages is protected.
- URL to Direct Unauthorized Visitors: Visitors trying to access unauthorized content will, therefore, be redirected to this URL. If the page is on the same domain; you can use a slug for the page, for example: “/unauthorized/”.
You can use the
shortcode on the selected unauthorized page. This is applicable if the URL points to a page on the same website.
Show an Excerpt
Enable the Show an excerpt to unauthorized visitors option to display an excerpt on protected pages for unauthorized visitors.
Here, you can choose one of the following options:
- More Tag: This option displays only the content before the “Read More” tag on protected pages. It prompts unauthorized visitors to log in or subscribe. This allows them to view the full content;
- Post Excerpt: This option allows users to preview the initial content of a post. Specifically, the default WordPress excerpt limit is 55 words; as a result, this gives a quick look before reading more.
- Custom: This feature lets you adjust the number of characters displayed to unauthorized users. For instance, you can configure it to show 150 characters from the beginning of the content shown.
Choosing the “Custom” option enables you to manage the character count displayed to users. This offers more flexibility than the default 55-word post excerpt. Custom excerpts display plain text, with all HTML tags removed.
Show a Login Form
Select the Show a Login Form on Pages Containing Unauthorized Content option to show a login form on unauthorized content pages, prompting users to log in before accessing restricted material.
Edit the Default Unauthorized Message
To update the default message displayed to unauthorized visitors, click the “Default Unauthorized Message” link. Then, you will see the editor where you can change the message as needed. Hence, this allows you to customize the experience for visitors who do not have access.
Assigning an Existing Custom Page as a Reserved Page
To select an alternative page, whether custom or existing, as the WishList LMS reserved page(s), follow these steps:
- Navigate to Dashboard > WishList LMS > Settings > Pages tab.
- Proceed to the Reserved Pages section.
- Click the WishList LMS Login Page drop-down menu. Select the existing page from your site that you wish to use as a login page.
- Click the Update Options button at the bottom of the page to apply your selection.
Group and Membership Page Slugs
In WishList LMS, you can define slugs for your group pricing page and membership registration pages. Specifically, slugs are the part of a URL that identifies a particular page or post. For example, in these URLs:
https://yourdomain.com/register/basicmembership, “register” is the slug;https://yourdomain.com/plans/lifetime, “plans” is the slug.
You can customize these default slugs to custom ones.
Group Pages Slug
The text you add to this field will replace the default slug for all your WishList LMS group pricing pages. Hence, if you enter “program” as your slug, and your group’s name is “Lifetime”, the group URL would be https://yourdomain.com/programme/lifetime.
Membership Pages Slug
Similarly to Groups, the text you set here will become the slug for all your WishList LMS Membership Registration pages. If you set “subscribe” as a custom slug and name the membership “Gold”, the URL will become https://yourdomain.com/subscribe/gold/.
Unauthorized Access
Unauthorized visitors are users who, for instance, try to view content on your website without logging in or subscribing. By managing content access, you can control what these visitors see, or alternatively, whether they can stay on the page. This, in turn, helps you protect your valuable content and, moreover, encourages non-members to register or log in.
Redirect Unauthorized Visitors to a Specific URL
You can enable unauthorized redirection to redirect users to a specified page instead of displaying the standard unauthorized message.
This option includes several settings:
- Redirect Method:
- template_redirect (recommended)
- init
- send_headers
- Redirect Non-Singular Views: This option stops unauthorized members from seeing non-singular views. Specifically, these include blog, category, or archive pages. Furthermore, this restriction applies particularly if any post on those pages is protected.
- URL to Direct Unauthorized Visitors: Visitors trying to access unauthorized content will, therefore, be redirected to this URL. If the page is on the same domain; you can use a slug for the page, for example: “/unauthorized/”.
You can use the
shortcode on the selected unauthorized page. This is applicable if the URL points to a page on the same website.
Show an Excerpt
Enable the Show an excerpt to unauthorized visitors option to display an excerpt on protected pages for unauthorized visitors.
Here, you can choose one of the following options:
- More Tag: This option displays only the content before the “Read More” tag on protected pages. It prompts unauthorized visitors to log in or subscribe. This allows them to view the full content;
- Post Excerpt: This option allows users to preview the initial content of a post. Specifically, the default WordPress excerpt limit is 55 words; as a result, this gives a quick look before reading more.
- Custom: This feature lets you adjust the number of characters displayed to unauthorized users. For instance, you can configure it to show 150 characters from the beginning of the content shown.
Choosing the “Custom” option enables you to manage the character count displayed to users. This offers more flexibility than the default 55-word post excerpt. Custom excerpts display plain text, with all HTML tags removed.
Show a Login Form
Select the Show a Login Form on Pages Containing Unauthorized Content option to show a login form on unauthorized content pages, prompting users to log in before accessing restricted material.
Edit the Default Unauthorized Message
To update the default message displayed to unauthorized visitors, click the “Default Unauthorized Message” link. Then, you will see the editor where you can change the message as needed. Hence, this allows you to customize the experience for visitors who do not have access.
Upon updating the settings, the WishList LMS will automatically create and configure the page for you.
Assigning an Existing Custom Page as a Reserved Page
To select an alternative page, whether custom or existing, as the WishList LMS reserved page(s), follow these steps:
- Navigate to Dashboard > WishList LMS > Settings > Pages tab.
- Proceed to the Reserved Pages section.
- Click the WishList LMS Login Page drop-down menu. Select the existing page from your site that you wish to use as a login page.
- Click the Update Options button at the bottom of the page to apply your selection.
Group and Membership Page Slugs
In WishList LMS, you can define slugs for your group pricing page and membership registration pages. Specifically, slugs are the part of a URL that identifies a particular page or post. For example, in these URLs:
https://yourdomain.com/register/basicmembership, “register” is the slug;https://yourdomain.com/plans/lifetime, “plans” is the slug.
You can customize these default slugs to custom ones.
Group Pages Slug
The text you add to this field will replace the default slug for all your WishList LMS group pricing pages. Hence, if you enter “program” as your slug, and your group’s name is “Lifetime”, the group URL would be https://yourdomain.com/programme/lifetime.
Membership Pages Slug
Similarly to Groups, the text you set here will become the slug for all your WishList LMS Membership Registration pages. If you set “subscribe” as a custom slug and name the membership “Gold”, the URL will become https://yourdomain.com/subscribe/gold/.
Unauthorized Access
Unauthorized visitors are users who, for instance, try to view content on your website without logging in or subscribing. By managing content access, you can control what these visitors see, or alternatively, whether they can stay on the page. This, in turn, helps you protect your valuable content and, moreover, encourages non-members to register or log in.
Redirect Unauthorized Visitors to a Specific URL
You can enable unauthorized redirection to redirect users to a specified page instead of displaying the standard unauthorized message.
This option includes several settings:
- Redirect Method:
- template_redirect (recommended)
- init
- send_headers
- Redirect Non-Singular Views: This option stops unauthorized members from seeing non-singular views. Specifically, these include blog, category, or archive pages. Furthermore, this restriction applies particularly if any post on those pages is protected.
- URL to Direct Unauthorized Visitors: Visitors trying to access unauthorized content will, therefore, be redirected to this URL. If the page is on the same domain; you can use a slug for the page, for example: “/unauthorized/”.
You can use the
shortcode on the selected unauthorized page. This is applicable if the URL points to a page on the same website.
Show an Excerpt
Enable the Show an excerpt to unauthorized visitors option to display an excerpt on protected pages for unauthorized visitors.
Here, you can choose one of the following options:
- More Tag: This option displays only the content before the “Read More” tag on protected pages. It prompts unauthorized visitors to log in or subscribe. This allows them to view the full content;
- Post Excerpt: This option allows users to preview the initial content of a post. Specifically, the default WordPress excerpt limit is 55 words; as a result, this gives a quick look before reading more.
- Custom: This feature lets you adjust the number of characters displayed to unauthorized users. For instance, you can configure it to show 150 characters from the beginning of the content shown.
Choosing the “Custom” option enables you to manage the character count displayed to users. This offers more flexibility than the default 55-word post excerpt. Custom excerpts display plain text, with all HTML tags removed.
Show a Login Form
Select the Show a Login Form on Pages Containing Unauthorized Content option to show a login form on unauthorized content pages, prompting users to log in before accessing restricted material.
Edit the Default Unauthorized Message
To update the default message displayed to unauthorized visitors, click the “Default Unauthorized Message” link. Then, you will see the editor where you can change the message as needed. Hence, this allows you to customize the experience for visitors who do not have access.
The Pages tab in WishList LMS Settings allows you to manage key default pages. Specifically, these include the Thank You Page, the Account Page, and the Login Page. Furthermore, this feature ensures that you have better control over the user experience.
This guide includes instructions for setting up the Group and Membership Page Slugs. Additionally, you will learn how to manage unauthorized content access settings.
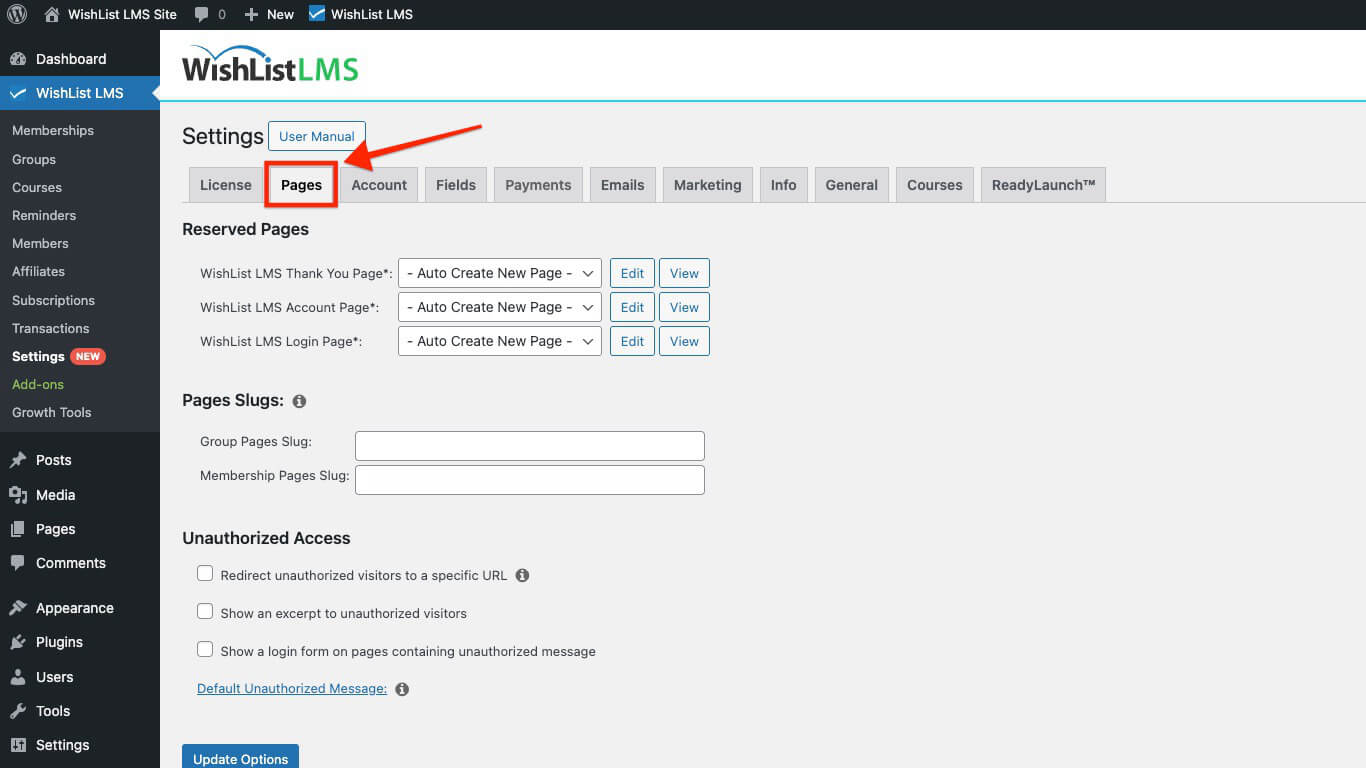
Reserved Pages
WishList LMS uses reserved pages, such as the Thank You Page, Account Page, and Login Page. Consequently, these pages will be created automatically as needed to support the functionality of WishList LMS.
You can set up reserved pages in two ways:
Furthermore, this section explains how to assign existing pages for WishList LMS reserved pages.
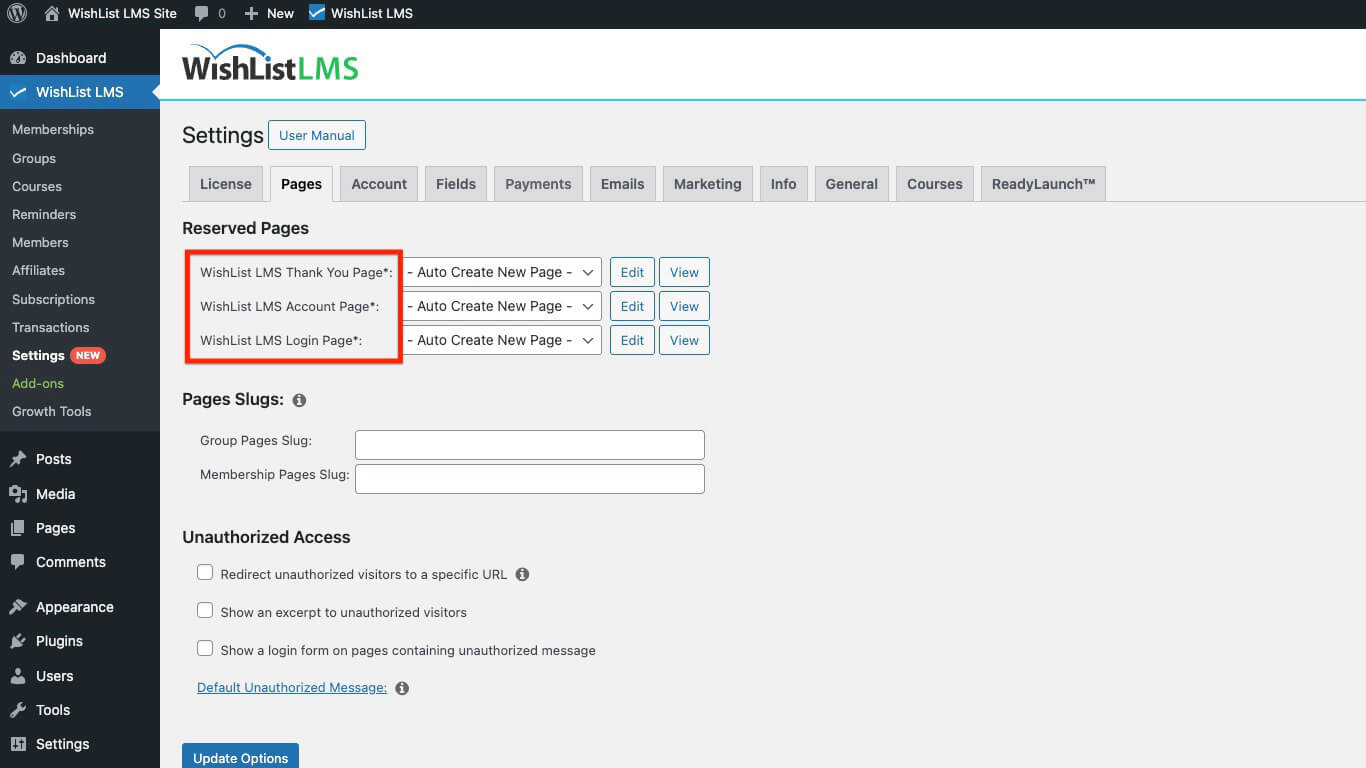
Required Reserved Pages
The following list describes each reserved page and its function.
- Thank You Page: Members see this page immediately after purchasing a WishList LMS membership.
- Account Page: On this page, members can view and update their profile information. They can also update their passwords and manage their payment and membership.
- Login Page: This page displays a login form that allows members to sign in and access their paid content.
Auto-Creating New Reserved Pages
To create a new reserved page, follow these steps:
- Navigate to Dashboard > WishList LMS > Settings > Pages tab.
- Head to the Reserved Pages section.
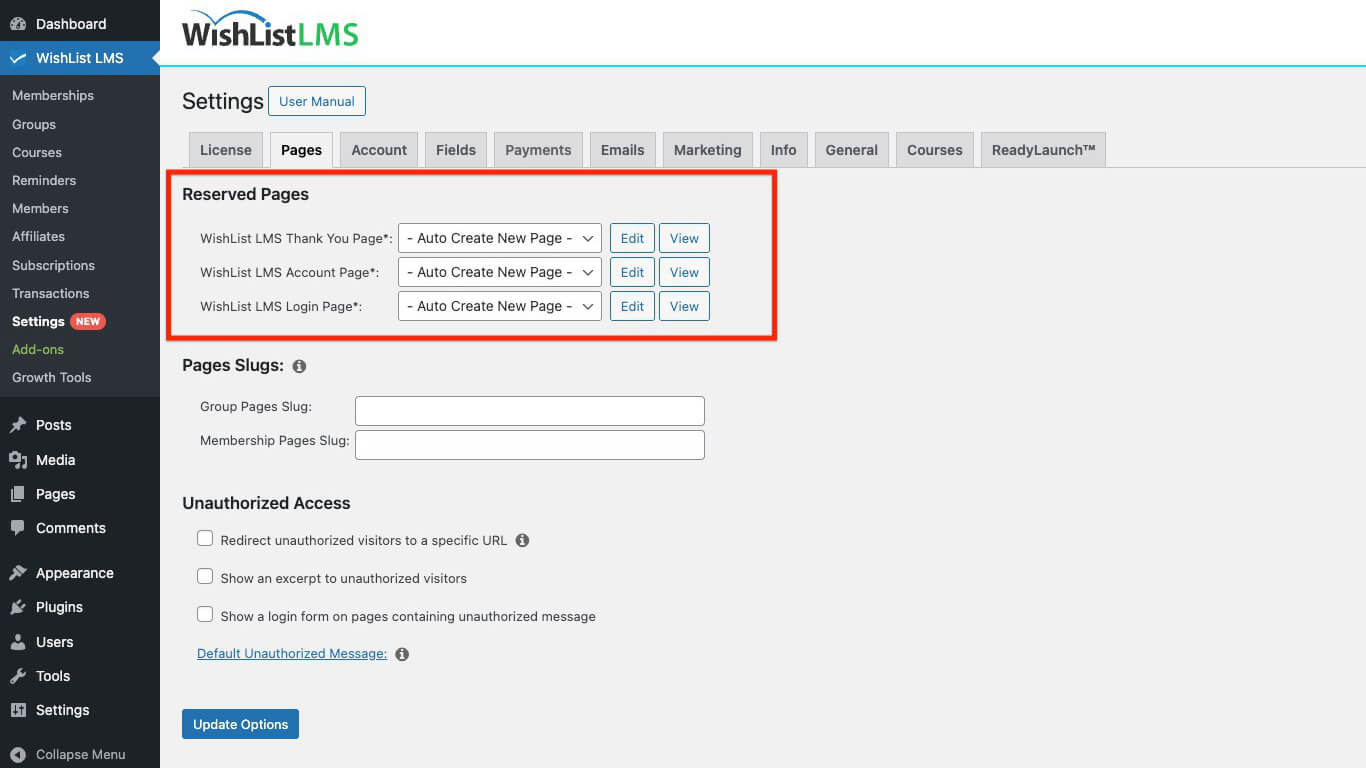
- Click on the drop-down menu of the WishList LMS reserved page you wish to create.
- Select “- Auto Create New Page -“ from the drop-down.
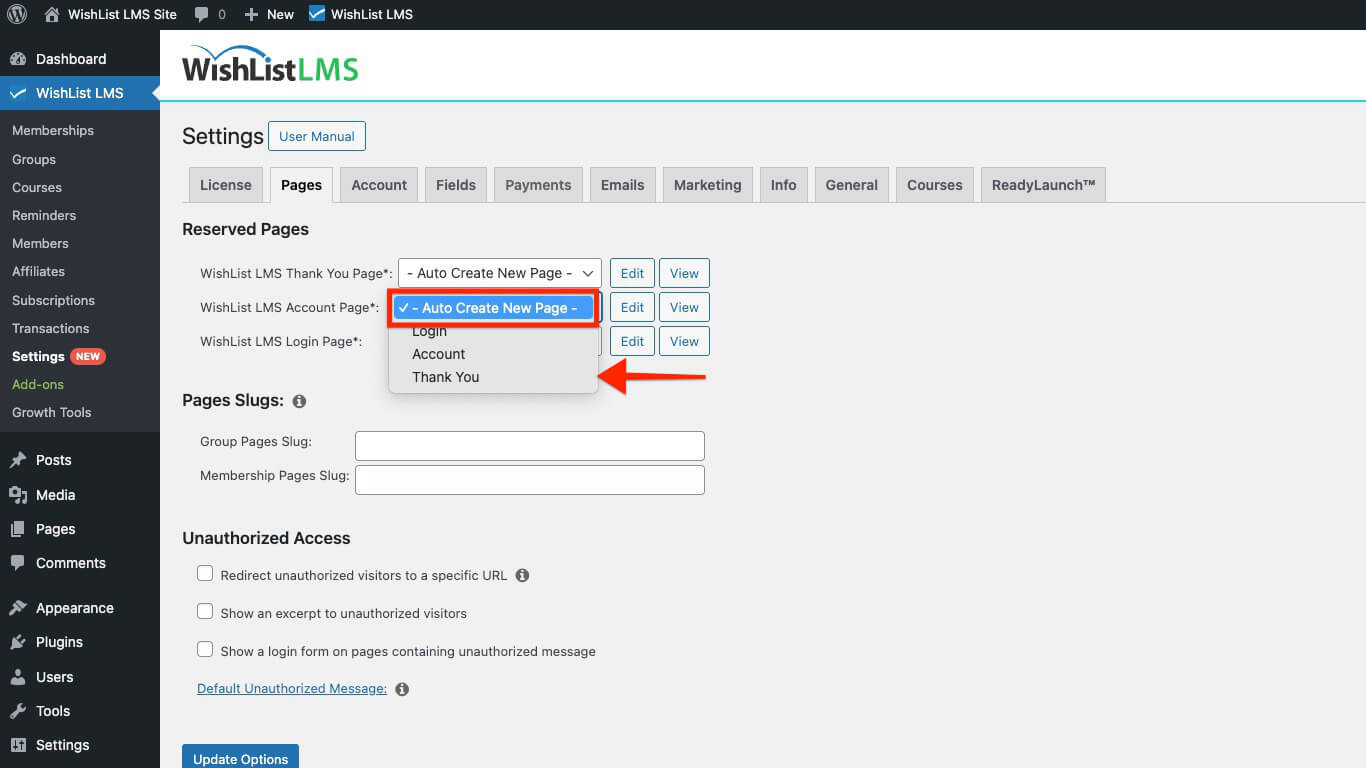
- Click the Update Options button at the bottom of the page to save your changes.
- Redirect Non-Singular Views: This option stops unauthorized members from seeing non-singular views. Specifically, these include blog, category, or archive pages. Furthermore, this restriction applies particularly if any post on those pages is protected.
- URL to Direct Unauthorized Visitors: Visitors trying to access unauthorized content will, therefore, be redirected to this URL. If the page is on the same domain; you can use a slug for the page, for example: “/unauthorized/”.
You can use the
shortcode on the selected unauthorized page. This is applicable if the URL points to a page on the same website.
Show an Excerpt
Enable the Show an excerpt to unauthorized visitors option to display an excerpt on protected pages for unauthorized visitors.
Here, you can choose one of the following options:
- More Tag: This option displays only the content before the “Read More” tag on protected pages. It prompts unauthorized visitors to log in or subscribe. This allows them to view the full content;
- Post Excerpt: This option allows users to preview the initial content of a post. Specifically, the default WordPress excerpt limit is 55 words; as a result, this gives a quick look before reading more.
- Custom: This feature lets you adjust the number of characters displayed to unauthorized users. For instance, you can configure it to show 150 characters from the beginning of the content shown.
Choosing the “Custom” option enables you to manage the character count displayed to users. This offers more flexibility than the default 55-word post excerpt. Custom excerpts display plain text, with all HTML tags removed.
Show a Login Form
Select the Show a Login Form on Pages Containing Unauthorized Content option to show a login form on unauthorized content pages, prompting users to log in before accessing restricted material.
Edit the Default Unauthorized Message
To update the default message displayed to unauthorized visitors, click the “Default Unauthorized Message” link. Then, you will see the editor where you can change the message as needed. Hence, this allows you to customize the experience for visitors who do not have access.
Unauthorized Access
Unauthorized visitors are users who, for instance, try to view content on your website without logging in or subscribing. By managing content access, you can control what these visitors see, or alternatively, whether they can stay on the page. This, in turn, helps you protect your valuable content and, moreover, encourages non-members to register or log in.
Redirect Unauthorized Visitors to a Specific URL
You can enable unauthorized redirection to redirect users to a specified page instead of displaying the standard unauthorized message.
This option includes several settings:
- Redirect Method:
- template_redirect (recommended)
- init
- send_headers
- Redirect Non-Singular Views: This option stops unauthorized members from seeing non-singular views. Specifically, these include blog, category, or archive pages. Furthermore, this restriction applies particularly if any post on those pages is protected.
- URL to Direct Unauthorized Visitors: Visitors trying to access unauthorized content will, therefore, be redirected to this URL. If the page is on the same domain; you can use a slug for the page, for example: “/unauthorized/”.
You can use the
shortcode on the selected unauthorized page. This is applicable if the URL points to a page on the same website.
Show an Excerpt
Enable the Show an excerpt to unauthorized visitors option to display an excerpt on protected pages for unauthorized visitors.
Here, you can choose one of the following options:
- More Tag: This option displays only the content before the “Read More” tag on protected pages. It prompts unauthorized visitors to log in or subscribe. This allows them to view the full content;
- Post Excerpt: This option allows users to preview the initial content of a post. Specifically, the default WordPress excerpt limit is 55 words; as a result, this gives a quick look before reading more.
- Custom: This feature lets you adjust the number of characters displayed to unauthorized users. For instance, you can configure it to show 150 characters from the beginning of the content shown.
Choosing the “Custom” option enables you to manage the character count displayed to users. This offers more flexibility than the default 55-word post excerpt. Custom excerpts display plain text, with all HTML tags removed.
Show a Login Form
Select the Show a Login Form on Pages Containing Unauthorized Content option to show a login form on unauthorized content pages, prompting users to log in before accessing restricted material.
Edit the Default Unauthorized Message
To update the default message displayed to unauthorized visitors, click the “Default Unauthorized Message” link. Then, you will see the editor where you can change the message as needed. Hence, this allows you to customize the experience for visitors who do not have access.
Group and Membership Page Slugs
In WishList LMS, you can define slugs for your group pricing page and membership registration pages. Specifically, slugs are the part of a URL that identifies a particular page or post. For example, in these URLs:
https://yourdomain.com/register/basicmembership, “register” is the slug;https://yourdomain.com/plans/lifetime, “plans” is the slug.
You can customize these default slugs to custom ones.
Group Pages Slug
The text you add to this field will replace the default slug for all your WishList LMS group pricing pages. Hence, if you enter “program” as your slug, and your group’s name is “Lifetime”, the group URL would be https://yourdomain.com/programme/lifetime.
Membership Pages Slug
Similarly to Groups, the text you set here will become the slug for all your WishList LMS Membership Registration pages. If you set “subscribe” as a custom slug and name the membership “Gold”, the URL will become https://yourdomain.com/subscribe/gold/.
Unauthorized Access
Unauthorized visitors are users who, for instance, try to view content on your website without logging in or subscribing. By managing content access, you can control what these visitors see, or alternatively, whether they can stay on the page. This, in turn, helps you protect your valuable content and, moreover, encourages non-members to register or log in.
Redirect Unauthorized Visitors to a Specific URL
You can enable unauthorized redirection to redirect users to a specified page instead of displaying the standard unauthorized message.
This option includes several settings:
- Redirect Method:
- template_redirect (recommended)
- init
- send_headers
- Redirect Non-Singular Views: This option stops unauthorized members from seeing non-singular views. Specifically, these include blog, category, or archive pages. Furthermore, this restriction applies particularly if any post on those pages is protected.
- URL to Direct Unauthorized Visitors: Visitors trying to access unauthorized content will, therefore, be redirected to this URL. If the page is on the same domain; you can use a slug for the page, for example: “/unauthorized/”.
You can use the
shortcode on the selected unauthorized page. This is applicable if the URL points to a page on the same website.
Show an Excerpt
Enable the Show an excerpt to unauthorized visitors option to display an excerpt on protected pages for unauthorized visitors.
Here, you can choose one of the following options:
- More Tag: This option displays only the content before the “Read More” tag on protected pages. It prompts unauthorized visitors to log in or subscribe. This allows them to view the full content;
- Post Excerpt: This option allows users to preview the initial content of a post. Specifically, the default WordPress excerpt limit is 55 words; as a result, this gives a quick look before reading more.
- Custom: This feature lets you adjust the number of characters displayed to unauthorized users. For instance, you can configure it to show 150 characters from the beginning of the content shown.
Choosing the “Custom” option enables you to manage the character count displayed to users. This offers more flexibility than the default 55-word post excerpt. Custom excerpts display plain text, with all HTML tags removed.
Show a Login Form
Select the Show a Login Form on Pages Containing Unauthorized Content option to show a login form on unauthorized content pages, prompting users to log in before accessing restricted material.
Edit the Default Unauthorized Message
To update the default message displayed to unauthorized visitors, click the “Default Unauthorized Message” link. Then, you will see the editor where you can change the message as needed. Hence, this allows you to customize the experience for visitors who do not have access.
Assigning an Existing Custom Page as a Reserved Page
To select an alternative page, whether custom or existing, as the WishList LMS reserved page(s), follow these steps:
- Navigate to Dashboard > WishList LMS > Settings > Pages tab.
- Proceed to the Reserved Pages section.
- Click the WishList LMS Login Page drop-down menu. Select the existing page from your site that you wish to use as a login page.
- Click the Update Options button at the bottom of the page to apply your selection.
Group and Membership Page Slugs
In WishList LMS, you can define slugs for your group pricing page and membership registration pages. Specifically, slugs are the part of a URL that identifies a particular page or post. For example, in these URLs:
https://yourdomain.com/register/basicmembership, “register” is the slug;https://yourdomain.com/plans/lifetime, “plans” is the slug.
You can customize these default slugs to custom ones.
Group Pages Slug
The text you add to this field will replace the default slug for all your WishList LMS group pricing pages. Hence, if you enter “program” as your slug, and your group’s name is “Lifetime”, the group URL would be https://yourdomain.com/programme/lifetime.
Membership Pages Slug
Similarly to Groups, the text you set here will become the slug for all your WishList LMS Membership Registration pages. If you set “subscribe” as a custom slug and name the membership “Gold”, the URL will become https://yourdomain.com/subscribe/gold/.
Unauthorized Access
Unauthorized visitors are users who, for instance, try to view content on your website without logging in or subscribing. By managing content access, you can control what these visitors see, or alternatively, whether they can stay on the page. This, in turn, helps you protect your valuable content and, moreover, encourages non-members to register or log in.
Redirect Unauthorized Visitors to a Specific URL
You can enable unauthorized redirection to redirect users to a specified page instead of displaying the standard unauthorized message.
This option includes several settings:
- Redirect Method:
- template_redirect (recommended)
- init
- send_headers
- Redirect Non-Singular Views: This option stops unauthorized members from seeing non-singular views. Specifically, these include blog, category, or archive pages. Furthermore, this restriction applies particularly if any post on those pages is protected.
- URL to Direct Unauthorized Visitors: Visitors trying to access unauthorized content will, therefore, be redirected to this URL. If the page is on the same domain; you can use a slug for the page, for example: “/unauthorized/”.
You can use the
shortcode on the selected unauthorized page. This is applicable if the URL points to a page on the same website.
Show an Excerpt
Enable the Show an excerpt to unauthorized visitors option to display an excerpt on protected pages for unauthorized visitors.
Here, you can choose one of the following options:
- More Tag: This option displays only the content before the “Read More” tag on protected pages. It prompts unauthorized visitors to log in or subscribe. This allows them to view the full content;
- Post Excerpt: This option allows users to preview the initial content of a post. Specifically, the default WordPress excerpt limit is 55 words; as a result, this gives a quick look before reading more.
- Custom: This feature lets you adjust the number of characters displayed to unauthorized users. For instance, you can configure it to show 150 characters from the beginning of the content shown.
Choosing the “Custom” option enables you to manage the character count displayed to users. This offers more flexibility than the default 55-word post excerpt. Custom excerpts display plain text, with all HTML tags removed.
Show a Login Form
Select the Show a Login Form on Pages Containing Unauthorized Content option to show a login form on unauthorized content pages, prompting users to log in before accessing restricted material.
Edit the Default Unauthorized Message
To update the default message displayed to unauthorized visitors, click the “Default Unauthorized Message” link. Then, you will see the editor where you can change the message as needed. Hence, this allows you to customize the experience for visitors who do not have access.
Upon updating the settings, the WishList LMS will automatically create and configure the page for you.
Assigning an Existing Custom Page as a Reserved Page
To select an alternative page, whether custom or existing, as the WishList LMS reserved page(s), follow these steps:
- Navigate to Dashboard > WishList LMS > Settings > Pages tab.
- Proceed to the Reserved Pages section.
- Click the WishList LMS Login Page drop-down menu. Select the existing page from your site that you wish to use as a login page.
- Click the Update Options button at the bottom of the page to apply your selection.
Group and Membership Page Slugs
In WishList LMS, you can define slugs for your group pricing page and membership registration pages. Specifically, slugs are the part of a URL that identifies a particular page or post. For example, in these URLs:
https://yourdomain.com/register/basicmembership, “register” is the slug;https://yourdomain.com/plans/lifetime, “plans” is the slug.
You can customize these default slugs to custom ones.
Group Pages Slug
The text you add to this field will replace the default slug for all your WishList LMS group pricing pages. Hence, if you enter “program” as your slug, and your group’s name is “Lifetime”, the group URL would be https://yourdomain.com/programme/lifetime.
Membership Pages Slug
Similarly to Groups, the text you set here will become the slug for all your WishList LMS Membership Registration pages. If you set “subscribe” as a custom slug and name the membership “Gold”, the URL will become https://yourdomain.com/subscribe/gold/.
Unauthorized Access
Unauthorized visitors are users who, for instance, try to view content on your website without logging in or subscribing. By managing content access, you can control what these visitors see, or alternatively, whether they can stay on the page. This, in turn, helps you protect your valuable content and, moreover, encourages non-members to register or log in.
Redirect Unauthorized Visitors to a Specific URL
You can enable unauthorized redirection to redirect users to a specified page instead of displaying the standard unauthorized message.
This option includes several settings:
- Redirect Method:
- template_redirect (recommended)
- init
- send_headers
- Redirect Non-Singular Views: This option stops unauthorized members from seeing non-singular views. Specifically, these include blog, category, or archive pages. Furthermore, this restriction applies particularly if any post on those pages is protected.
- URL to Direct Unauthorized Visitors: Visitors trying to access unauthorized content will, therefore, be redirected to this URL. If the page is on the same domain; you can use a slug for the page, for example: “/unauthorized/”.
You can use the
shortcode on the selected unauthorized page. This is applicable if the URL points to a page on the same website.
Show an Excerpt
Enable the Show an excerpt to unauthorized visitors option to display an excerpt on protected pages for unauthorized visitors.
Here, you can choose one of the following options:
- More Tag: This option displays only the content before the “Read More” tag on protected pages. It prompts unauthorized visitors to log in or subscribe. This allows them to view the full content;
- Post Excerpt: This option allows users to preview the initial content of a post. Specifically, the default WordPress excerpt limit is 55 words; as a result, this gives a quick look before reading more.
- Custom: This feature lets you adjust the number of characters displayed to unauthorized users. For instance, you can configure it to show 150 characters from the beginning of the content shown.
Choosing the “Custom” option enables you to manage the character count displayed to users. This offers more flexibility than the default 55-word post excerpt. Custom excerpts display plain text, with all HTML tags removed.
Show a Login Form
Select the Show a Login Form on Pages Containing Unauthorized Content option to show a login form on unauthorized content pages, prompting users to log in before accessing restricted material.
Edit the Default Unauthorized Message
To update the default message displayed to unauthorized visitors, click the “Default Unauthorized Message” link. Then, you will see the editor where you can change the message as needed. Hence, this allows you to customize the experience for visitors who do not have access.