With the built-in Stripe integration, WishList LMS can collect online payments automatically. Furthermore, you can enable additional international, national, and regional payment methods through Stripe, providing users with preferred payment options.
This document will show you how to connect your Stripe account to WishList LMS. Furthermore, it explains how to configure and test Stripe online payments with WishList LMS.
Prerequisites
Stripe configuration requires several elements in place before connecting your Stripe account with WishList LMS.
Firstly, your website must have an active SSL certificate for secure payment processing.
Next, having a verified Stripe account with connected bank details is essential. Have in mind that the business verification in Stripe may take several days for new accounts. Complete this process before launching your membership site. In addition, ensure your Stripe account matches your business entity for legal compliance.
Finally, you’ll need to connect your site to WishList LMS.com:
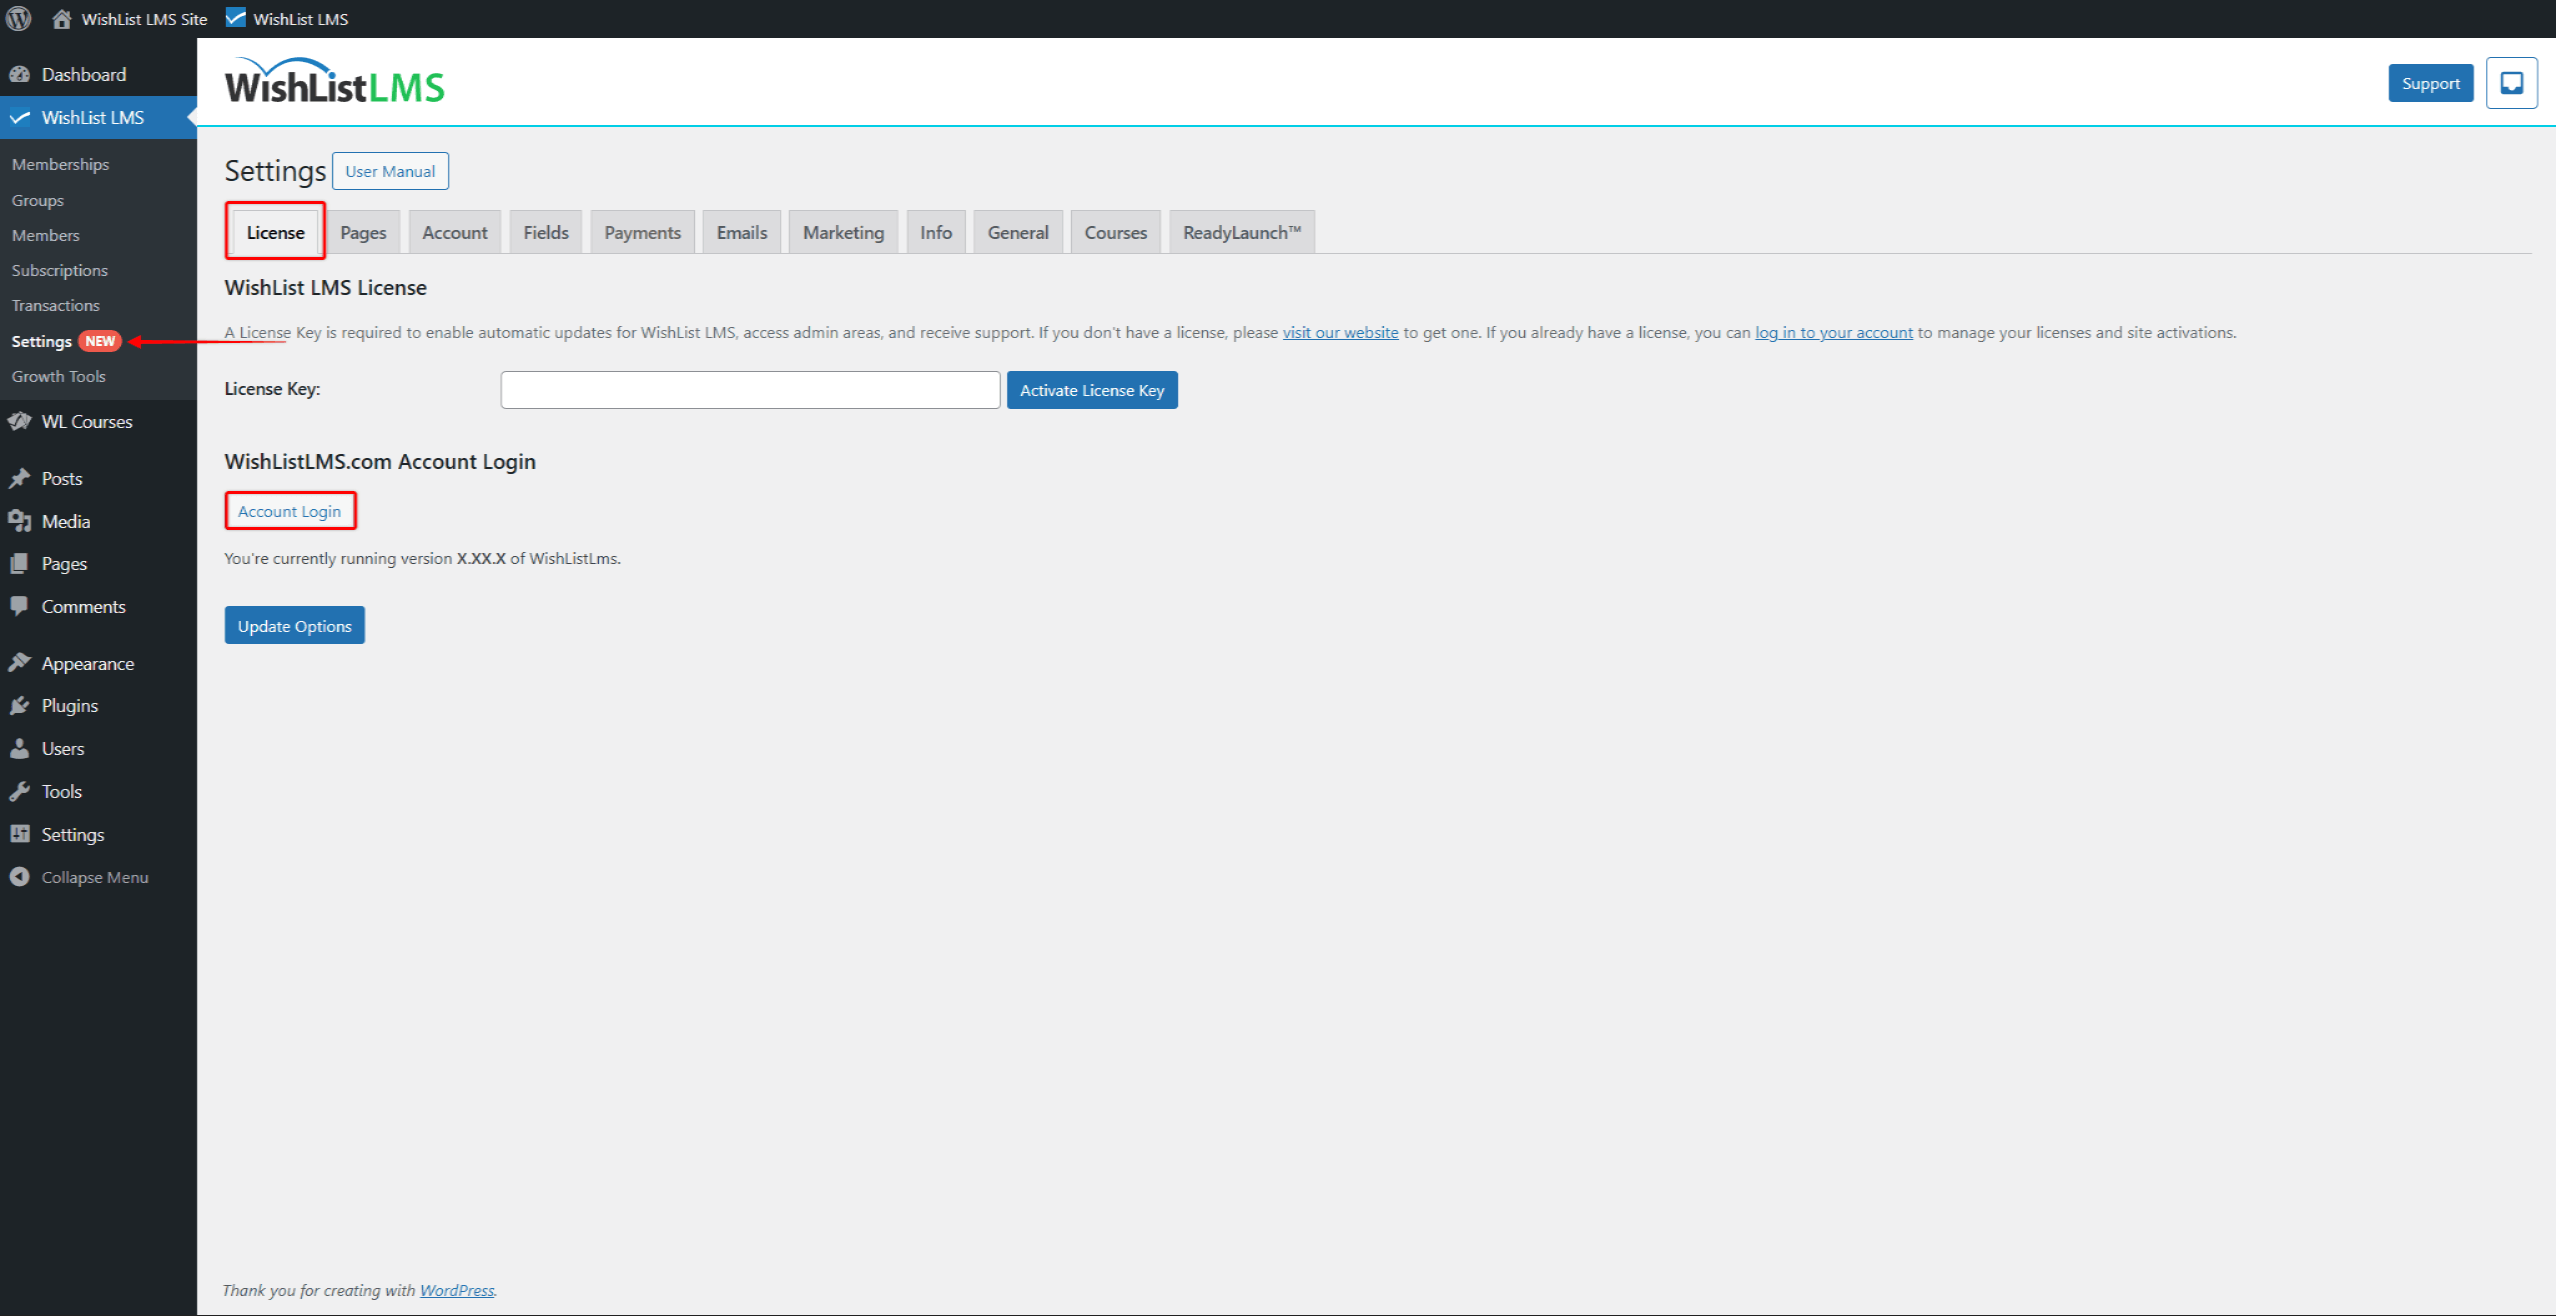
- Navigate to Dashboard > WishList LMS > Settings > License tab.
- Under the WishList LMS.com Account Login section, click the Account Login button.
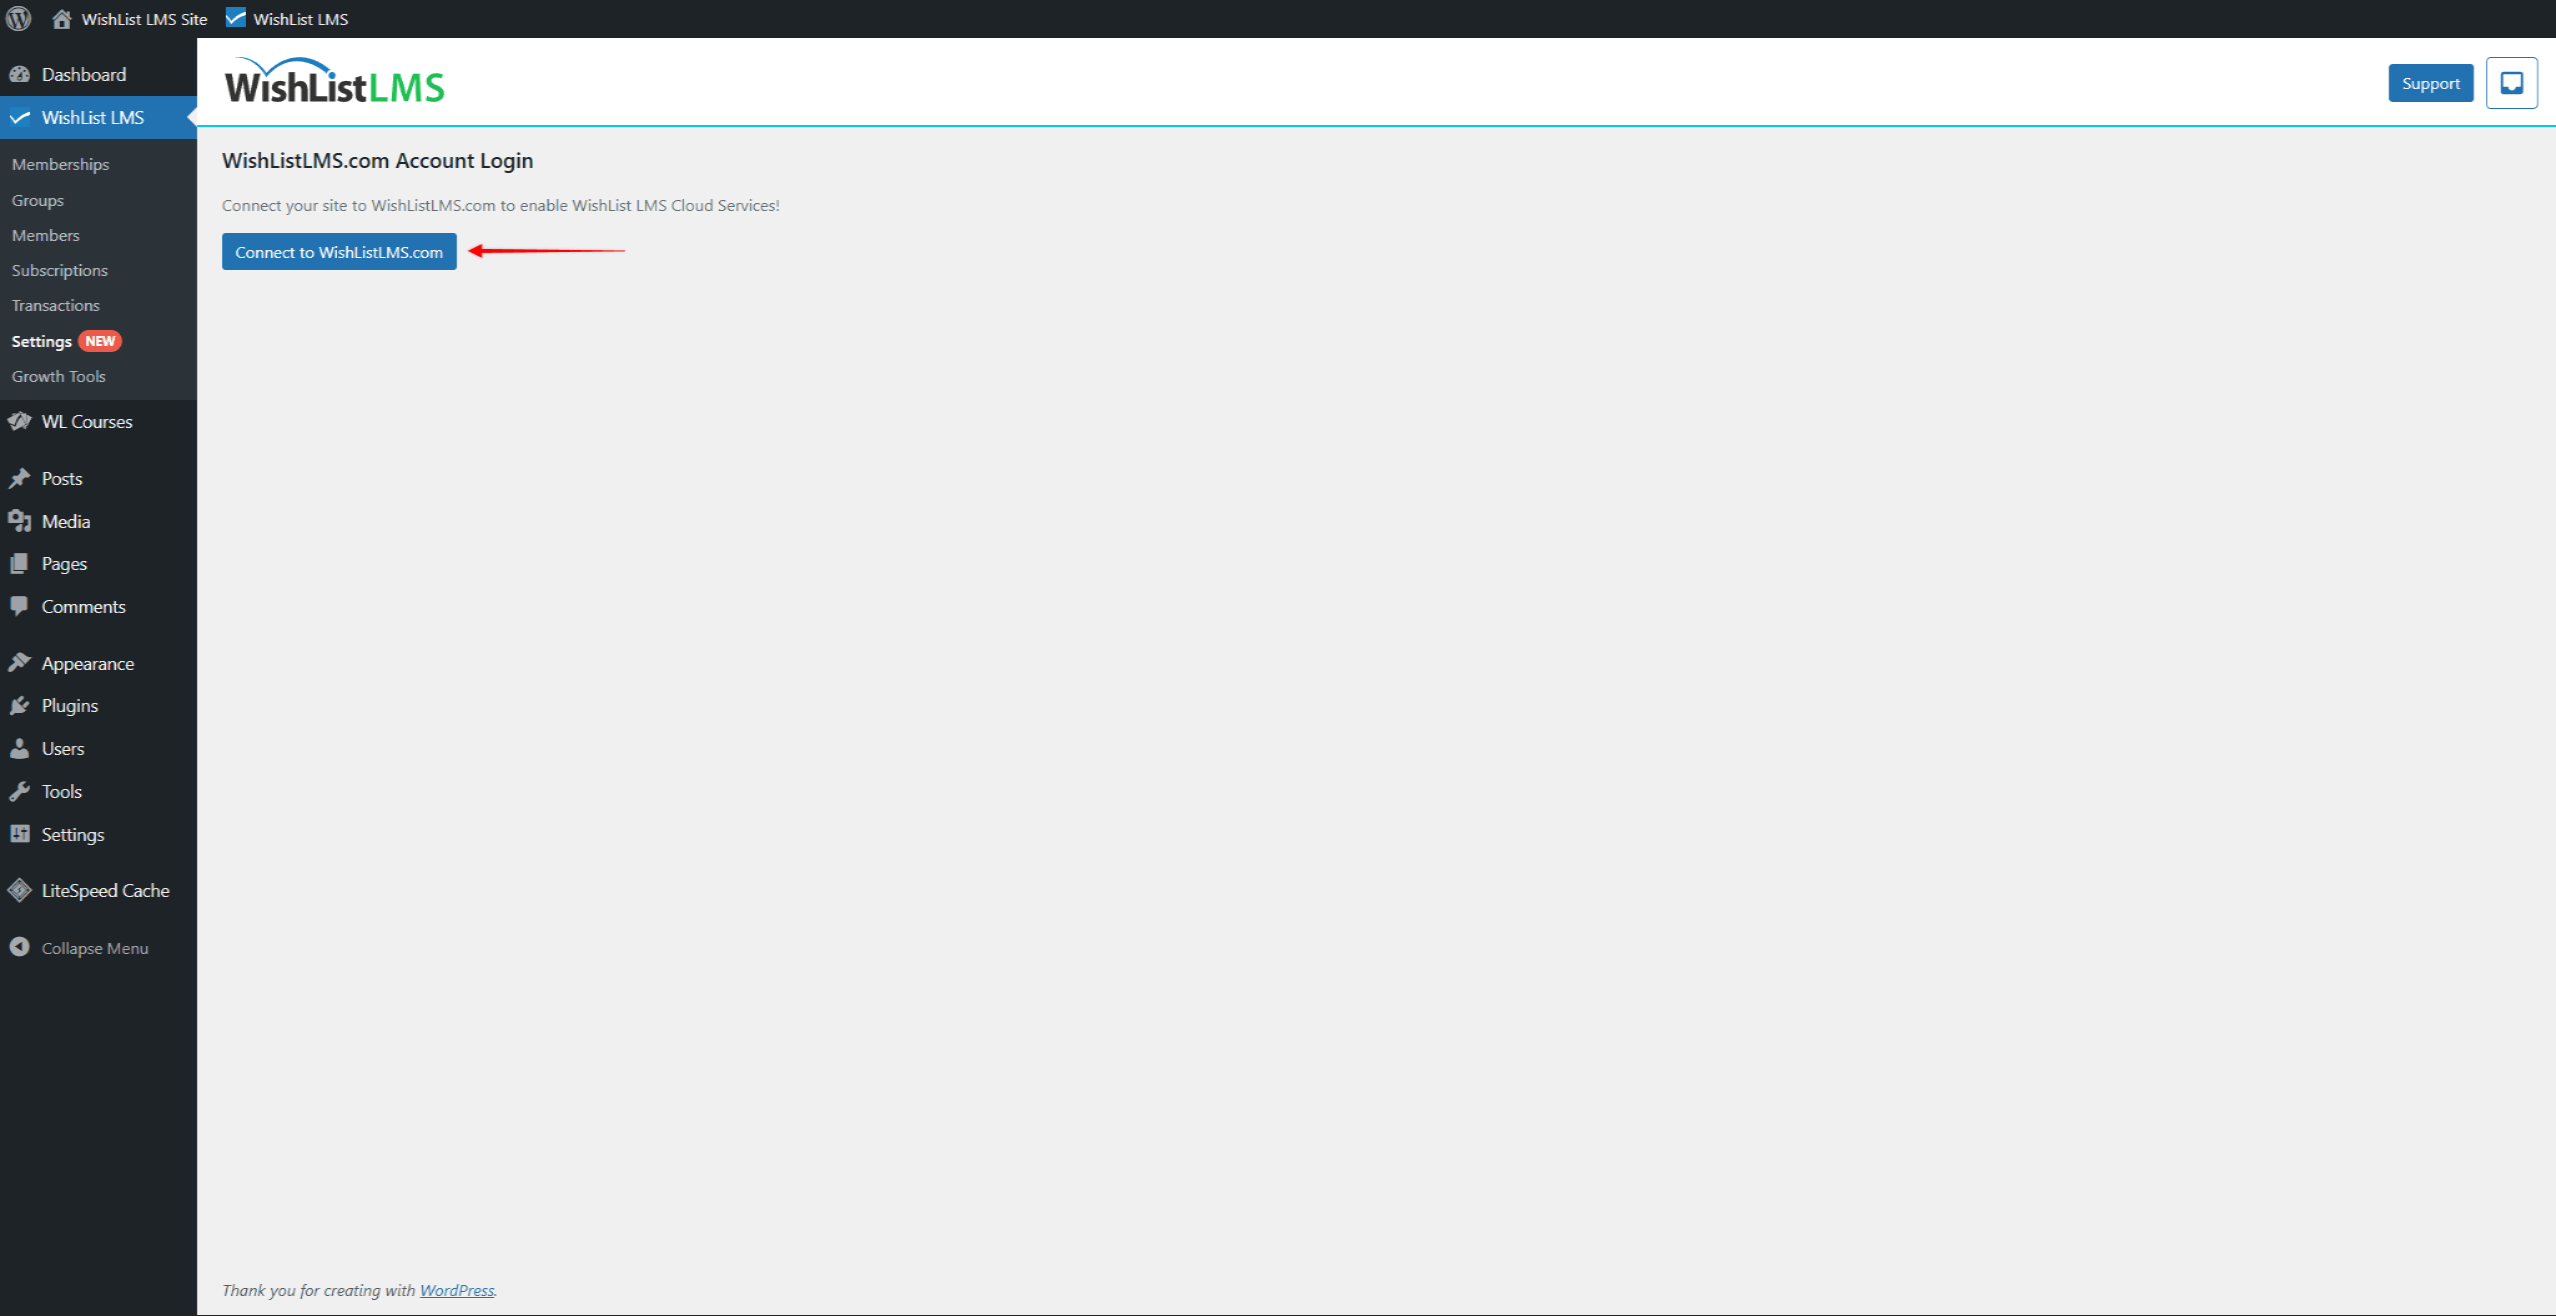
- On the next page, click the Connect to WishList LMS.com button.
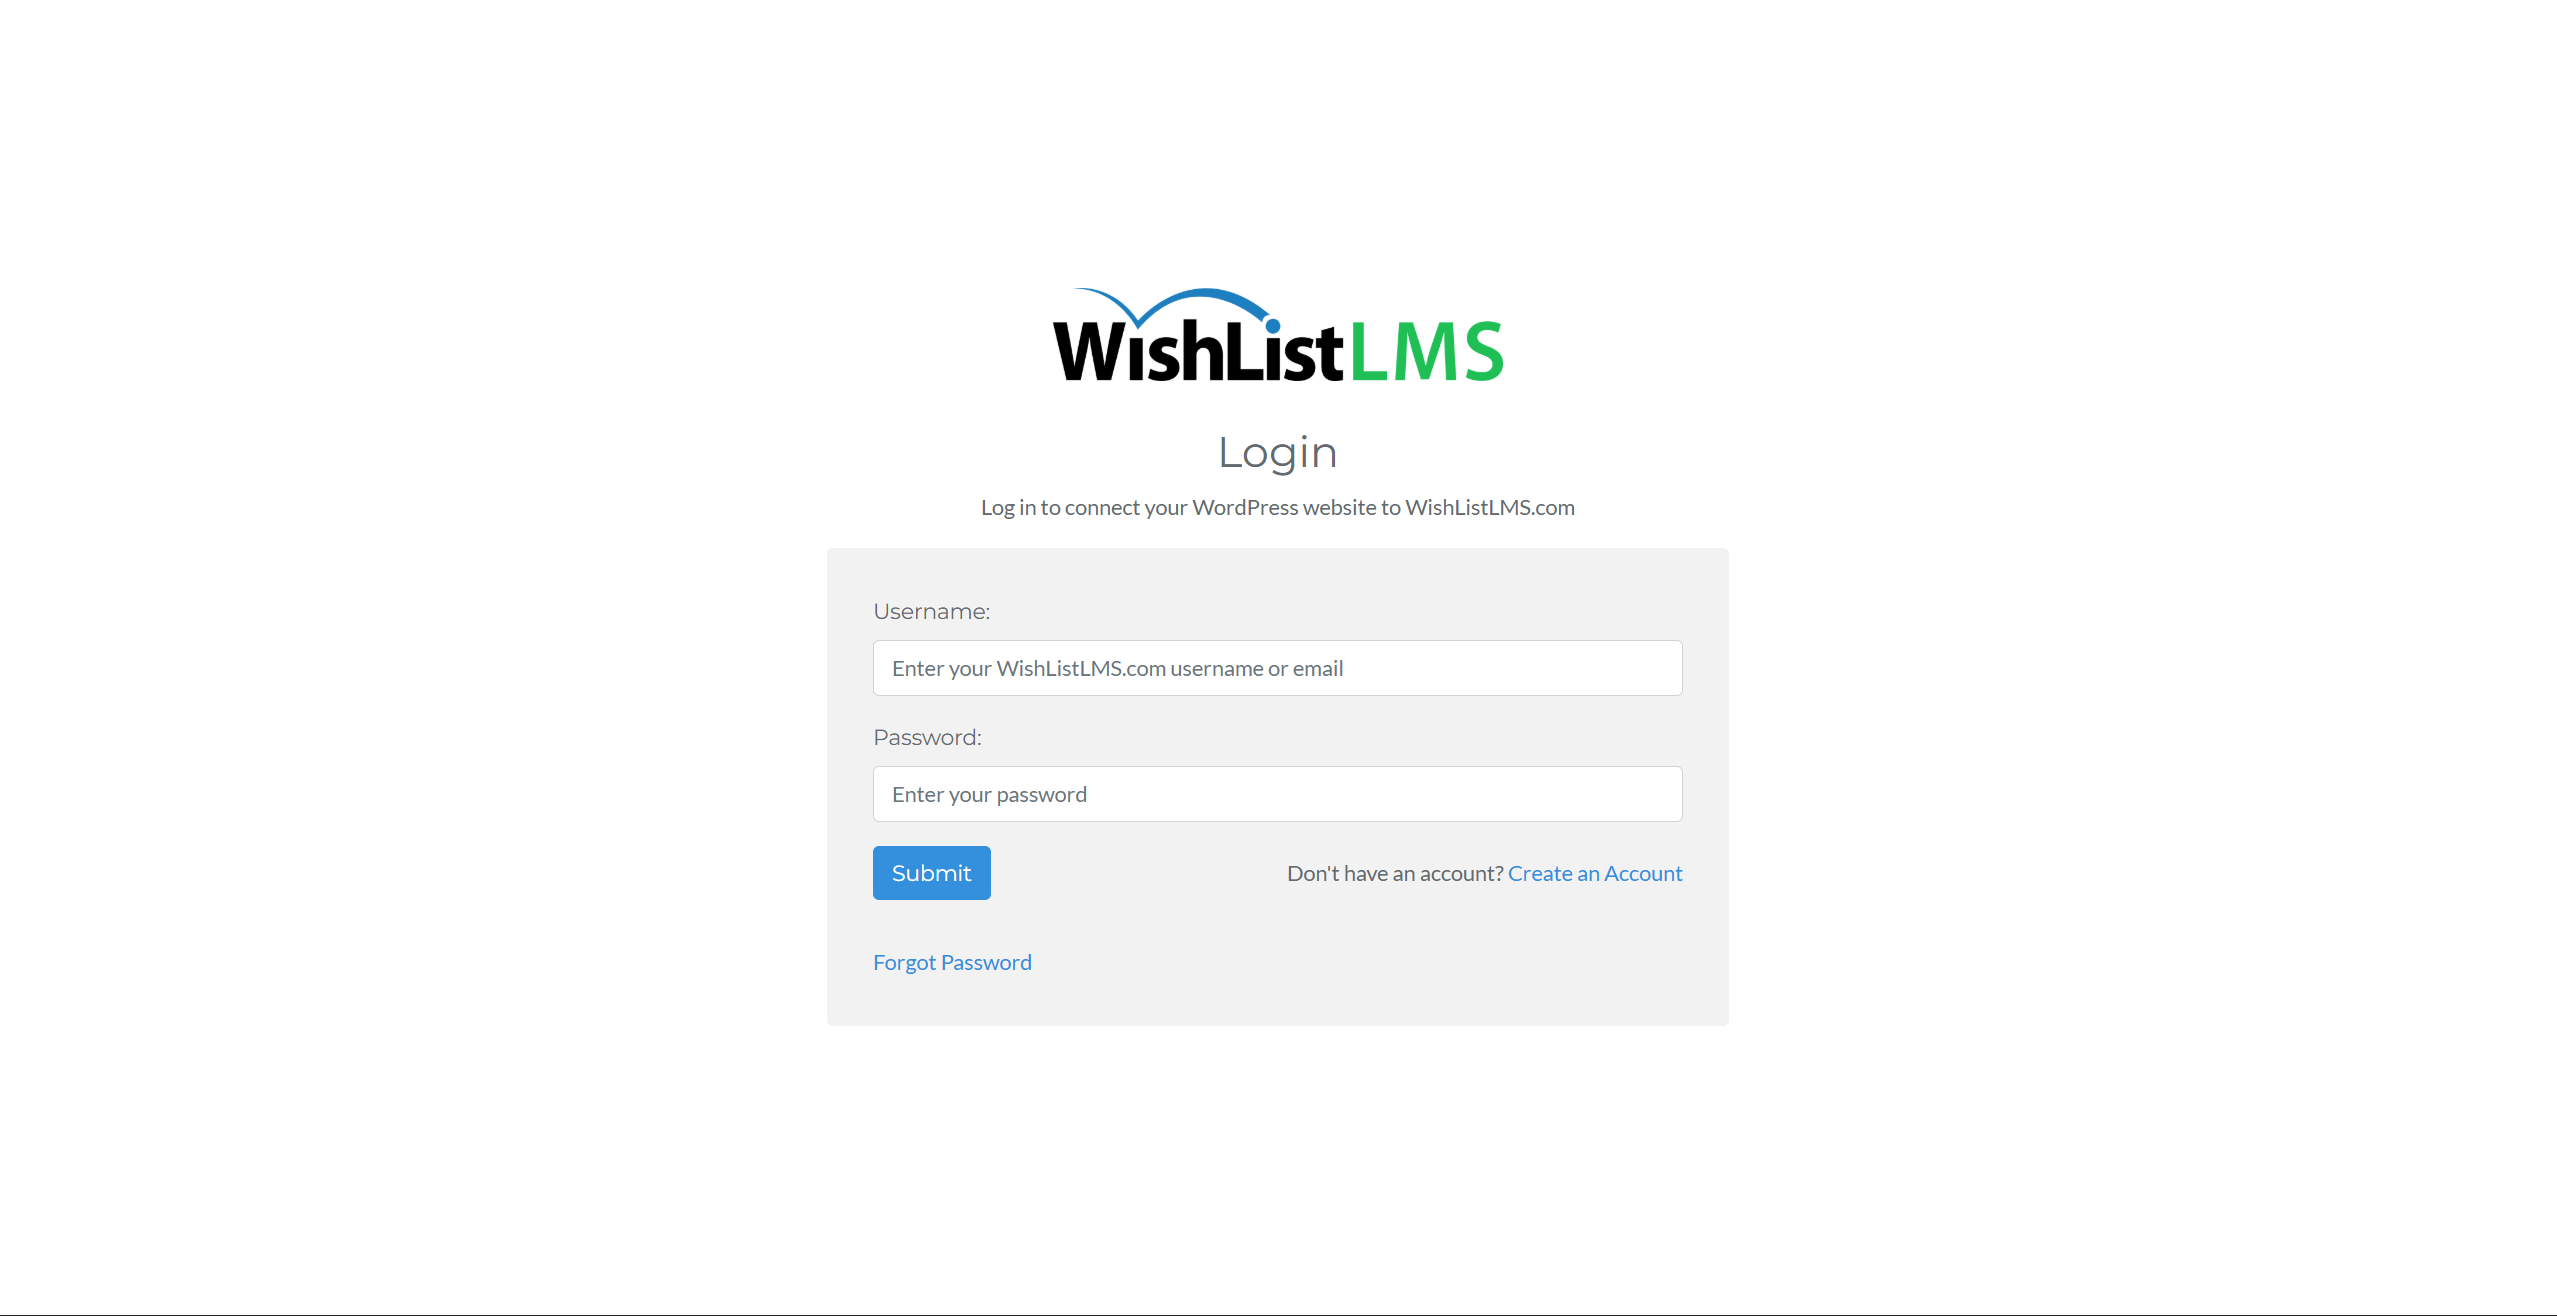
- You will be redirected to the WishList LMS login form. Add your WishList LMS account credentials and click Submit.
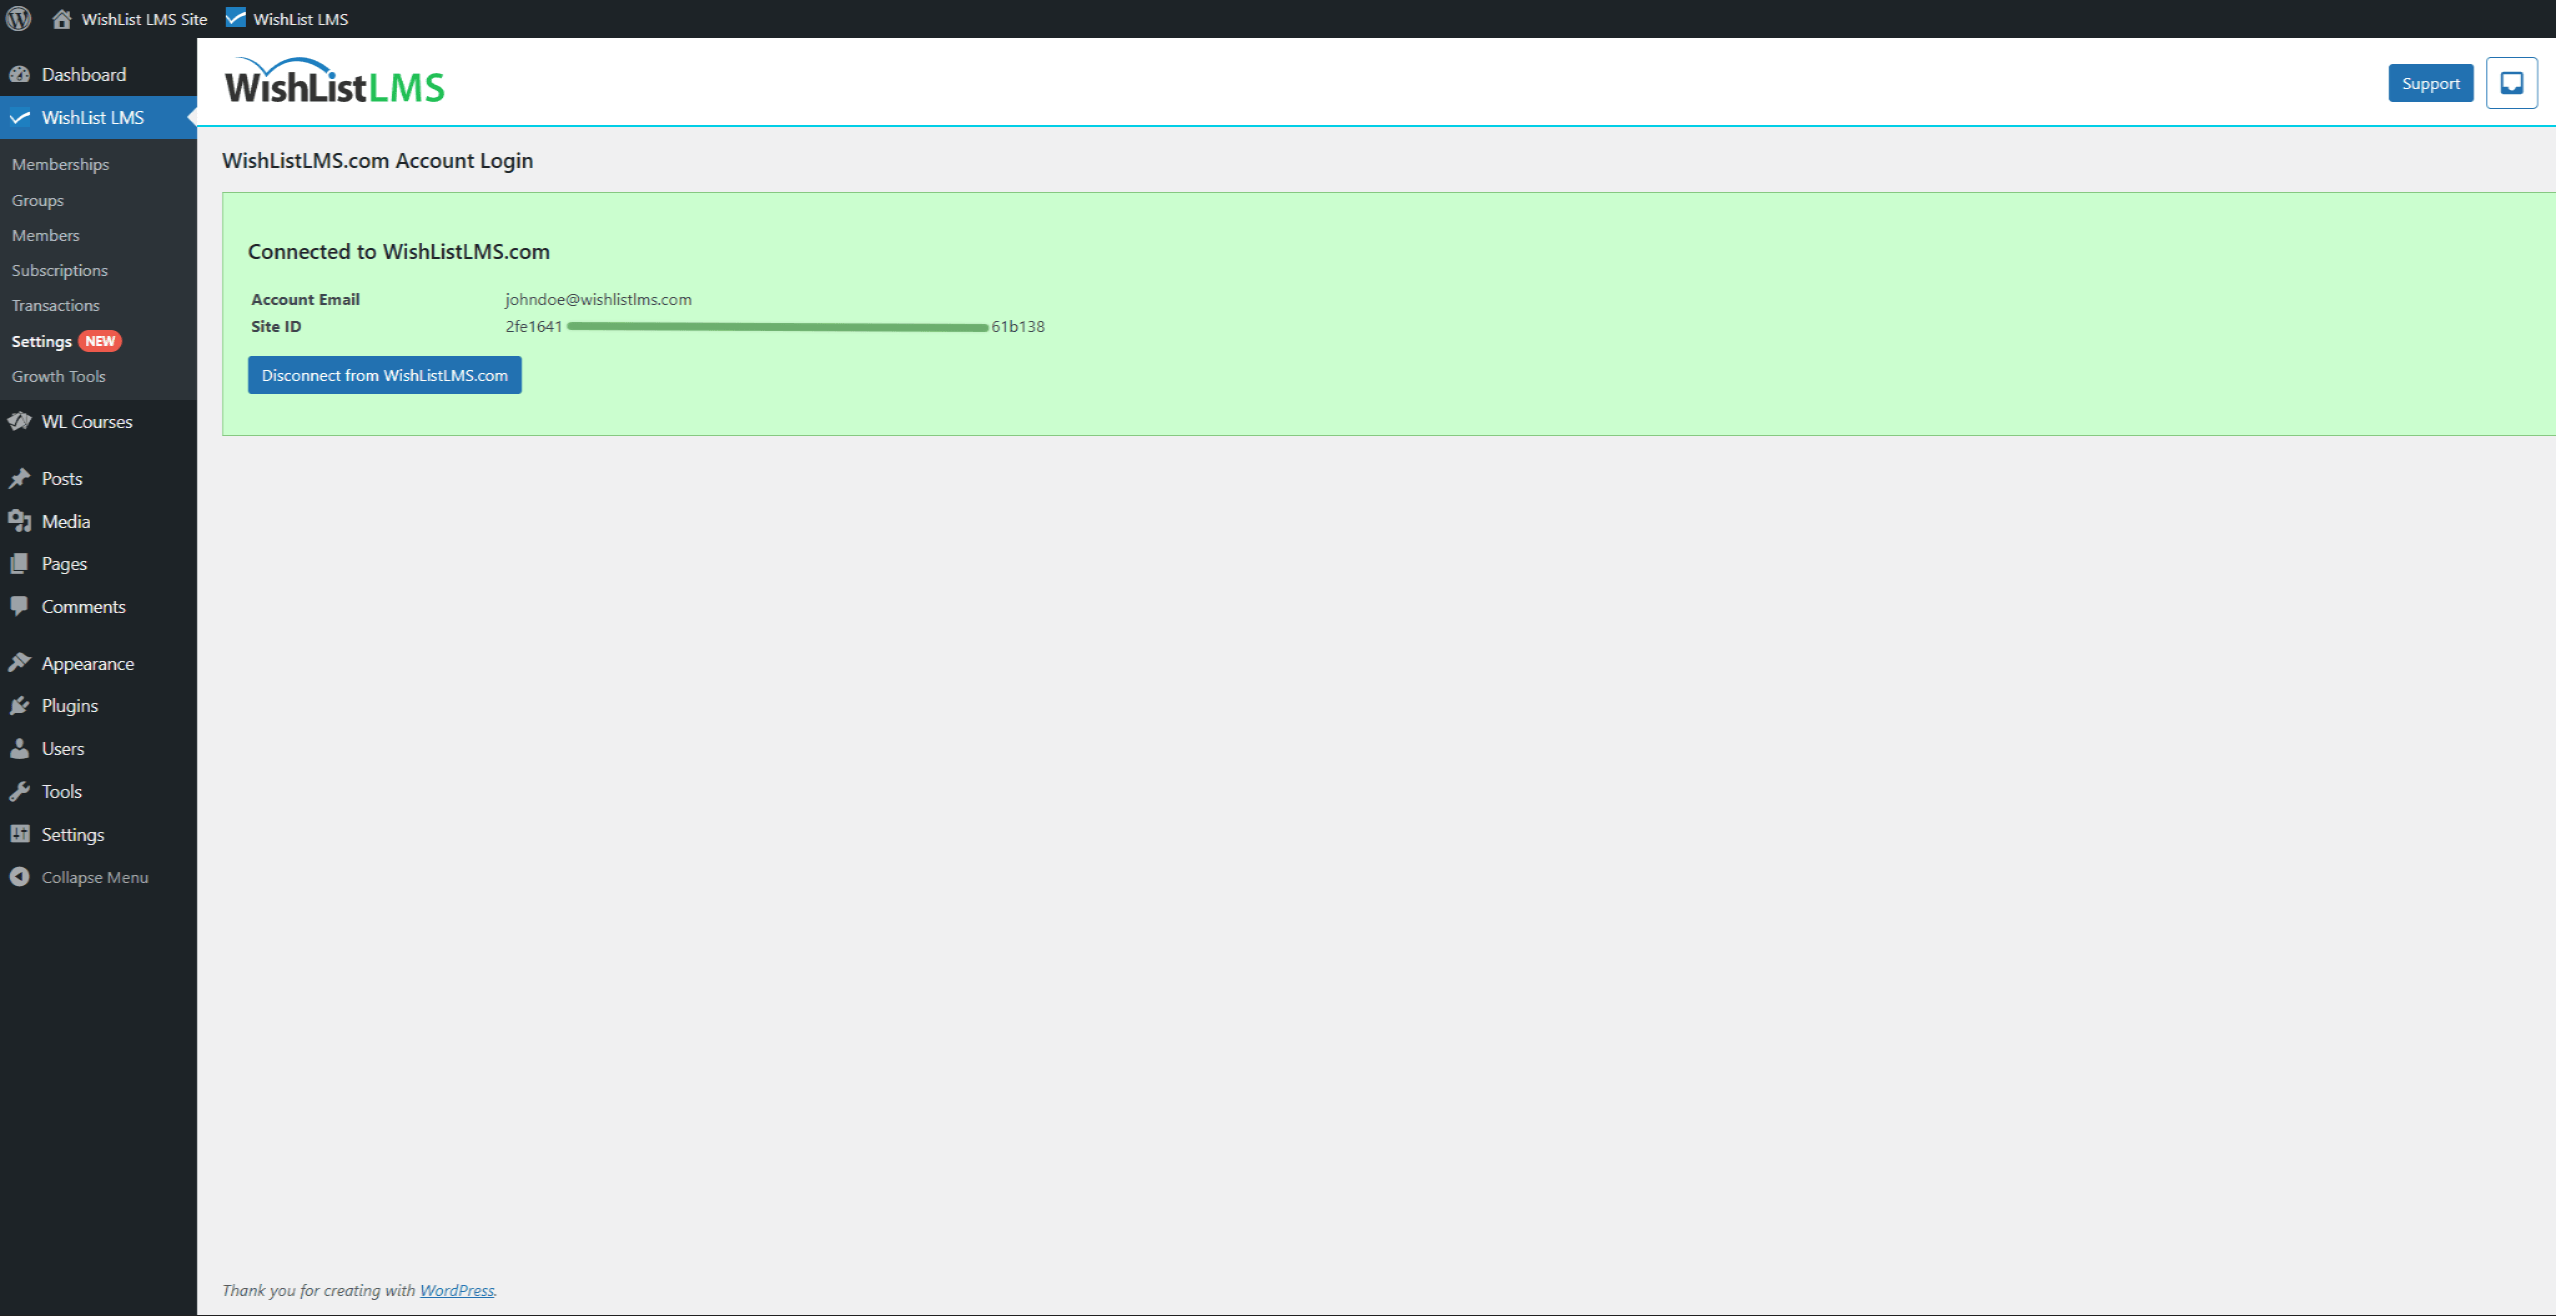
- Finally, you’ll be automatically returned to the previous page in your website Dashboard. If the connection was successful, you will see a green banner and the status “Connected to WishList LMS.com”.
Connecting Stripe
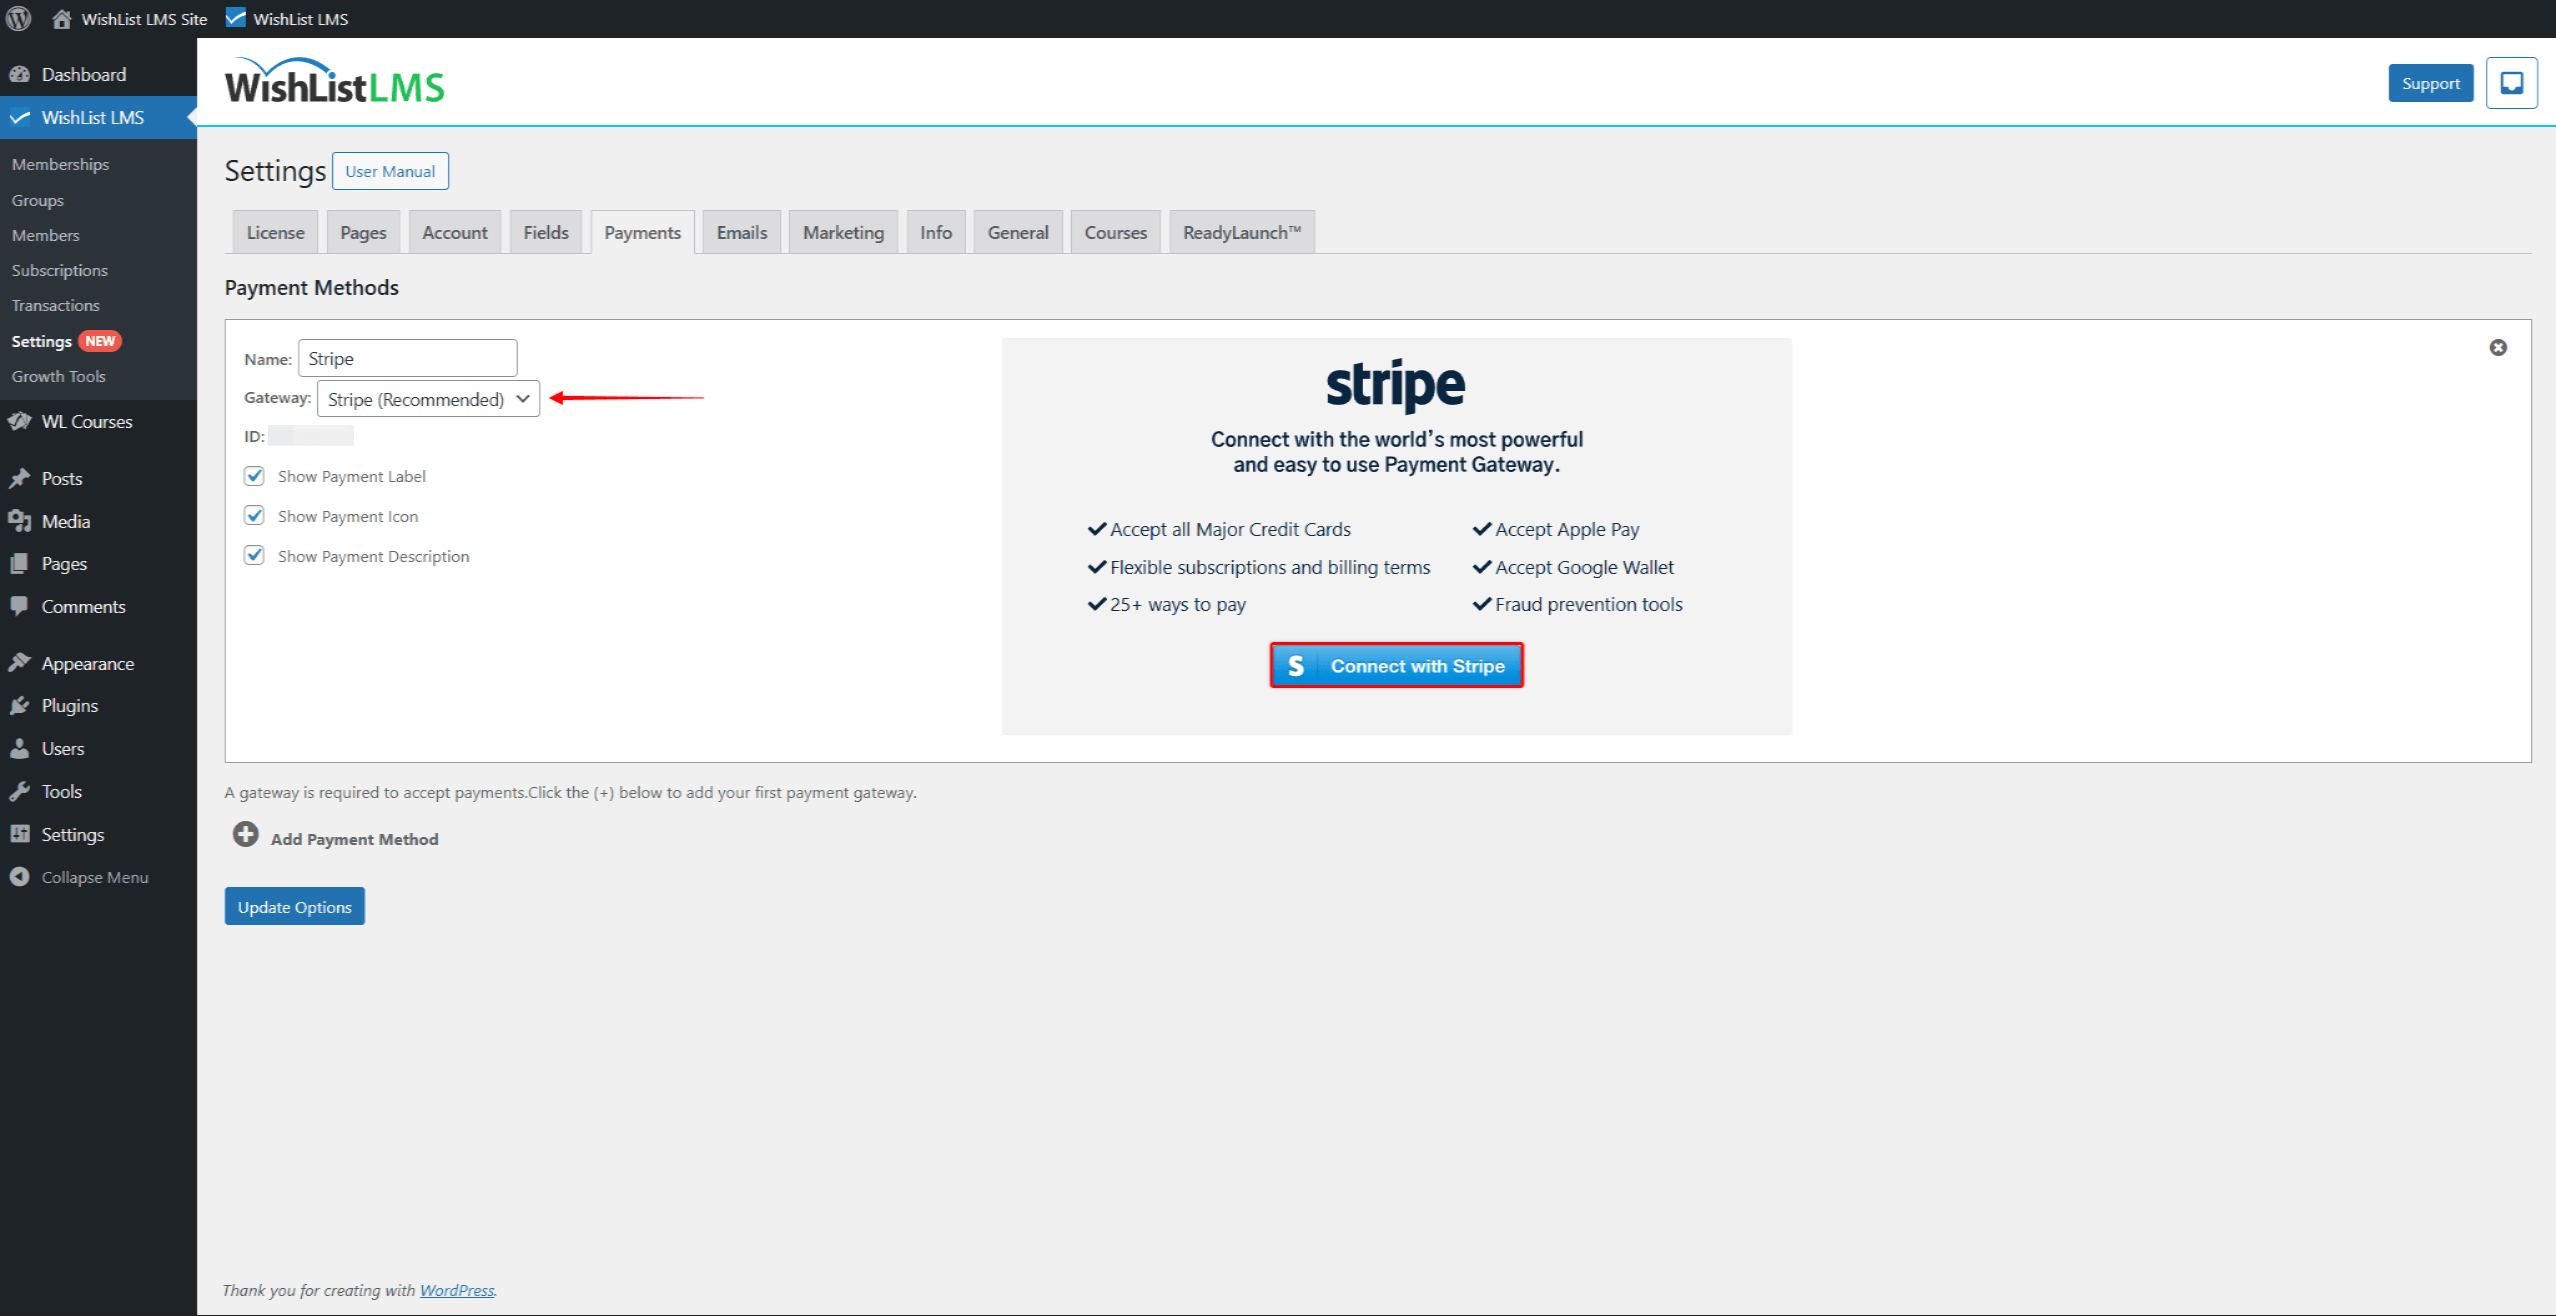
- Add and configure a new payment method under the Payments tab in the WishList LMS settings.
- Under the Gateway dropdown, select Stripe as the gateway type.
- On the right side of the payment gateway, click the Connect with Stripe button.
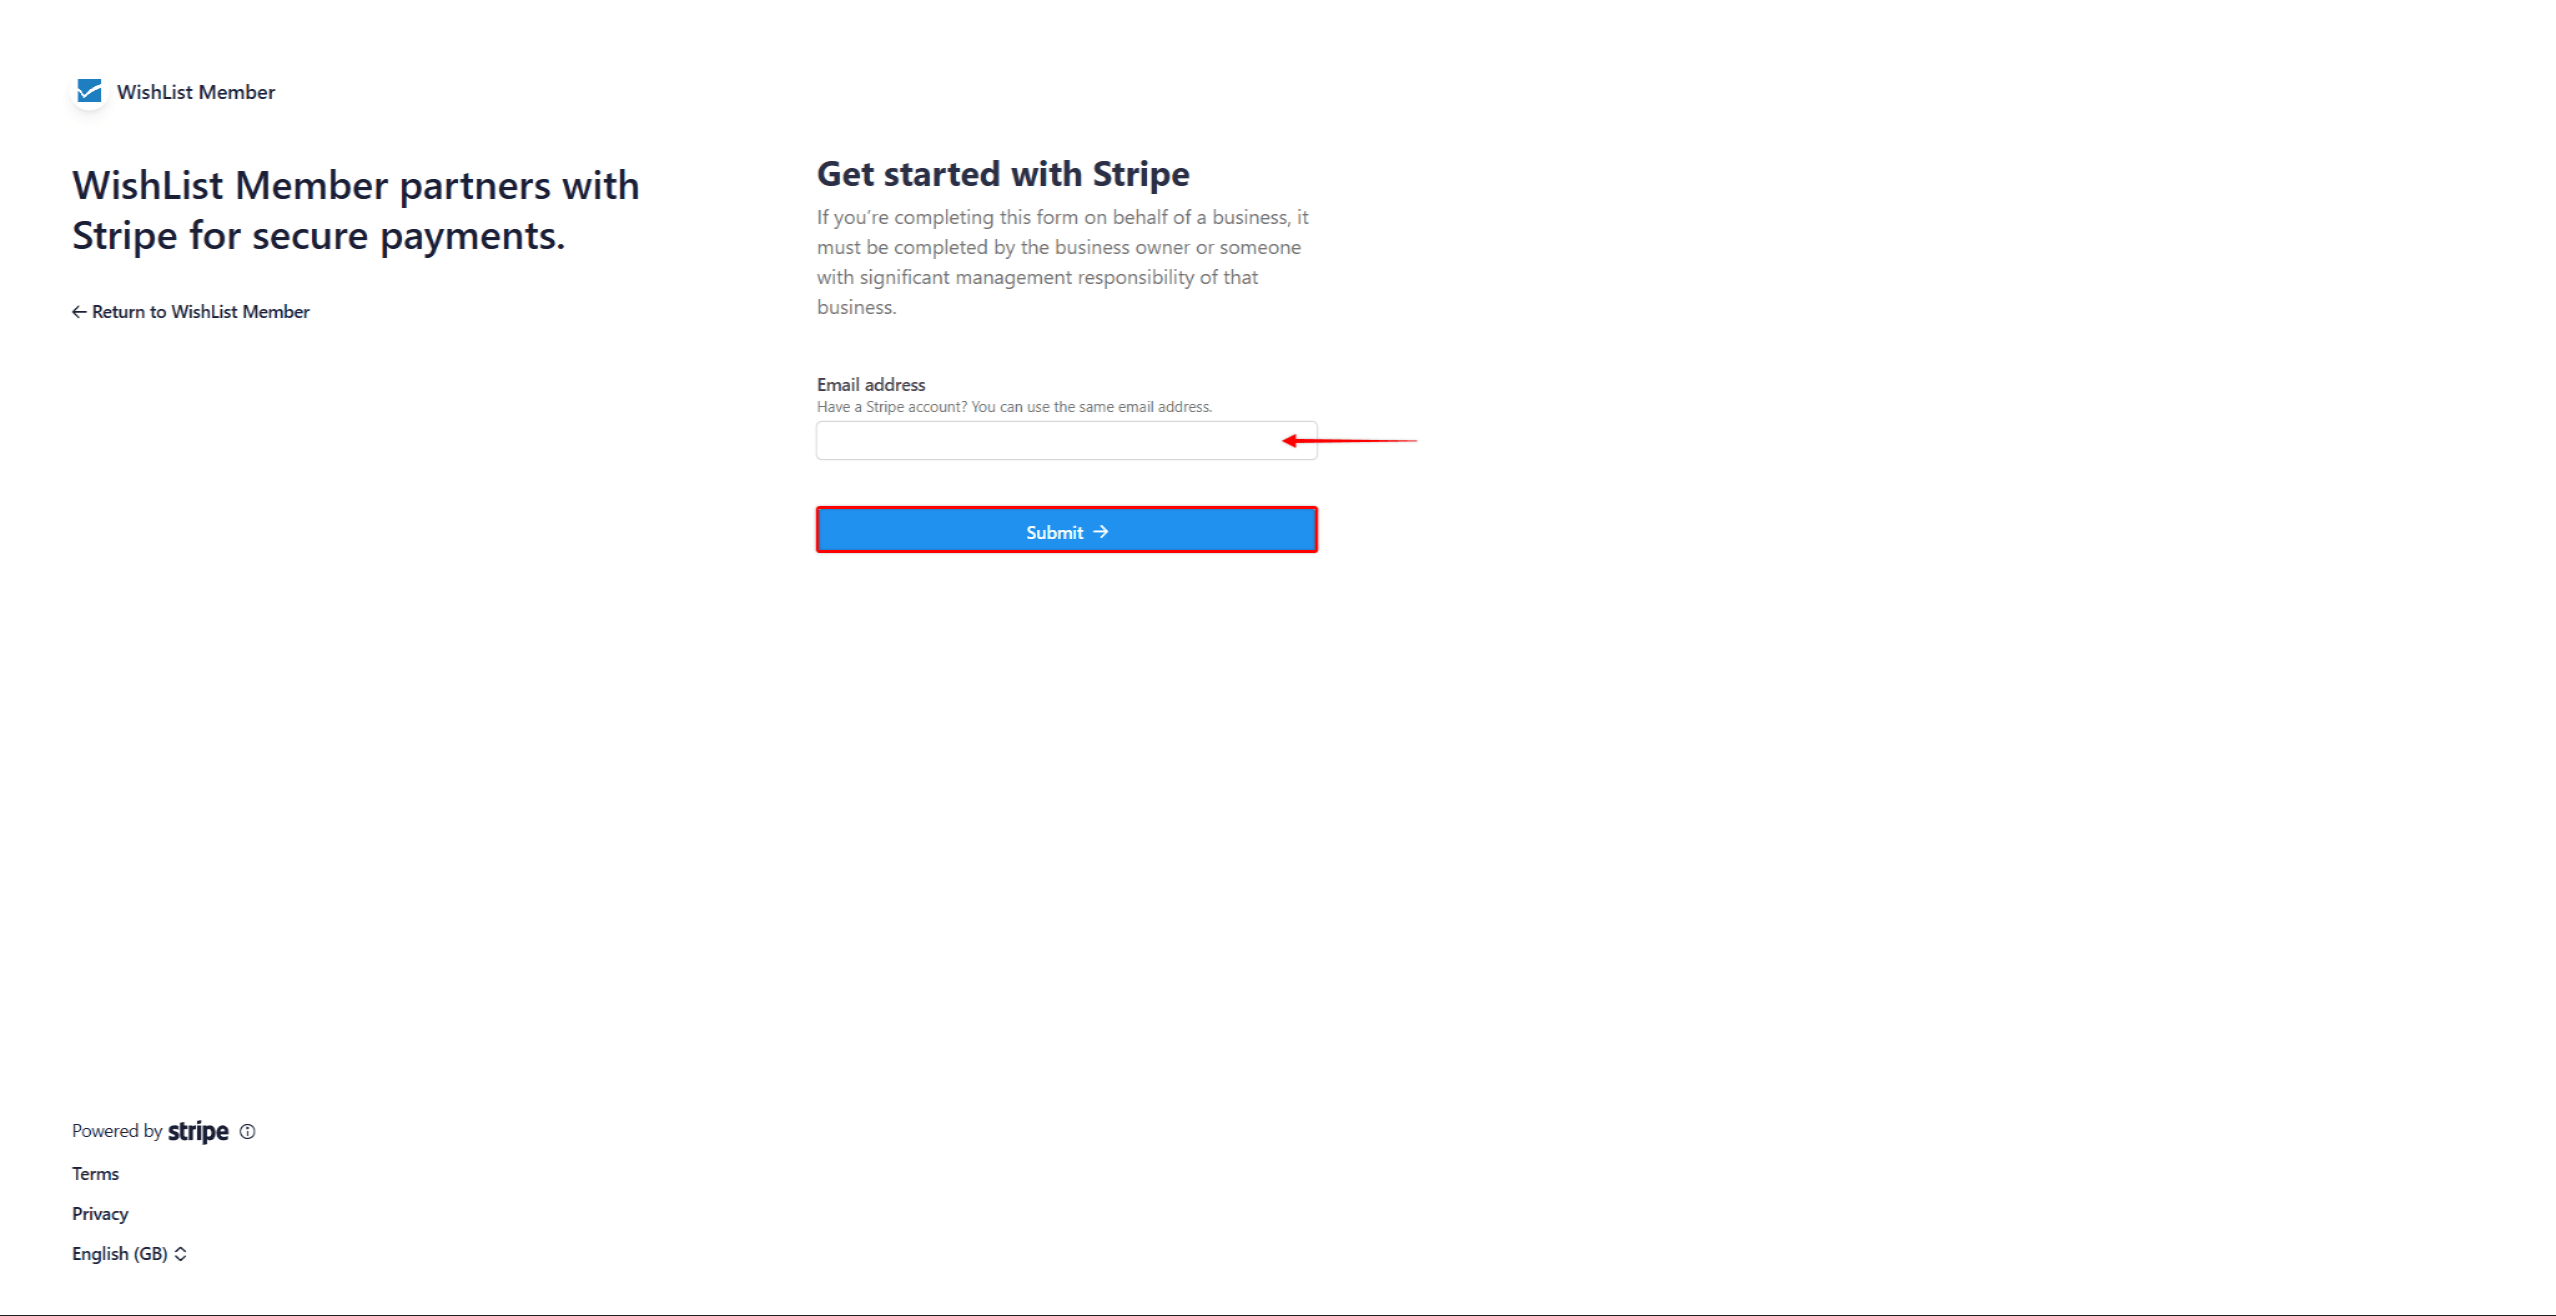
- Next, you’ll be transferred to log in to your Stripe account.
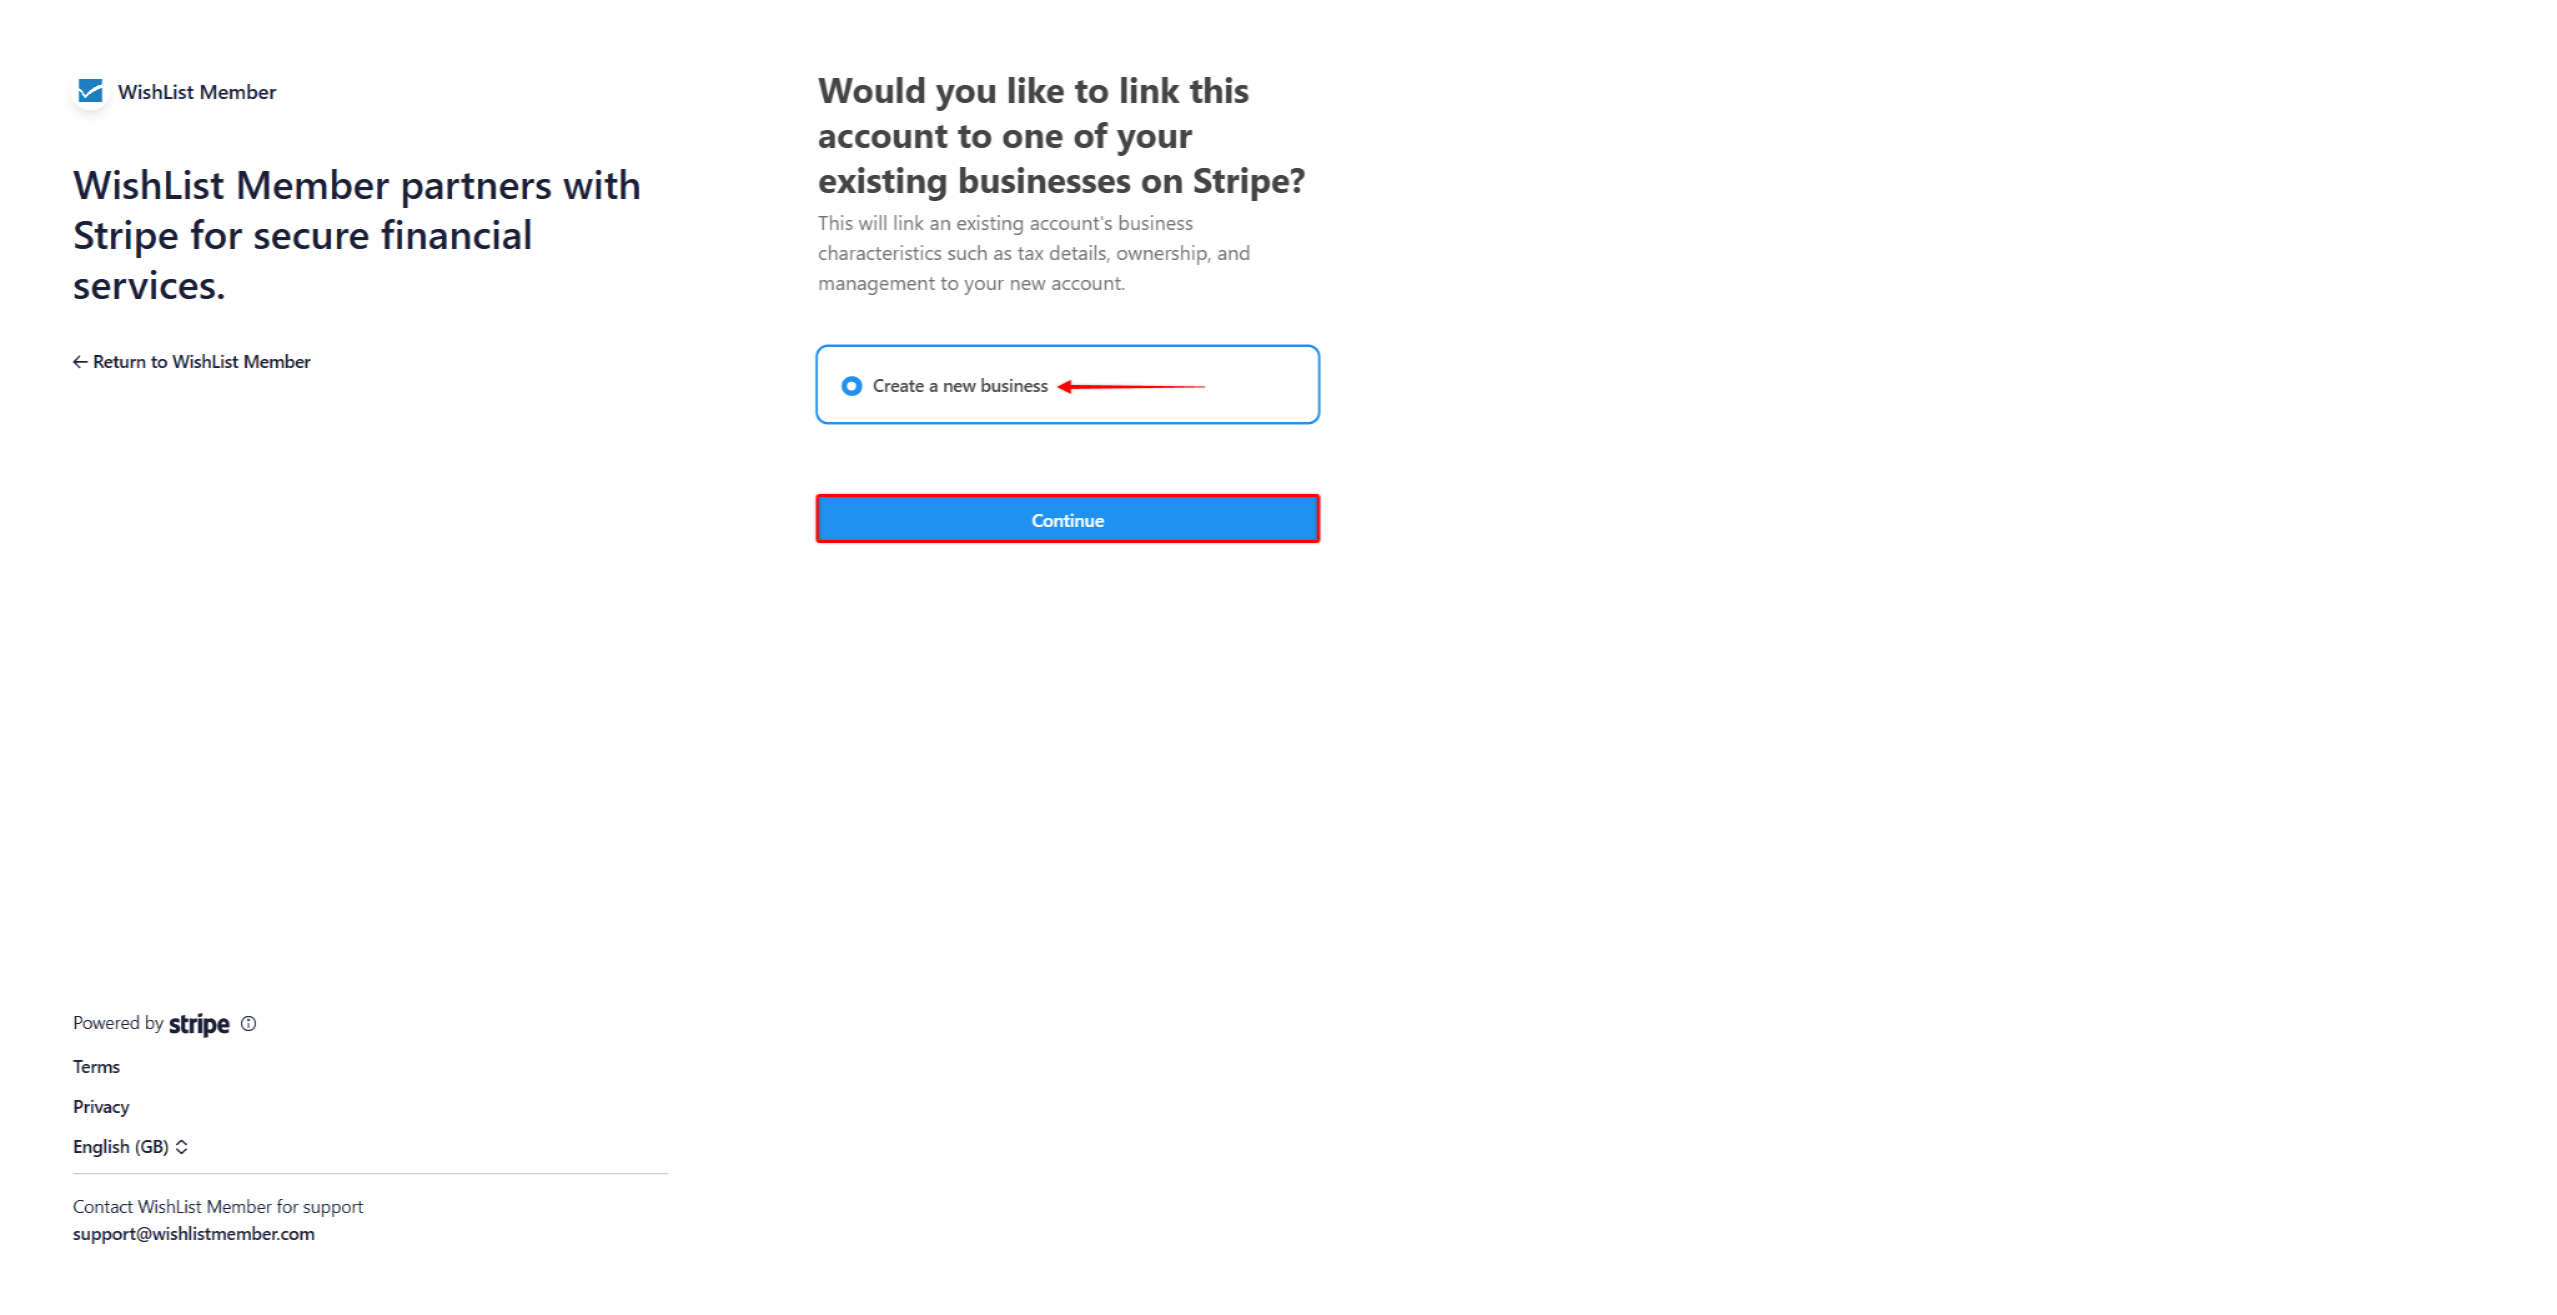
- Choose the business within your Stripe account that you wish to connect with WishList LMS. If you don’t already have a business in your Stripe account, you can create a new one.
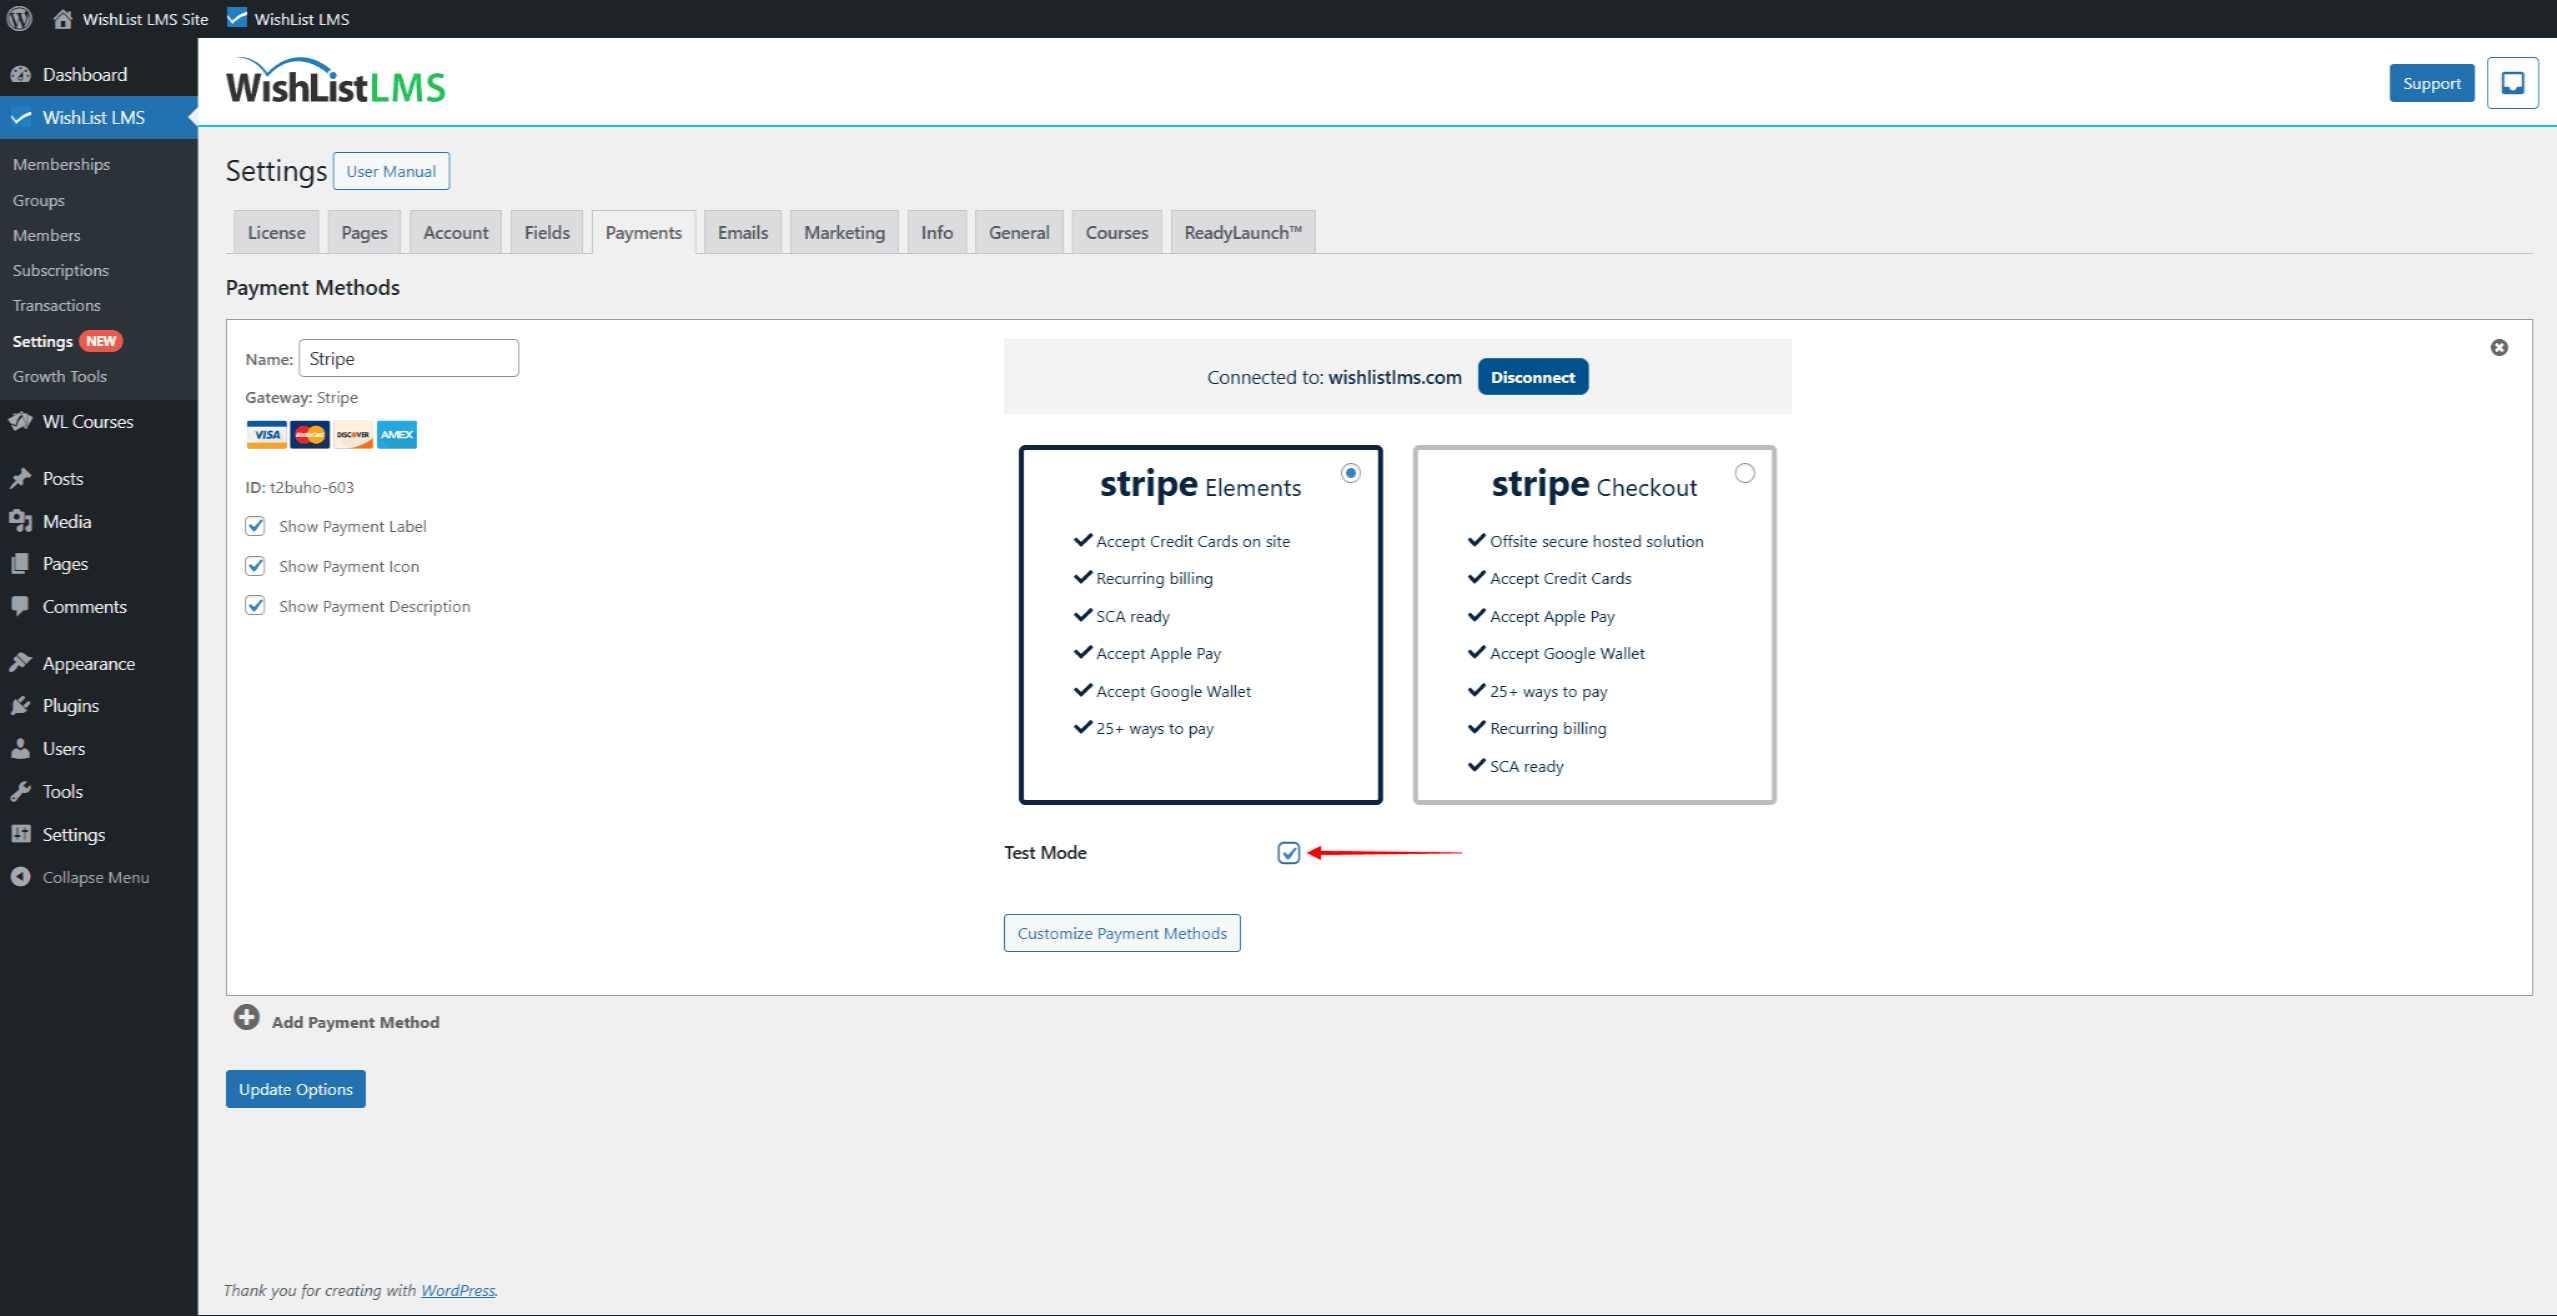
- Once Stripe is connected, you will be returned to settings automatically. You will see the notice confirming Stripe is connected to your website.

- In addition, you can choose the method Stripe will use to collect the payment details of your users. Here, you can choose the embedded Stripe Elements form or the Stripe Checkout page.
Stripe Capabilities
WishList LMS uses several Stripe capabilities that activate automatically when you connect your Stripe account. These include card payments, recurring subscriptions, and webhook delivery for transaction synchronization.
Verify that the connected Stripe business has all required capabilities active. Disabled capabilities prevent specific payment methods or subscription features from working on your site.
Stripe Tax
Stripe Tax automatically calculates and collects sales tax, VAT, or GST on transactions processed through your connected Stripe account. Configure tax behavior directly in your Stripe Dashboard under the Tax settings.
WishList LMS passes the required customer details to Stripe so the correct tax rates apply during checkout. Tax amounts appear on the Stripe receipts and the WishList LMS transaction records.
Custom Domain for Stripe Checkout
Stripe Checkout supports a custom domain that displays your branded URL on the hosted payment page. Configure the domain inside your Stripe Dashboard under Settings > Branding before linking it to checkout sessions.
Using Stripe on Staging Sites
Connect a separate Stripe sandbox account for staging environments. Migrating a live Stripe connection from a production site to a staging clone breaks webhooks and may cause duplicate subscription processing.
Troubleshooting the Stripe Gateway
Common Stripe gateway issues include failed webhook delivery, missing transactions, and connection errors. Most issues resolve by reconnecting the Stripe account or verifying the webhook endpoint in your Stripe Dashboard.
- Confirm the Stripe account remains connected under the Payments tab.
- Check the Webhooks section in your Stripe Dashboard for failed events.
- Verify the SSL certificate on your domain is valid and active.
- Reconnect the Stripe gateway if transactions stop synchronizing.
Stripe Configuration Options
Payment mode selection determines whether you’re processing real (live) or test transactions.
Start with test mode to verify the proper configuration before switching to live payments. Switch to live mode only after thorough testing.
Test mode allows unlimited testing without real charges. Use Stripe’s test card numbers to simulate various scenarios. This includes successful payments, declines, and insufficient funds.
Furthermore, WishList LMS and Stripe communicate through a webhook. It enables the real-time payment status updates. The webhook is configured automatically when connecting to Stripe.
Also, next to the default payment card method, you can enable additional payment methods for WishList LMS through Stripe.

Testing Stripe Payments
Comprehensive testing prevents payment issues after launch. Test various scenarios to ensure the Stripe connection works and payments and refunds are processed correctly.
To enable Stripe testing, follow these steps:
- Navigate to Dashboard > WishList LMS > Settings > Payments tab.
- Scroll down to your Stripe gateway, and enable the Test Mode option.
- Next, navigate to your Stripe account and click on your account switcher dropdown menu. If you have multiple accounts, select the account you connected with WishList LMS.
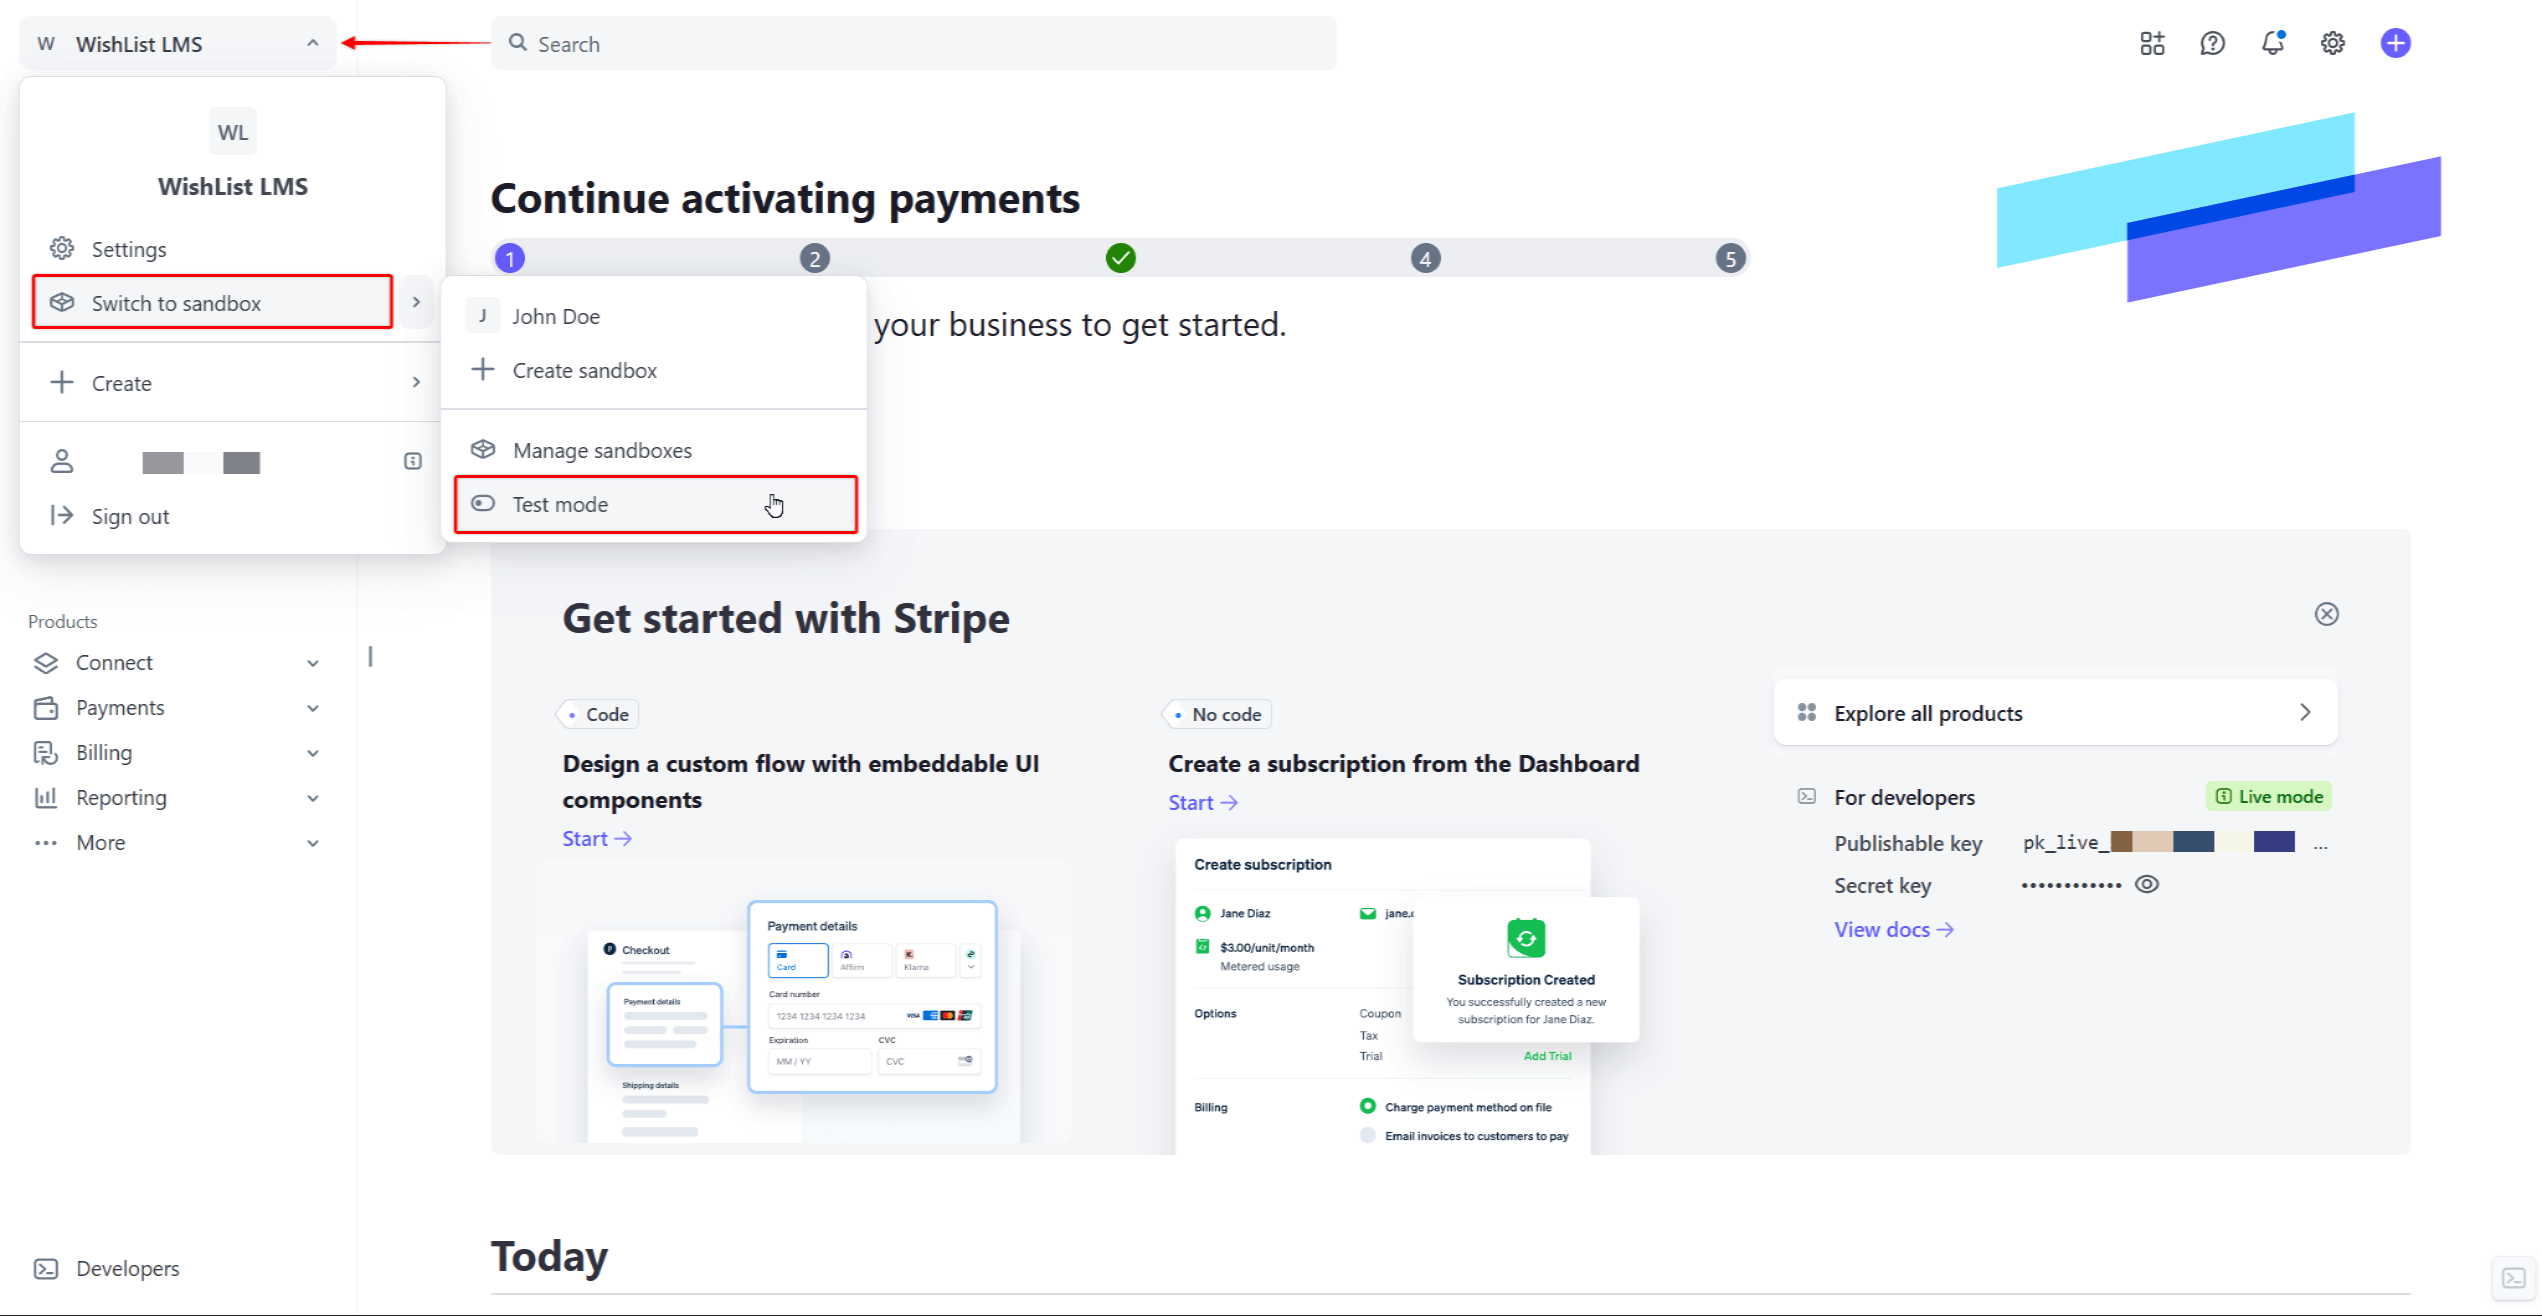
- Finally, click Switch to sandbox, and then on the Test mode option.
How To Test Stripe?
Now, you can start testing Stripe by submitting test registrations for your memberships:
- Access your website as a visitor.
- Navigate to any membership registration page on your site.
- Fill in the test user data. You can use any dummy data for testing purposes.
- Choose Stripe as the payment method.
- Add the Stripe test card data to the payment form fields, and submit the registration.
- Following the registration, verify that the test payment was processed correctly both in WishList LMS and Stripe.
You can test different scenarios using these common Stripe test card numbers:
- Successful payment: 4242 4242 4242 4242
- Declined payment: 4000 0000 0000 0002
- Declined due to insufficient funds: 4000 0000 0000 9995
- Expired card: 4000 0000 0000 0069
The following testing checklist includes the scenarios you should test before switching your Stripe gateway to live mode:
- Successful one-time payment
- Successful recurring subscription
- Failed payment handling
- Subscription renewal process
- Cancellation workflow
- Refund processing
Once your tests were successful, you can switch WishList LMS and your Stripe account to live payments:
- Disable Test Mode for the Stripe gateway at Dashboard > WishList LMS > Settings > Payments tab. This will switch Stripe to live payments on your website;
- In your Stripe account, navigate again to Account > Switch to sandbox > Test mode. This will switch your Stripe account to live mode.
Following these steps, any registration submitted on your website will be a real charge, and Stripe will collect funds.