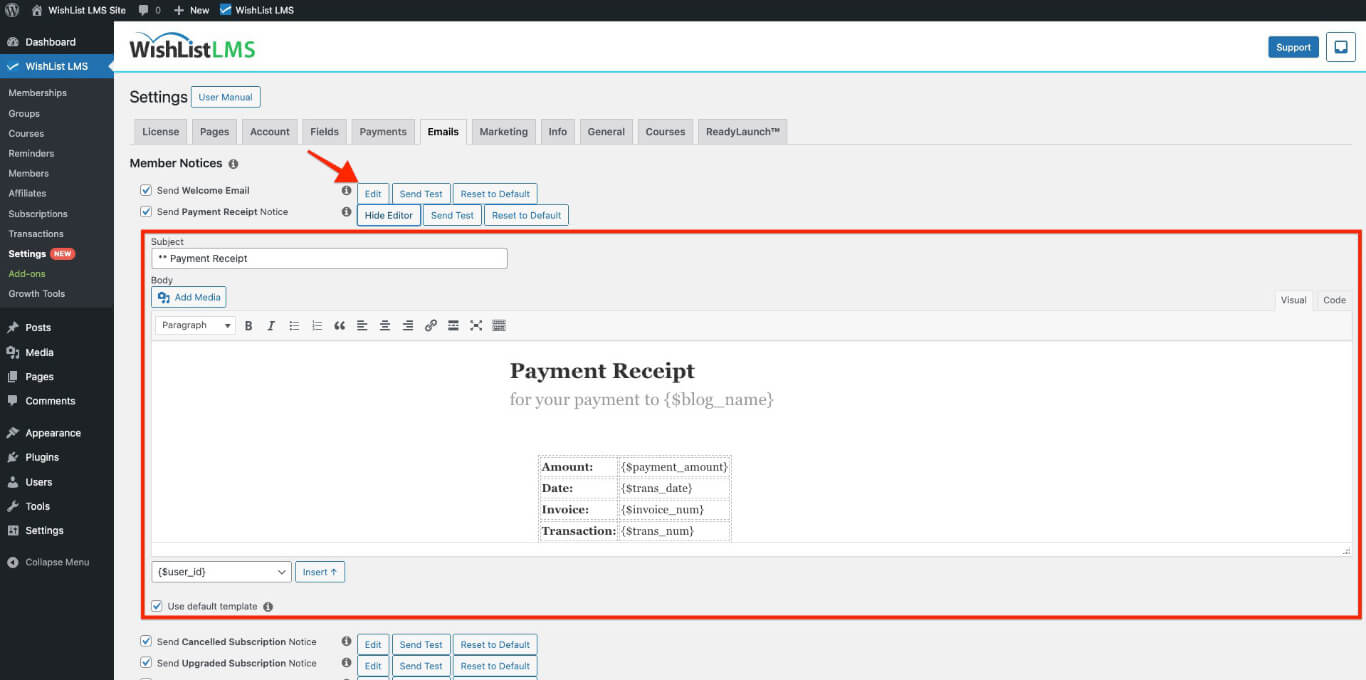
Customizing the Content of WishList LMS Emails
You can customize any WishList LMS email template content from the Emails tab.
To customize any email template, follow these steps:
- Click the Edit button next to each email.
- Update the Subject and Body fields in the template editor.
- Add or remove email parameters as needed.
- Save the template changes.
WishList LMS allows you to customize email styles. Therefore, you can easily change how emails look. This feature gives you complete control over email appearance. Additionally, you can adjust branding to match your needs.
The Emails tab includes options to control the global email font, font size, and base text color. For deeper customization, copy the email template files from /wp-content/plugins/wishlist-lms/app/emails/ into /wp-content/themes/your-theme/wishlist-lms/emails/ and edit the overrides in your theme.
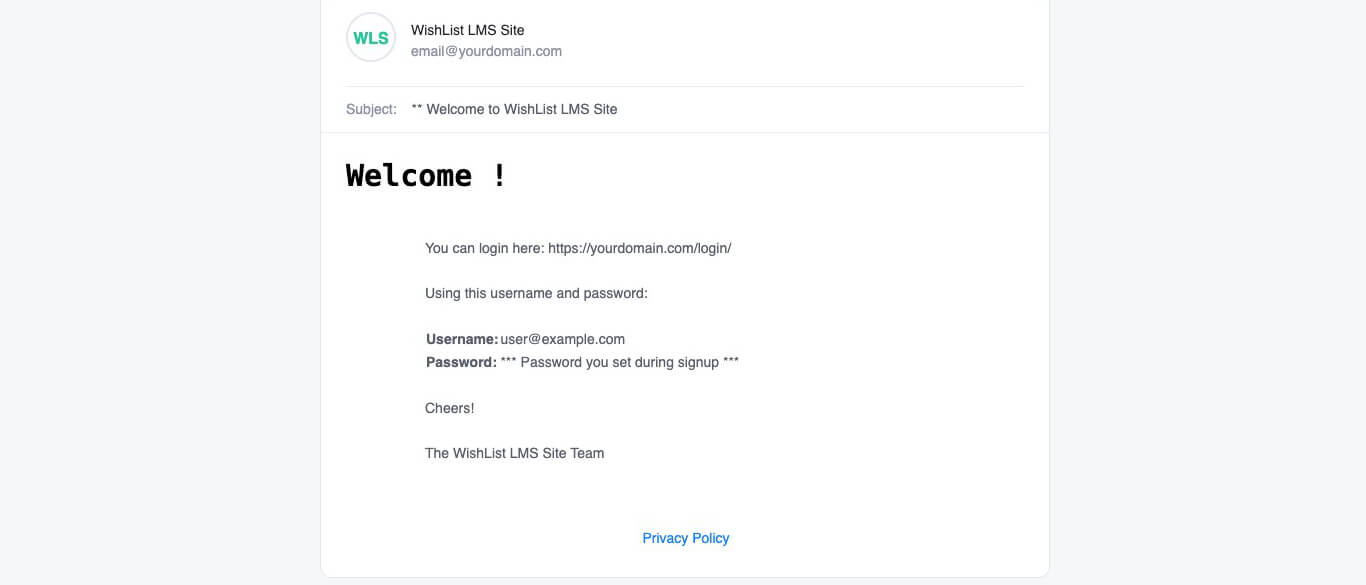
Understanding the Parameters for WishList LMS Emails
WishList LMS uses parameters to include member-specific details in emails. When emails are sent, these parameters change to real user data.
These are some standard email parameters:
{$user_first_name}: Member’s first name;{$user_last_name}: Member’s last name;{$username}: Member’s username;{$user_email}: Member’s email address;{$blog_name}: WordPress site name;{$product_name}: Purchased membership name;{$transaction_total}: Payment amount;{$login_page}: Link to login page.
For example, the email template might be like this:
Hi {$user_first_name}, Welcome to the {$blog_name} membership area. Your {$product_name} subscription is now active.
Actual email sent to member “John”:
Here, the email delivered to the user whose name is John will look like this:
Hi John, Welcome to the Example Site membership area. Your Premium Membership subscription is now active.
Adding Custom Fields to WishList LMS Emails
You can include custom field data in emails using the {$usermeta:slug} format. Replace “slug” with the actual field slug.
You can find the custom field slugs following these steps:
- Navigate to Dashboard > WishList LMS > Settings > Fields tab.
- Locate the custom field.
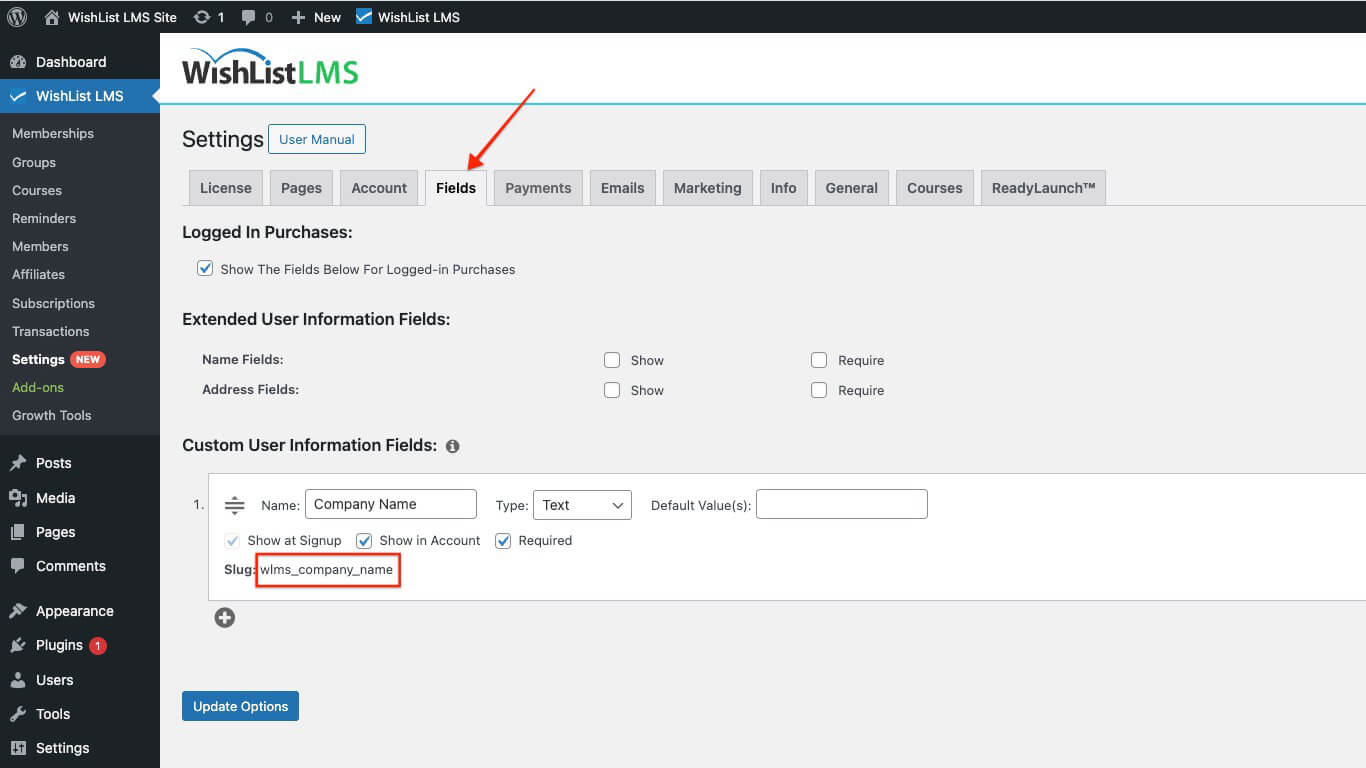
- Note the field slug for parameter usage.
For a custom field with slug “wlms_office_phone“, use:
{$usermeta:wlms_office_phone}
Custom Field Slug Management
Create shorter, more manageable slugs:
- Create a new field with an abbreviated slug.
- Click Update to save the field.
- Edit the field name to display the full title.
- The slug remains abbreviated while the display name shows fully.
Third-Party Email Service Integration
WishList LMS can connect with various email services, such as SendGrid, Mandrill, MailGun, and Amazon SES. Consequently, these services help improve email deliverability and, in addition, offer advanced features for sending emails.
Customizing the Content of WishList LMS Emails
You can customize any WishList LMS email template content from the Emails tab.
To customize any email template, follow these steps:
- Click the Edit button next to each email.
- Update the Subject and Body fields in the template editor.
- Add or remove email parameters as needed.
- Save the template changes.
WishList LMS allows you to customize email styles. Therefore, you can easily change how emails look. This feature gives you complete control over email appearance. Additionally, you can adjust branding to match your needs.
The Emails tab includes options to control the global email font, font size, and base text color. For deeper customization, copy the email template files from /wp-content/plugins/wishlist-lms/app/emails/ into /wp-content/themes/your-theme/wishlist-lms/emails/ and edit the overrides in your theme.
Understanding the Parameters for WishList LMS Emails
WishList LMS uses parameters to include member-specific details in emails. When emails are sent, these parameters change to real user data.
These are some standard email parameters:
{$user_first_name}: Member’s first name;{$user_last_name}: Member’s last name;{$username}: Member’s username;{$user_email}: Member’s email address;{$blog_name}: WordPress site name;{$product_name}: Purchased membership name;{$transaction_total}: Payment amount;{$login_page}: Link to login page.
For example, the email template might be like this:
Hi {$user_first_name}, Welcome to the {$blog_name} membership area. Your {$product_name} subscription is now active.
Actual email sent to member “John”:
Here, the email delivered to the user whose name is John will look like this:
Hi John, Welcome to the Example Site membership area. Your Premium Membership subscription is now active.
Adding Custom Fields to WishList LMS Emails
You can include custom field data in emails using the {$usermeta:slug} format. Replace “slug” with the actual field slug.
You can find the custom field slugs following these steps:
- Navigate to Dashboard > WishList LMS > Settings > Fields tab.
- Locate the custom field.
- Note the field slug for parameter usage.
For a custom field with slug “wlms_office_phone“, use:
{$usermeta:wlms_office_phone}
Custom Field Slug Management
Create shorter, more manageable slugs:
- Create a new field with an abbreviated slug.
- Click Update to save the field.
- Edit the field name to display the full title.
- The slug remains abbreviated while the display name shows fully.
- Payment Receipt Notice: This notice is sent to users to confirm that their payment is complete;
- Cancelled Subscription Notice: This tells users when their subscriptions are ending;
- Upgraded Subscription Notice: This notifies users when their membership has been upgraded;
- Downgraded Subscription Notice: This notifies users when their membership has been downgraded;
- Paused Subscription Notice: This notifies users when their subscription is paused;
- Resumed Subscription Notice: This notice confirms when the user’s subscription has resumed.;
- Refunded Transaction Notice: This notice informs users about their refunded payments;
- Failed Transaction Notice: This alert notifies users when their transaction fails;
- Credit Card Expiring Notice: This notice warns users when their credit card is expiring.
Each notification can be enabled or disabled based on your communication preferences.
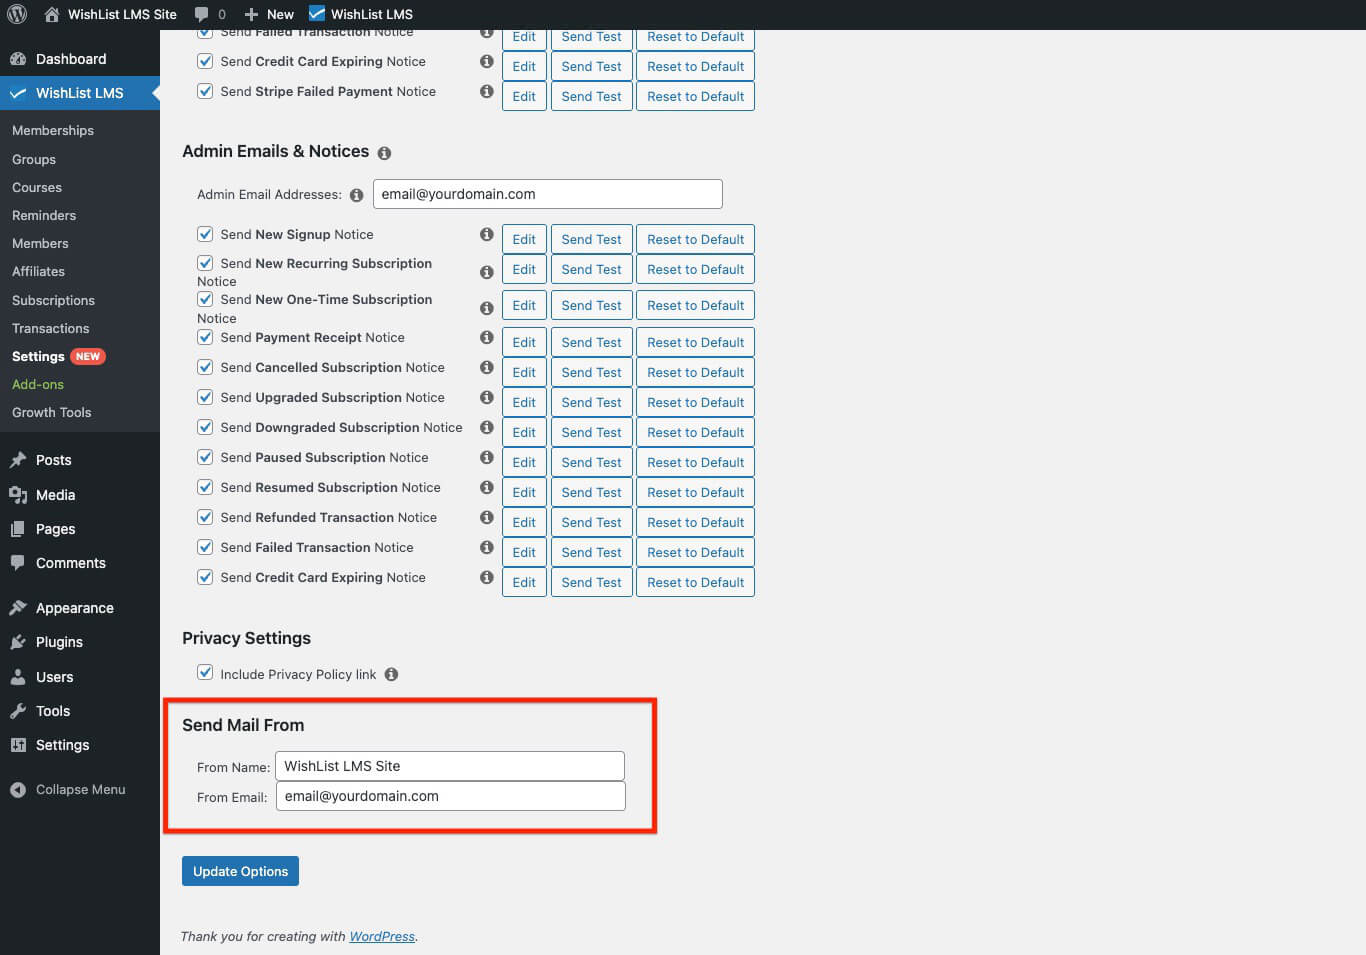
Admin Emails and Notices
Admin notifications, therefore, inform admins about member activities and site events. Consequently, they help keep track of membership operations effectively.

To configure the Admin Email Addresses:
- On the Emails tab, scroll down to the Admin Emails & Notices section
- Locate the Admin Email Addresses field.
- Enter email addresses separated by commas for multiple recipients.
- The default admin email comes from Dashboard > Settings > General.
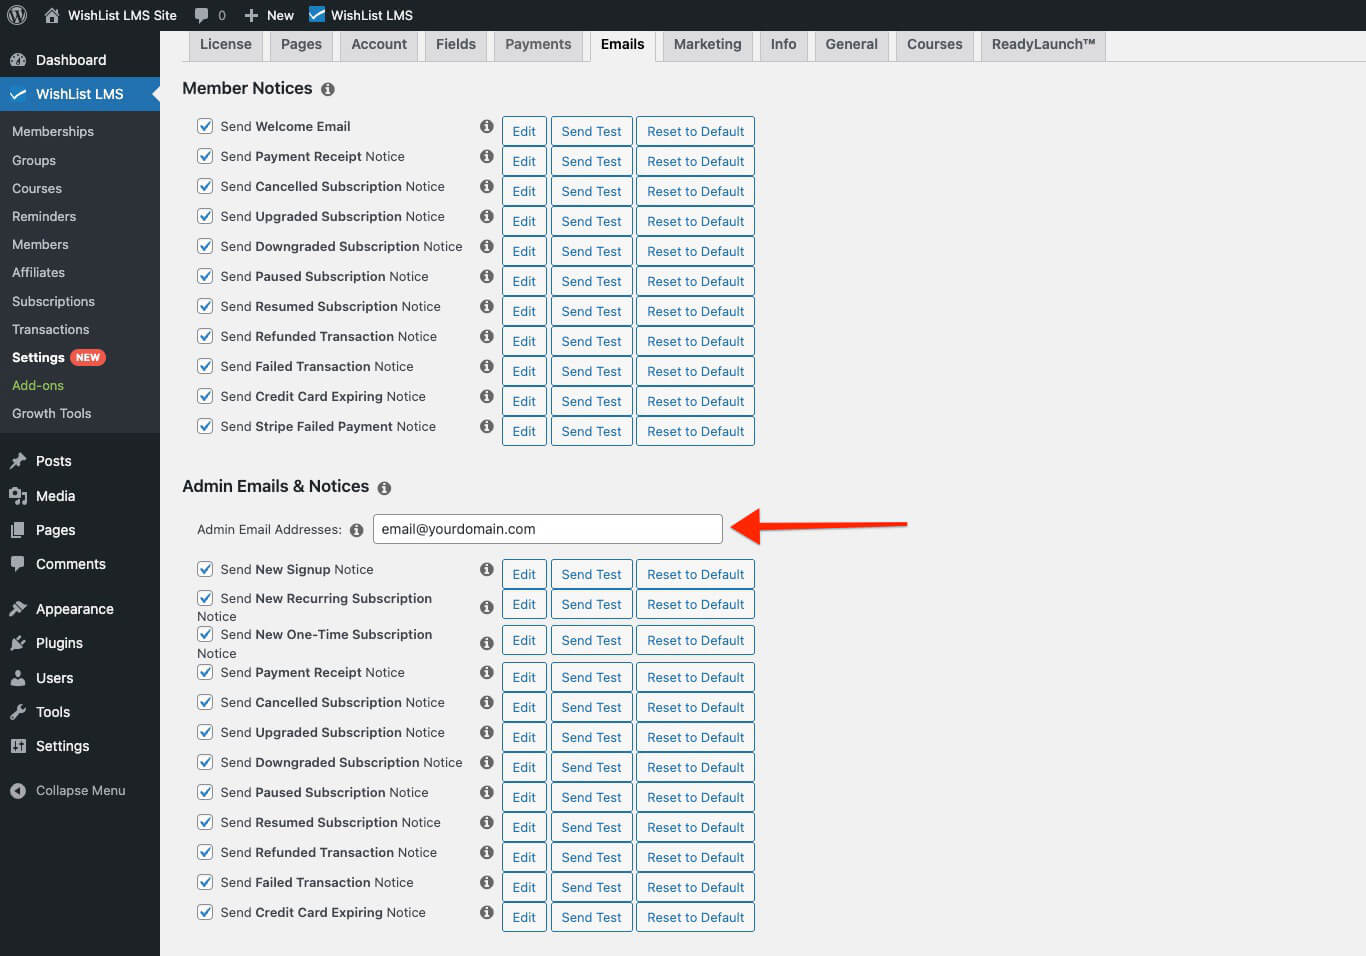
Available Admin Notifications
Enable these admin notifications as needed:
- New–Signup Notice: This notice informs you when a new member registers;
- New One-Time Subscription Notice: This notice informs you when a user subscribes to a non-recurring membership;
- New Recurring Subscription Notice: This notice informs you when a user subscribes to a recurring membership;
- Payment Receipt Notice: This notice informs you when a payment is received;
- Cancelled Subscription Notice: This notice informs you when a user’s subscriptions have been cancelled.;
- Upgraded Subscription Notice: This notice informs you when a user membership upgrades;
- Downgraded Subscription Notice: This notice informs you when a user’s membership downgrades;
- Paused Subscription Notice: This notice alerts you when a member has paused subscriptions;
- Resumed Subscription Notice: This notifies you when a member has resumed subscriptions;
- Refunded Transaction Notice: This notice confirms when a member’s payments have been refunded;
- Failed Transaction Notice: This notice informs you when a member’s payment fails.;
- Credit Card Expiring Notice: This notice informs you when a user’s credit card is expiring.
Privacy Settings
By checking this option, you can include a link; consequently, this link will direct users to your site’s Privacy Policy page. Moreover, it will appear in all WishList LMS emails.
- Include Privacy Policy link.
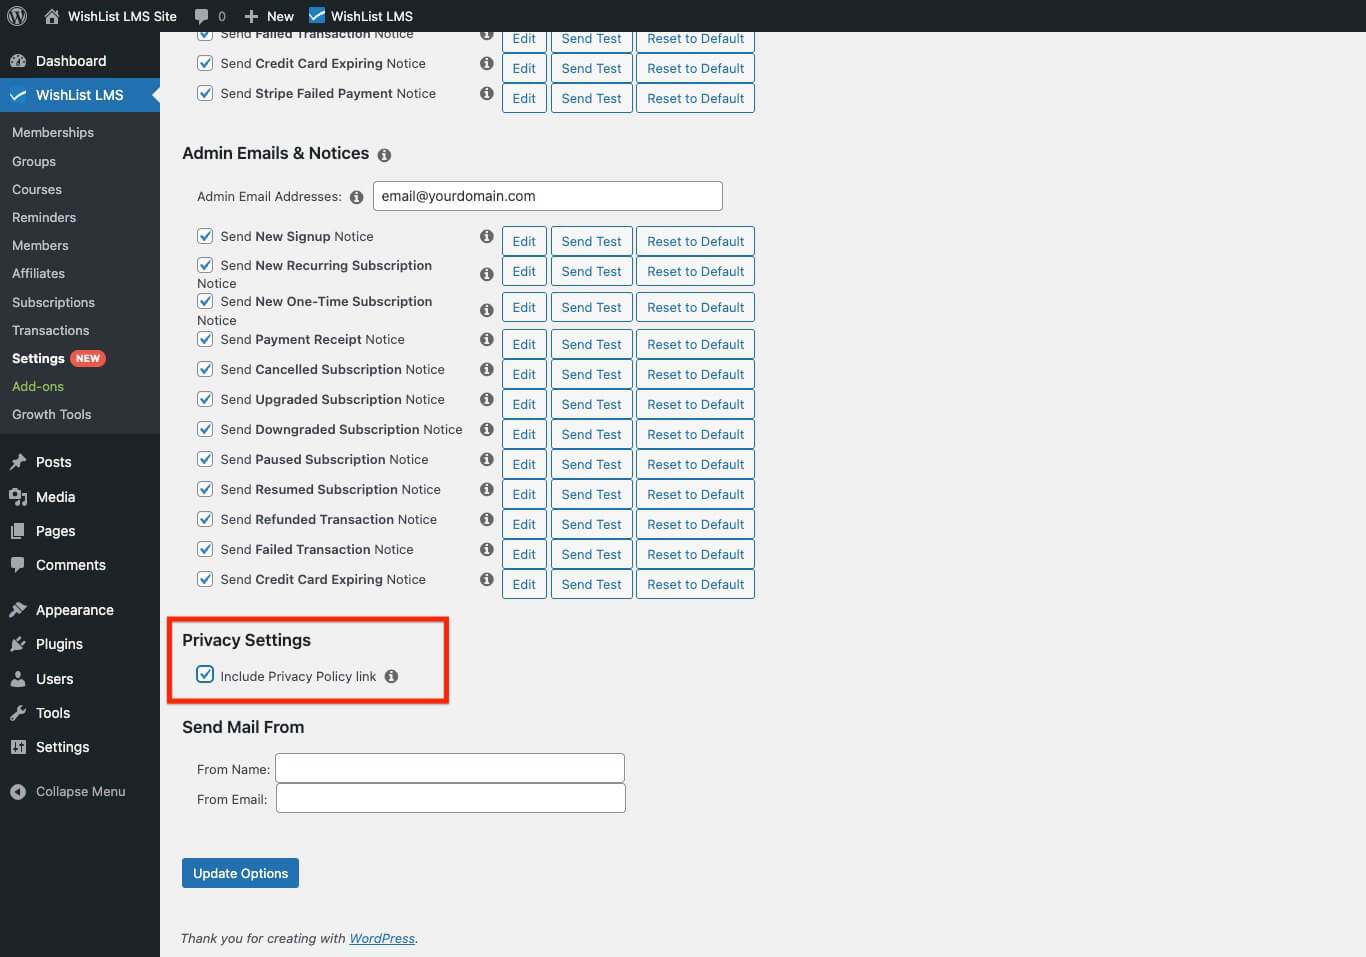
Send Mail From
WishList LMS sends emails from a specific sender. First, you can set the sender’s name. Additionally, you can choose the sender’s email address. This way, all outgoing emails have consistent contact information.
To configure the sender’s information, follow these steps:
- On the Emails tab, scroll to the bottom of the page to locate the From Name field.
- Enter the name that appears as the email sender.
- Add your preferred email address in the From Email field.
Third-Party Email Service Integration
WishList LMS can connect with various email services, such as SendGrid, Mandrill, MailGun, and Amazon SES. Consequently, these services help improve email deliverability and, in addition, offer advanced features for sending emails.
Customizing the Content of WishList LMS Emails
You can customize any WishList LMS email template content from the Emails tab.
To customize any email template, follow these steps:
- Click the Edit button next to each email.
- Update the Subject and Body fields in the template editor.
- Add or remove email parameters as needed.
- Save the template changes.
WishList LMS allows you to customize email styles. Therefore, you can easily change how emails look. This feature gives you complete control over email appearance. Additionally, you can adjust branding to match your needs.
The Emails tab includes options to control the global email font, font size, and base text color. For deeper customization, copy the email template files from /wp-content/plugins/wishlist-lms/app/emails/ into /wp-content/themes/your-theme/wishlist-lms/emails/ and edit the overrides in your theme.
Understanding the Parameters for WishList LMS Emails
WishList LMS uses parameters to include member-specific details in emails. When emails are sent, these parameters change to real user data.
These are some standard email parameters:
{$user_first_name}: Member’s first name;{$user_last_name}: Member’s last name;{$username}: Member’s username;{$user_email}: Member’s email address;{$blog_name}: WordPress site name;{$product_name}: Purchased membership name;{$transaction_total}: Payment amount;{$login_page}: Link to login page.
For example, the email template might be like this:
Hi {$user_first_name}, Welcome to the {$blog_name} membership area. Your {$product_name} subscription is now active.
Actual email sent to member “John”:
Here, the email delivered to the user whose name is John will look like this:
Hi John, Welcome to the Example Site membership area. Your Premium Membership subscription is now active.
Adding Custom Fields to WishList LMS Emails
You can include custom field data in emails using the {$usermeta:slug} format. Replace “slug” with the actual field slug.
You can find the custom field slugs following these steps:
- Navigate to Dashboard > WishList LMS > Settings > Fields tab.
- Locate the custom field.
- Note the field slug for parameter usage.
For a custom field with slug “wlms_office_phone“, use:
{$usermeta:wlms_office_phone}
Custom Field Slug Management
Create shorter, more manageable slugs:
- Create a new field with an abbreviated slug.
- Click Update to save the field.
- Edit the field name to display the full title.
- The slug remains abbreviated while the display name shows fully.
Custom Field Slug Management
Create shorter, more manageable slugs:
- Create a new field with an abbreviated slug.
- Click Update to save the field.
- Edit the field name to display the full title.
- The slug remains abbreviated while the display name shows fully.
- Payment Receipt Notice: This notice is sent to users to confirm that their payment is complete;
- Cancelled Subscription Notice: This tells users when their subscriptions are ending;
- Upgraded Subscription Notice: This notifies users when their membership has been upgraded;
- Downgraded Subscription Notice: This notifies users when their membership has been downgraded;
- Paused Subscription Notice: This notifies users when their subscription is paused;
- Resumed Subscription Notice: This notice confirms when the user’s subscription has resumed.;
- Refunded Transaction Notice: This notice informs users about their refunded payments;
- Failed Transaction Notice: This alert notifies users when their transaction fails;
- Credit Card Expiring Notice: This notice warns users when their credit card is expiring.
Each notification can be enabled or disabled based on your communication preferences.
Admin Emails and Notices
Admin notifications, therefore, inform admins about member activities and site events. Consequently, they help keep track of membership operations effectively.
To configure the Admin Email Addresses:
- On the Emails tab, scroll down to the Admin Emails & Notices section
- Locate the Admin Email Addresses field.
- Enter email addresses separated by commas for multiple recipients.
- The default admin email comes from Dashboard > Settings > General.
Available Admin Notifications
Enable these admin notifications as needed:
- New–Signup Notice: This notice informs you when a new member registers;
- New One-Time Subscription Notice: This notice informs you when a user subscribes to a non-recurring membership;
- New Recurring Subscription Notice: This notice informs you when a user subscribes to a recurring membership;
- Payment Receipt Notice: This notice informs you when a payment is received;
- Cancelled Subscription Notice: This notice informs you when a user’s subscriptions have been cancelled.;
- Upgraded Subscription Notice: This notice informs you when a user membership upgrades;
- Downgraded Subscription Notice: This notice informs you when a user’s membership downgrades;
- Paused Subscription Notice: This notice alerts you when a member has paused subscriptions;
- Resumed Subscription Notice: This notifies you when a member has resumed subscriptions;
- Refunded Transaction Notice: This notice confirms when a member’s payments have been refunded;
- Failed Transaction Notice: This notice informs you when a member’s payment fails.;
- Credit Card Expiring Notice: This notice informs you when a user’s credit card is expiring.
Privacy Settings
By checking this option, you can include a link; consequently, this link will direct users to your site’s Privacy Policy page. Moreover, it will appear in all WishList LMS emails.
- Include Privacy Policy link.
Send Mail From
WishList LMS sends emails from a specific sender. First, you can set the sender’s name. Additionally, you can choose the sender’s email address. This way, all outgoing emails have consistent contact information.
To configure the sender’s information, follow these steps:
- On the Emails tab, scroll to the bottom of the page to locate the From Name field.
- Enter the name that appears as the email sender.
- Add your preferred email address in the From Email field.
Third-Party Email Service Integration
WishList LMS can connect with various email services, such as SendGrid, Mandrill, MailGun, and Amazon SES. Consequently, these services help improve email deliverability and, in addition, offer advanced features for sending emails.
Customizing the Content of WishList LMS Emails
You can customize any WishList LMS email template content from the Emails tab.
To customize any email template, follow these steps:
- Click the Edit button next to each email.
- Update the Subject and Body fields in the template editor.
- Add or remove email parameters as needed.
- Save the template changes.
WishList LMS allows you to customize email styles. Therefore, you can easily change how emails look. This feature gives you complete control over email appearance. Additionally, you can adjust branding to match your needs.
The Emails tab includes options to control the global email font, font size, and base text color. For deeper customization, copy the email template files from /wp-content/plugins/wishlist-lms/app/emails/ into /wp-content/themes/your-theme/wishlist-lms/emails/ and edit the overrides in your theme.
Understanding the Parameters for WishList LMS Emails
WishList LMS uses parameters to include member-specific details in emails. When emails are sent, these parameters change to real user data.
These are some standard email parameters:
{$user_first_name}: Member’s first name;{$user_last_name}: Member’s last name;{$username}: Member’s username;{$user_email}: Member’s email address;{$blog_name}: WordPress site name;{$product_name}: Purchased membership name;{$transaction_total}: Payment amount;{$login_page}: Link to login page.
For example, the email template might be like this:
Hi {$user_first_name}, Welcome to the {$blog_name} membership area. Your {$product_name} subscription is now active.
Actual email sent to member “John”:
Here, the email delivered to the user whose name is John will look like this:
Hi John, Welcome to the Example Site membership area. Your Premium Membership subscription is now active.
Adding Custom Fields to WishList LMS Emails
You can include custom field data in emails using the {$usermeta:slug} format. Replace “slug” with the actual field slug.
You can find the custom field slugs following these steps:
- Navigate to Dashboard > WishList LMS > Settings > Fields tab.
- Locate the custom field.
- Note the field slug for parameter usage.
For a custom field with slug “wlms_office_phone“, use:
{$usermeta:wlms_office_phone}
Custom Field Slug Management
Create shorter, more manageable slugs:
- Create a new field with an abbreviated slug.
- Click Update to save the field.
- Edit the field name to display the full title.
- The slug remains abbreviated while the display name shows fully.
- Payment Receipt Notice: This notice is sent to users to confirm that their payment is complete;
- Cancelled Subscription Notice: This tells users when their subscriptions are ending;
- Upgraded Subscription Notice: This notifies users when their membership has been upgraded;
- Downgraded Subscription Notice: This notifies users when their membership has been downgraded;
- Paused Subscription Notice: This notifies users when their subscription is paused;
- Resumed Subscription Notice: This notice confirms when the user’s subscription has resumed.;
- Refunded Transaction Notice: This notice informs users about their refunded payments;
- Failed Transaction Notice: This alert notifies users when their transaction fails;
- Credit Card Expiring Notice: This notice warns users when their credit card is expiring.
Each notification can be enabled or disabled based on your communication preferences.
Admin Emails and Notices
Admin notifications, therefore, inform admins about member activities and site events. Consequently, they help keep track of membership operations effectively.
To configure the Admin Email Addresses:
- On the Emails tab, scroll down to the Admin Emails & Notices section
- Locate the Admin Email Addresses field.
- Enter email addresses separated by commas for multiple recipients.
- The default admin email comes from Dashboard > Settings > General.
Available Admin Notifications
Enable these admin notifications as needed:
- New–Signup Notice: This notice informs you when a new member registers;
- New One-Time Subscription Notice: This notice informs you when a user subscribes to a non-recurring membership;
- New Recurring Subscription Notice: This notice informs you when a user subscribes to a recurring membership;
- Payment Receipt Notice: This notice informs you when a payment is received;
- Cancelled Subscription Notice: This notice informs you when a user’s subscriptions have been cancelled.;
- Upgraded Subscription Notice: This notice informs you when a user membership upgrades;
- Downgraded Subscription Notice: This notice informs you when a user’s membership downgrades;
- Paused Subscription Notice: This notice alerts you when a member has paused subscriptions;
- Resumed Subscription Notice: This notifies you when a member has resumed subscriptions;
- Refunded Transaction Notice: This notice confirms when a member’s payments have been refunded;
- Failed Transaction Notice: This notice informs you when a member’s payment fails.;
- Credit Card Expiring Notice: This notice informs you when a user’s credit card is expiring.
Privacy Settings
By checking this option, you can include a link; consequently, this link will direct users to your site’s Privacy Policy page. Moreover, it will appear in all WishList LMS emails.
- Include Privacy Policy link.
Send Mail From
WishList LMS sends emails from a specific sender. First, you can set the sender’s name. Additionally, you can choose the sender’s email address. This way, all outgoing emails have consistent contact information.
To configure the sender’s information, follow these steps:
- On the Emails tab, scroll to the bottom of the page to locate the From Name field.
- Enter the name that appears as the email sender.
- Add your preferred email address in the From Email field.
Third-Party Email Service Integration
WishList LMS can connect with various email services, such as SendGrid, Mandrill, MailGun, and Amazon SES. Consequently, these services help improve email deliverability and, in addition, offer advanced features for sending emails.
Customizing the Content of WishList LMS Emails
You can customize any WishList LMS email template content from the Emails tab.
To customize any email template, follow these steps:
- Click the Edit button next to each email.
- Update the Subject and Body fields in the template editor.
- Add or remove email parameters as needed.
- Save the template changes.
WishList LMS allows you to customize email styles. Therefore, you can easily change how emails look. This feature gives you complete control over email appearance. Additionally, you can adjust branding to match your needs.
The Emails tab includes options to control the global email font, font size, and base text color. For deeper customization, copy the email template files from /wp-content/plugins/wishlist-lms/app/emails/ into /wp-content/themes/your-theme/wishlist-lms/emails/ and edit the overrides in your theme.
Understanding the Parameters for WishList LMS Emails
WishList LMS uses parameters to include member-specific details in emails. When emails are sent, these parameters change to real user data.
These are some standard email parameters:
{$user_first_name}: Member’s first name;{$user_last_name}: Member’s last name;{$username}: Member’s username;{$user_email}: Member’s email address;{$blog_name}: WordPress site name;{$product_name}: Purchased membership name;{$transaction_total}: Payment amount;{$login_page}: Link to login page.
For example, the email template might be like this:
Hi {$user_first_name}, Welcome to the {$blog_name} membership area. Your {$product_name} subscription is now active.
Actual email sent to member “John”:
Here, the email delivered to the user whose name is John will look like this:
Hi John, Welcome to the Example Site membership area. Your Premium Membership subscription is now active.
Adding Custom Fields to WishList LMS Emails
You can include custom field data in emails using the {$usermeta:slug} format. Replace “slug” with the actual field slug.
You can find the custom field slugs following these steps:
- Navigate to Dashboard > WishList LMS > Settings > Fields tab.
- Locate the custom field.
- Note the field slug for parameter usage.
For a custom field with slug “wlms_office_phone“, use:
{$usermeta:wlms_office_phone}
Custom Field Slug Management
Create shorter, more manageable slugs:
- Create a new field with an abbreviated slug.
- Click Update to save the field.
- Edit the field name to display the full title.
- The slug remains abbreviated while the display name shows fully.
- Payment Receipt Notice: This notice is sent to users to confirm that their payment is complete;
- Cancelled Subscription Notice: This tells users when their subscriptions are ending;
- Upgraded Subscription Notice: This notifies users when their membership has been upgraded;
- Downgraded Subscription Notice: This notifies users when their membership has been downgraded;
- Paused Subscription Notice: This notifies users when their subscription is paused;
- Resumed Subscription Notice: This notice confirms when the user’s subscription has resumed.;
- Refunded Transaction Notice: This notice informs users about their refunded payments;
- Failed Transaction Notice: This alert notifies users when their transaction fails;
- Credit Card Expiring Notice: This notice warns users when their credit card is expiring.
Each notification can be enabled or disabled based on your communication preferences.
Admin Emails and Notices
Admin notifications, therefore, inform admins about member activities and site events. Consequently, they help keep track of membership operations effectively.
To configure the Admin Email Addresses:
- On the Emails tab, scroll down to the Admin Emails & Notices section
- Locate the Admin Email Addresses field.
- Enter email addresses separated by commas for multiple recipients.
- The default admin email comes from Dashboard > Settings > General.
Available Admin Notifications
Enable these admin notifications as needed:
- New–Signup Notice: This notice informs you when a new member registers;
- New One-Time Subscription Notice: This notice informs you when a user subscribes to a non-recurring membership;
- New Recurring Subscription Notice: This notice informs you when a user subscribes to a recurring membership;
- Payment Receipt Notice: This notice informs you when a payment is received;
- Cancelled Subscription Notice: This notice informs you when a user’s subscriptions have been cancelled.;
- Upgraded Subscription Notice: This notice informs you when a user membership upgrades;
- Downgraded Subscription Notice: This notice informs you when a user’s membership downgrades;
- Paused Subscription Notice: This notice alerts you when a member has paused subscriptions;
- Resumed Subscription Notice: This notifies you when a member has resumed subscriptions;
- Refunded Transaction Notice: This notice confirms when a member’s payments have been refunded;
- Failed Transaction Notice: This notice informs you when a member’s payment fails.;
- Credit Card Expiring Notice: This notice informs you when a user’s credit card is expiring.
Privacy Settings
By checking this option, you can include a link; consequently, this link will direct users to your site’s Privacy Policy page. Moreover, it will appear in all WishList LMS emails.
- Include Privacy Policy link.
Send Mail From
WishList LMS sends emails from a specific sender. First, you can set the sender’s name. Additionally, you can choose the sender’s email address. This way, all outgoing emails have consistent contact information.
To configure the sender’s information, follow these steps:
- On the Emails tab, scroll to the bottom of the page to locate the From Name field.
- Enter the name that appears as the email sender.
- Add your preferred email address in the From Email field.
Third-Party Email Service Integration
WishList LMS can connect with various email services, such as SendGrid, Mandrill, MailGun, and Amazon SES. Consequently, these services help improve email deliverability and, in addition, offer advanced features for sending emails.
Customizing the Content of WishList LMS Emails
You can customize any WishList LMS email template content from the Emails tab.
To customize any email template, follow these steps:
- Click the Edit button next to each email.
- Update the Subject and Body fields in the template editor.
- Add or remove email parameters as needed.
- Save the template changes.
WishList LMS allows you to customize email styles. Therefore, you can easily change how emails look. This feature gives you complete control over email appearance. Additionally, you can adjust branding to match your needs.
The Emails tab includes options to control the global email font, font size, and base text color. For deeper customization, copy the email template files from /wp-content/plugins/wishlist-lms/app/emails/ into /wp-content/themes/your-theme/wishlist-lms/emails/ and edit the overrides in your theme.
Understanding the Parameters for WishList LMS Emails
WishList LMS uses parameters to include member-specific details in emails. When emails are sent, these parameters change to real user data.
These are some standard email parameters:
{$user_first_name}: Member’s first name;{$user_last_name}: Member’s last name;{$username}: Member’s username;{$user_email}: Member’s email address;{$blog_name}: WordPress site name;{$product_name}: Purchased membership name;{$transaction_total}: Payment amount;{$login_page}: Link to login page.
For example, the email template might be like this:
Hi {$user_first_name}, Welcome to the {$blog_name} membership area. Your {$product_name} subscription is now active.
Actual email sent to member “John”:
Here, the email delivered to the user whose name is John will look like this:
Hi John, Welcome to the Example Site membership area. Your Premium Membership subscription is now active.
Adding Custom Fields to WishList LMS Emails
You can include custom field data in emails using the {$usermeta:slug} format. Replace “slug” with the actual field slug.
You can find the custom field slugs following these steps:
- Navigate to Dashboard > WishList LMS > Settings > Fields tab.
- Locate the custom field.
- Note the field slug for parameter usage.
For a custom field with slug “wlms_office_phone“, use:
{$usermeta:wlms_office_phone}
Custom Field Slug Management
Create shorter, more manageable slugs:
- Create a new field with an abbreviated slug.
- Click Update to save the field.
- Edit the field name to display the full title.
- The slug remains abbreviated while the display name shows fully.
Custom Field Slug Management
Create shorter, more manageable slugs:
- Create a new field with an abbreviated slug.
- Click Update to save the field.
- Edit the field name to display the full title.
- The slug remains abbreviated while the display name shows fully.
Third-Party Email Service Integration
WishList LMS can connect with various email services, such as SendGrid, Mandrill, MailGun, and Amazon SES. Consequently, these services help improve email deliverability and, in addition, offer advanced features for sending emails.
Customizing the Content of WishList LMS Emails
You can customize any WishList LMS email template content from the Emails tab.
To customize any email template, follow these steps:
- Click the Edit button next to each email.
- Update the Subject and Body fields in the template editor.
- Add or remove email parameters as needed.
- Save the template changes.
WishList LMS allows you to customize email styles. Therefore, you can easily change how emails look. This feature gives you complete control over email appearance. Additionally, you can adjust branding to match your needs.
The Emails tab includes options to control the global email font, font size, and base text color. For deeper customization, copy the email template files from /wp-content/plugins/wishlist-lms/app/emails/ into /wp-content/themes/your-theme/wishlist-lms/emails/ and edit the overrides in your theme.
Understanding the Parameters for WishList LMS Emails
WishList LMS uses parameters to include member-specific details in emails. When emails are sent, these parameters change to real user data.
These are some standard email parameters:
{$user_first_name}: Member’s first name;{$user_last_name}: Member’s last name;{$username}: Member’s username;{$user_email}: Member’s email address;{$blog_name}: WordPress site name;{$product_name}: Purchased membership name;{$transaction_total}: Payment amount;{$login_page}: Link to login page.
For example, the email template might be like this:
Hi {$user_first_name}, Welcome to the {$blog_name} membership area. Your {$product_name} subscription is now active.
Actual email sent to member “John”:
Here, the email delivered to the user whose name is John will look like this:
Hi John, Welcome to the Example Site membership area. Your Premium Membership subscription is now active.
Adding Custom Fields to WishList LMS Emails
You can include custom field data in emails using the {$usermeta:slug} format. Replace “slug” with the actual field slug.
You can find the custom field slugs following these steps:
- Navigate to Dashboard > WishList LMS > Settings > Fields tab.
- Locate the custom field.
- Note the field slug for parameter usage.
For a custom field with slug “wlms_office_phone“, use:
{$usermeta:wlms_office_phone}
Custom Field Slug Management
Create shorter, more manageable slugs:
- Create a new field with an abbreviated slug.
- Click Update to save the field.
- Edit the field name to display the full title.
- The slug remains abbreviated while the display name shows fully.
- Payment Receipt Notice: This notice is sent to users to confirm that their payment is complete;
- Cancelled Subscription Notice: This tells users when their subscriptions are ending;
- Upgraded Subscription Notice: This notifies users when their membership has been upgraded;
- Downgraded Subscription Notice: This notifies users when their membership has been downgraded;
- Paused Subscription Notice: This notifies users when their subscription is paused;
- Resumed Subscription Notice: This notice confirms when the user’s subscription has resumed.;
- Refunded Transaction Notice: This notice informs users about their refunded payments;
- Failed Transaction Notice: This alert notifies users when their transaction fails;
- Credit Card Expiring Notice: This notice warns users when their credit card is expiring.
Each notification can be enabled or disabled based on your communication preferences.
Admin Emails and Notices
Admin notifications, therefore, inform admins about member activities and site events. Consequently, they help keep track of membership operations effectively.
To configure the Admin Email Addresses:
- On the Emails tab, scroll down to the Admin Emails & Notices section
- Locate the Admin Email Addresses field.
- Enter email addresses separated by commas for multiple recipients.
- The default admin email comes from Dashboard > Settings > General.
Available Admin Notifications
Enable these admin notifications as needed:
- New–Signup Notice: This notice informs you when a new member registers;
- New One-Time Subscription Notice: This notice informs you when a user subscribes to a non-recurring membership;
- New Recurring Subscription Notice: This notice informs you when a user subscribes to a recurring membership;
- Payment Receipt Notice: This notice informs you when a payment is received;
- Cancelled Subscription Notice: This notice informs you when a user’s subscriptions have been cancelled.;
- Upgraded Subscription Notice: This notice informs you when a user membership upgrades;
- Downgraded Subscription Notice: This notice informs you when a user’s membership downgrades;
- Paused Subscription Notice: This notice alerts you when a member has paused subscriptions;
- Resumed Subscription Notice: This notifies you when a member has resumed subscriptions;
- Refunded Transaction Notice: This notice confirms when a member’s payments have been refunded;
- Failed Transaction Notice: This notice informs you when a member’s payment fails.;
- Credit Card Expiring Notice: This notice informs you when a user’s credit card is expiring.
Privacy Settings
By checking this option, you can include a link; consequently, this link will direct users to your site’s Privacy Policy page. Moreover, it will appear in all WishList LMS emails.
- Include Privacy Policy link.
Send Mail From
WishList LMS sends emails from a specific sender. First, you can set the sender’s name. Additionally, you can choose the sender’s email address. This way, all outgoing emails have consistent contact information.
To configure the sender’s information, follow these steps:
- On the Emails tab, scroll to the bottom of the page to locate the From Name field.
- Enter the name that appears as the email sender.
- Add your preferred email address in the From Email field.
Third-Party Email Service Integration
WishList LMS can connect with various email services, such as SendGrid, Mandrill, MailGun, and Amazon SES. Consequently, these services help improve email deliverability and, in addition, offer advanced features for sending emails.
Customizing the Content of WishList LMS Emails
You can customize any WishList LMS email template content from the Emails tab.
To customize any email template, follow these steps:
- Click the Edit button next to each email.
- Update the Subject and Body fields in the template editor.
- Add or remove email parameters as needed.
- Save the template changes.
WishList LMS allows you to customize email styles. Therefore, you can easily change how emails look. This feature gives you complete control over email appearance. Additionally, you can adjust branding to match your needs.
The Emails tab includes options to control the global email font, font size, and base text color. For deeper customization, copy the email template files from /wp-content/plugins/wishlist-lms/app/emails/ into /wp-content/themes/your-theme/wishlist-lms/emails/ and edit the overrides in your theme.
Understanding the Parameters for WishList LMS Emails
WishList LMS uses parameters to include member-specific details in emails. When emails are sent, these parameters change to real user data.
These are some standard email parameters:
{$user_first_name}: Member’s first name;{$user_last_name}: Member’s last name;{$username}: Member’s username;{$user_email}: Member’s email address;{$blog_name}: WordPress site name;{$product_name}: Purchased membership name;{$transaction_total}: Payment amount;{$login_page}: Link to login page.
For example, the email template might be like this:
Hi {$user_first_name}, Welcome to the {$blog_name} membership area. Your {$product_name} subscription is now active.
Actual email sent to member “John”:
Here, the email delivered to the user whose name is John will look like this:
Hi John, Welcome to the Example Site membership area. Your Premium Membership subscription is now active.
Adding Custom Fields to WishList LMS Emails
You can include custom field data in emails using the {$usermeta:slug} format. Replace “slug” with the actual field slug.
You can find the custom field slugs following these steps:
- Navigate to Dashboard > WishList LMS > Settings > Fields tab.
- Locate the custom field.
- Note the field slug for parameter usage.
For a custom field with slug “wlms_office_phone“, use:
{$usermeta:wlms_office_phone}
Custom Field Slug Management
Create shorter, more manageable slugs:
- Create a new field with an abbreviated slug.
- Click Update to save the field.
- Edit the field name to display the full title.
- The slug remains abbreviated while the display name shows fully.
Third-Party Email Service Integration
WishList LMS can connect with various email services, such as SendGrid, Mandrill, MailGun, and Amazon SES. Consequently, these services help improve email deliverability and, in addition, offer advanced features for sending emails.
Customizing the Content of WishList LMS Emails
You can customize any WishList LMS email template content from the Emails tab.
To customize any email template, follow these steps:
- Click the Edit button next to each email.
- Update the Subject and Body fields in the template editor.
- Add or remove email parameters as needed.
- Save the template changes.
WishList LMS allows you to customize email styles. Therefore, you can easily change how emails look. This feature gives you complete control over email appearance. Additionally, you can adjust branding to match your needs.
The Emails tab includes options to control the global email font, font size, and base text color. For deeper customization, copy the email template files from /wp-content/plugins/wishlist-lms/app/emails/ into /wp-content/themes/your-theme/wishlist-lms/emails/ and edit the overrides in your theme.
Understanding the Parameters for WishList LMS Emails
WishList LMS uses parameters to include member-specific details in emails. When emails are sent, these parameters change to real user data.
These are some standard email parameters:
{$user_first_name}: Member’s first name;{$user_last_name}: Member’s last name;{$username}: Member’s username;{$user_email}: Member’s email address;{$blog_name}: WordPress site name;{$product_name}: Purchased membership name;{$transaction_total}: Payment amount;{$login_page}: Link to login page.
For example, the email template might be like this:
Hi {$user_first_name}, Welcome to the {$blog_name} membership area. Your {$product_name} subscription is now active.
Actual email sent to member “John”:
Here, the email delivered to the user whose name is John will look like this:
Hi John, Welcome to the Example Site membership area. Your Premium Membership subscription is now active.
Adding Custom Fields to WishList LMS Emails
You can include custom field data in emails using the {$usermeta:slug} format. Replace “slug” with the actual field slug.
You can find the custom field slugs following these steps:
- Navigate to Dashboard > WishList LMS > Settings > Fields tab.
- Locate the custom field.
- Note the field slug for parameter usage.
For a custom field with slug “wlms_office_phone“, use:
{$usermeta:wlms_office_phone}
Custom Field Slug Management
Create shorter, more manageable slugs:
- Create a new field with an abbreviated slug.
- Click Update to save the field.
- Edit the field name to display the full title.
- The slug remains abbreviated while the display name shows fully.
- Payment Receipt Notice: This notice is sent to users to confirm that their payment is complete;
- Cancelled Subscription Notice: This tells users when their subscriptions are ending;
- Upgraded Subscription Notice: This notifies users when their membership has been upgraded;
- Downgraded Subscription Notice: This notifies users when their membership has been downgraded;
- Paused Subscription Notice: This notifies users when their subscription is paused;
- Resumed Subscription Notice: This notice confirms when the user’s subscription has resumed.;
- Refunded Transaction Notice: This notice informs users about their refunded payments;
- Failed Transaction Notice: This alert notifies users when their transaction fails;
- Credit Card Expiring Notice: This notice warns users when their credit card is expiring.
Each notification can be enabled or disabled based on your communication preferences.
Admin Emails and Notices
Admin notifications, therefore, inform admins about member activities and site events. Consequently, they help keep track of membership operations effectively.
To configure the Admin Email Addresses:
- On the Emails tab, scroll down to the Admin Emails & Notices section
- Locate the Admin Email Addresses field.
- Enter email addresses separated by commas for multiple recipients.
- The default admin email comes from Dashboard > Settings > General.
Available Admin Notifications
Enable these admin notifications as needed:
- New–Signup Notice: This notice informs you when a new member registers;
- New One-Time Subscription Notice: This notice informs you when a user subscribes to a non-recurring membership;
- New Recurring Subscription Notice: This notice informs you when a user subscribes to a recurring membership;
- Payment Receipt Notice: This notice informs you when a payment is received;
- Cancelled Subscription Notice: This notice informs you when a user’s subscriptions have been cancelled.;
- Upgraded Subscription Notice: This notice informs you when a user membership upgrades;
- Downgraded Subscription Notice: This notice informs you when a user’s membership downgrades;
- Paused Subscription Notice: This notice alerts you when a member has paused subscriptions;
- Resumed Subscription Notice: This notifies you when a member has resumed subscriptions;
- Refunded Transaction Notice: This notice confirms when a member’s payments have been refunded;
- Failed Transaction Notice: This notice informs you when a member’s payment fails.;
- Credit Card Expiring Notice: This notice informs you when a user’s credit card is expiring.
Privacy Settings
By checking this option, you can include a link; consequently, this link will direct users to your site’s Privacy Policy page. Moreover, it will appear in all WishList LMS emails.
- Include Privacy Policy link.
Send Mail From
WishList LMS sends emails from a specific sender. First, you can set the sender’s name. Additionally, you can choose the sender’s email address. This way, all outgoing emails have consistent contact information.
To configure the sender’s information, follow these steps:
- On the Emails tab, scroll to the bottom of the page to locate the From Name field.
- Enter the name that appears as the email sender.
- Add your preferred email address in the From Email field.
Third-Party Email Service Integration
WishList LMS can connect with various email services, such as SendGrid, Mandrill, MailGun, and Amazon SES. Consequently, these services help improve email deliverability and, in addition, offer advanced features for sending emails.
Customizing the Content of WishList LMS Emails
You can customize any WishList LMS email template content from the Emails tab.
To customize any email template, follow these steps:
- Click the Edit button next to each email.
- Update the Subject and Body fields in the template editor.
- Add or remove email parameters as needed.
- Save the template changes.
WishList LMS allows you to customize email styles. Therefore, you can easily change how emails look. This feature gives you complete control over email appearance. Additionally, you can adjust branding to match your needs.
The Emails tab includes options to control the global email font, font size, and base text color. For deeper customization, copy the email template files from /wp-content/plugins/wishlist-lms/app/emails/ into /wp-content/themes/your-theme/wishlist-lms/emails/ and edit the overrides in your theme.
Understanding the Parameters for WishList LMS Emails
WishList LMS uses parameters to include member-specific details in emails. When emails are sent, these parameters change to real user data.
These are some standard email parameters:
{$user_first_name}: Member’s first name;{$user_last_name}: Member’s last name;{$username}: Member’s username;{$user_email}: Member’s email address;{$blog_name}: WordPress site name;{$product_name}: Purchased membership name;{$transaction_total}: Payment amount;{$login_page}: Link to login page.
For example, the email template might be like this:
Hi {$user_first_name}, Welcome to the {$blog_name} membership area. Your {$product_name} subscription is now active.
Actual email sent to member “John”:
Here, the email delivered to the user whose name is John will look like this:
Hi John, Welcome to the Example Site membership area. Your Premium Membership subscription is now active.
Adding Custom Fields to WishList LMS Emails
You can include custom field data in emails using the {$usermeta:slug} format. Replace “slug” with the actual field slug.
You can find the custom field slugs following these steps:
- Navigate to Dashboard > WishList LMS > Settings > Fields tab.
- Locate the custom field.
- Note the field slug for parameter usage.
For a custom field with slug “wlms_office_phone“, use:
{$usermeta:wlms_office_phone}
Custom Field Slug Management
Create shorter, more manageable slugs:
- Create a new field with an abbreviated slug.
- Click Update to save the field.
- Edit the field name to display the full title.
- The slug remains abbreviated while the display name shows fully.
Custom Field Slug Management
Create shorter, more manageable slugs:
- Create a new field with an abbreviated slug.
- Click Update to save the field.
- Edit the field name to display the full title.
- The slug remains abbreviated while the display name shows fully.
Customizing the Content of WishList LMS Emails
You can customize any WishList LMS email template content from the Emails tab.
To customize any email template, follow these steps:
- Click the Edit button next to each email.
- Update the Subject and Body fields in the template editor.
- Add or remove email parameters as needed.
- Save the template changes.
WishList LMS allows you to customize email styles. Therefore, you can easily change how emails look. This feature gives you complete control over email appearance. Additionally, you can adjust branding to match your needs.
The Emails tab includes options to control the global email font, font size, and base text color. For deeper customization, copy the email template files from /wp-content/plugins/wishlist-lms/app/emails/ into /wp-content/themes/your-theme/wishlist-lms/emails/ and edit the overrides in your theme.
Understanding the Parameters for WishList LMS Emails
WishList LMS uses parameters to include member-specific details in emails. When emails are sent, these parameters change to real user data.
These are some standard email parameters:
{$user_first_name}: Member’s first name;{$user_last_name}: Member’s last name;{$username}: Member’s username;{$user_email}: Member’s email address;{$blog_name}: WordPress site name;{$product_name}: Purchased membership name;{$transaction_total}: Payment amount;{$login_page}: Link to login page.
For example, the email template might be like this:
Hi {$user_first_name}, Welcome to the {$blog_name} membership area. Your {$product_name} subscription is now active.
Actual email sent to member “John”:
Here, the email delivered to the user whose name is John will look like this:
Hi John, Welcome to the Example Site membership area. Your Premium Membership subscription is now active.
Adding Custom Fields to WishList LMS Emails
You can include custom field data in emails using the {$usermeta:slug} format. Replace “slug” with the actual field slug.
You can find the custom field slugs following these steps:
- Navigate to Dashboard > WishList LMS > Settings > Fields tab.
- Locate the custom field.
- Note the field slug for parameter usage.
For a custom field with slug “wlms_office_phone“, use:
{$usermeta:wlms_office_phone}
Custom Field Slug Management
Create shorter, more manageable slugs:
- Create a new field with an abbreviated slug.
- Click Update to save the field.
- Edit the field name to display the full title.
- The slug remains abbreviated while the display name shows fully.
Third-Party Email Service Integration
WishList LMS can connect with various email services, such as SendGrid, Mandrill, MailGun, and Amazon SES. Consequently, these services help improve email deliverability and, in addition, offer advanced features for sending emails.
Customizing the Content of WishList LMS Emails
You can customize any WishList LMS email template content from the Emails tab.
To customize any email template, follow these steps:
- Click the Edit button next to each email.
- Update the Subject and Body fields in the template editor.
- Add or remove email parameters as needed.
- Save the template changes.
WishList LMS allows you to customize email styles. Therefore, you can easily change how emails look. This feature gives you complete control over email appearance. Additionally, you can adjust branding to match your needs.
The Emails tab includes options to control the global email font, font size, and base text color. For deeper customization, copy the email template files from /wp-content/plugins/wishlist-lms/app/emails/ into /wp-content/themes/your-theme/wishlist-lms/emails/ and edit the overrides in your theme.
Understanding the Parameters for WishList LMS Emails
WishList LMS uses parameters to include member-specific details in emails. When emails are sent, these parameters change to real user data.
These are some standard email parameters:
{$user_first_name}: Member’s first name;{$user_last_name}: Member’s last name;{$username}: Member’s username;{$user_email}: Member’s email address;{$blog_name}: WordPress site name;{$product_name}: Purchased membership name;{$transaction_total}: Payment amount;{$login_page}: Link to login page.
For example, the email template might be like this:
Hi {$user_first_name}, Welcome to the {$blog_name} membership area. Your {$product_name} subscription is now active.
Actual email sent to member “John”:
Here, the email delivered to the user whose name is John will look like this:
Hi John, Welcome to the Example Site membership area. Your Premium Membership subscription is now active.
Adding Custom Fields to WishList LMS Emails
You can include custom field data in emails using the {$usermeta:slug} format. Replace “slug” with the actual field slug.
You can find the custom field slugs following these steps:
- Navigate to Dashboard > WishList LMS > Settings > Fields tab.
- Locate the custom field.
- Note the field slug for parameter usage.
For a custom field with slug “wlms_office_phone“, use:
{$usermeta:wlms_office_phone}
Custom Field Slug Management
Create shorter, more manageable slugs:
- Create a new field with an abbreviated slug.
- Click Update to save the field.
- Edit the field name to display the full title.
- The slug remains abbreviated while the display name shows fully.
- Payment Receipt Notice: This notice is sent to users to confirm that their payment is complete;
- Cancelled Subscription Notice: This tells users when their subscriptions are ending;
- Upgraded Subscription Notice: This notifies users when their membership has been upgraded;
- Downgraded Subscription Notice: This notifies users when their membership has been downgraded;
- Paused Subscription Notice: This notifies users when their subscription is paused;
- Resumed Subscription Notice: This notice confirms when the user’s subscription has resumed.;
- Refunded Transaction Notice: This notice informs users about their refunded payments;
- Failed Transaction Notice: This alert notifies users when their transaction fails;
- Credit Card Expiring Notice: This notice warns users when their credit card is expiring.
Each notification can be enabled or disabled based on your communication preferences.
Admin Emails and Notices
Admin notifications, therefore, inform admins about member activities and site events. Consequently, they help keep track of membership operations effectively.
To configure the Admin Email Addresses:
- On the Emails tab, scroll down to the Admin Emails & Notices section
- Locate the Admin Email Addresses field.
- Enter email addresses separated by commas for multiple recipients.
- The default admin email comes from Dashboard > Settings > General.
Available Admin Notifications
Enable these admin notifications as needed:
- New–Signup Notice: This notice informs you when a new member registers;
- New One-Time Subscription Notice: This notice informs you when a user subscribes to a non-recurring membership;
- New Recurring Subscription Notice: This notice informs you when a user subscribes to a recurring membership;
- Payment Receipt Notice: This notice informs you when a payment is received;
- Cancelled Subscription Notice: This notice informs you when a user’s subscriptions have been cancelled.;
- Upgraded Subscription Notice: This notice informs you when a user membership upgrades;
- Downgraded Subscription Notice: This notice informs you when a user’s membership downgrades;
- Paused Subscription Notice: This notice alerts you when a member has paused subscriptions;
- Resumed Subscription Notice: This notifies you when a member has resumed subscriptions;
- Refunded Transaction Notice: This notice confirms when a member’s payments have been refunded;
- Failed Transaction Notice: This notice informs you when a member’s payment fails.;
- Credit Card Expiring Notice: This notice informs you when a user’s credit card is expiring.
Privacy Settings
By checking this option, you can include a link; consequently, this link will direct users to your site’s Privacy Policy page. Moreover, it will appear in all WishList LMS emails.
- Include Privacy Policy link.
Send Mail From
WishList LMS sends emails from a specific sender. First, you can set the sender’s name. Additionally, you can choose the sender’s email address. This way, all outgoing emails have consistent contact information.
To configure the sender’s information, follow these steps:
- On the Emails tab, scroll to the bottom of the page to locate the From Name field.
- Enter the name that appears as the email sender.
- Add your preferred email address in the From Email field.
Third-Party Email Service Integration
WishList LMS can connect with various email services, such as SendGrid, Mandrill, MailGun, and Amazon SES. Consequently, these services help improve email deliverability and, in addition, offer advanced features for sending emails.
Customizing the Content of WishList LMS Emails
You can customize any WishList LMS email template content from the Emails tab.
To customize any email template, follow these steps:
- Click the Edit button next to each email.
- Update the Subject and Body fields in the template editor.
- Add or remove email parameters as needed.
- Save the template changes.
WishList LMS allows you to customize email styles. Therefore, you can easily change how emails look. This feature gives you complete control over email appearance. Additionally, you can adjust branding to match your needs.
The Emails tab includes options to control the global email font, font size, and base text color. For deeper customization, copy the email template files from /wp-content/plugins/wishlist-lms/app/emails/ into /wp-content/themes/your-theme/wishlist-lms/emails/ and edit the overrides in your theme.
Understanding the Parameters for WishList LMS Emails
WishList LMS uses parameters to include member-specific details in emails. When emails are sent, these parameters change to real user data.
These are some standard email parameters:
{$user_first_name}: Member’s first name;{$user_last_name}: Member’s last name;{$username}: Member’s username;{$user_email}: Member’s email address;{$blog_name}: WordPress site name;{$product_name}: Purchased membership name;{$transaction_total}: Payment amount;{$login_page}: Link to login page.
For example, the email template might be like this:
Hi {$user_first_name}, Welcome to the {$blog_name} membership area. Your {$product_name} subscription is now active.
Actual email sent to member “John”:
Here, the email delivered to the user whose name is John will look like this:
Hi John, Welcome to the Example Site membership area. Your Premium Membership subscription is now active.
Adding Custom Fields to WishList LMS Emails
You can include custom field data in emails using the {$usermeta:slug} format. Replace “slug” with the actual field slug.
You can find the custom field slugs following these steps:
- Navigate to Dashboard > WishList LMS > Settings > Fields tab.
- Locate the custom field.
- Note the field slug for parameter usage.
For a custom field with slug “wlms_office_phone“, use:
{$usermeta:wlms_office_phone}
Custom Field Slug Management
Create shorter, more manageable slugs:
- Create a new field with an abbreviated slug.
- Click Update to save the field.
- Edit the field name to display the full title.
- The slug remains abbreviated while the display name shows fully.
This guide explains how to set up the WishList LMS Emails tab to manage automatic emails. The WishList LMS automatically sends emails to keep members informed when they join, make payments, or change their subscriptions. This means you don’t have to do any manual work to keep everyone updated.
Understanding WishList LMS Email System
The WishList LMS Emails tab, therefore, helps you send automated emails. Specifically, these emails about subscriptions are sent to both users and admins. In this way, you can keep everyone informed effectively. Additionally, they provide updates on payments. Within the Emails tab, you can configure four sections. Each section serves a specific purpose:
Extras:
Accessing WishList LMS Emails Settings
You can configure all email settings through the WishList LMS settings:
- Navigate to Dashboard > WishList LMS > Settings.
- Click the Emails tab.
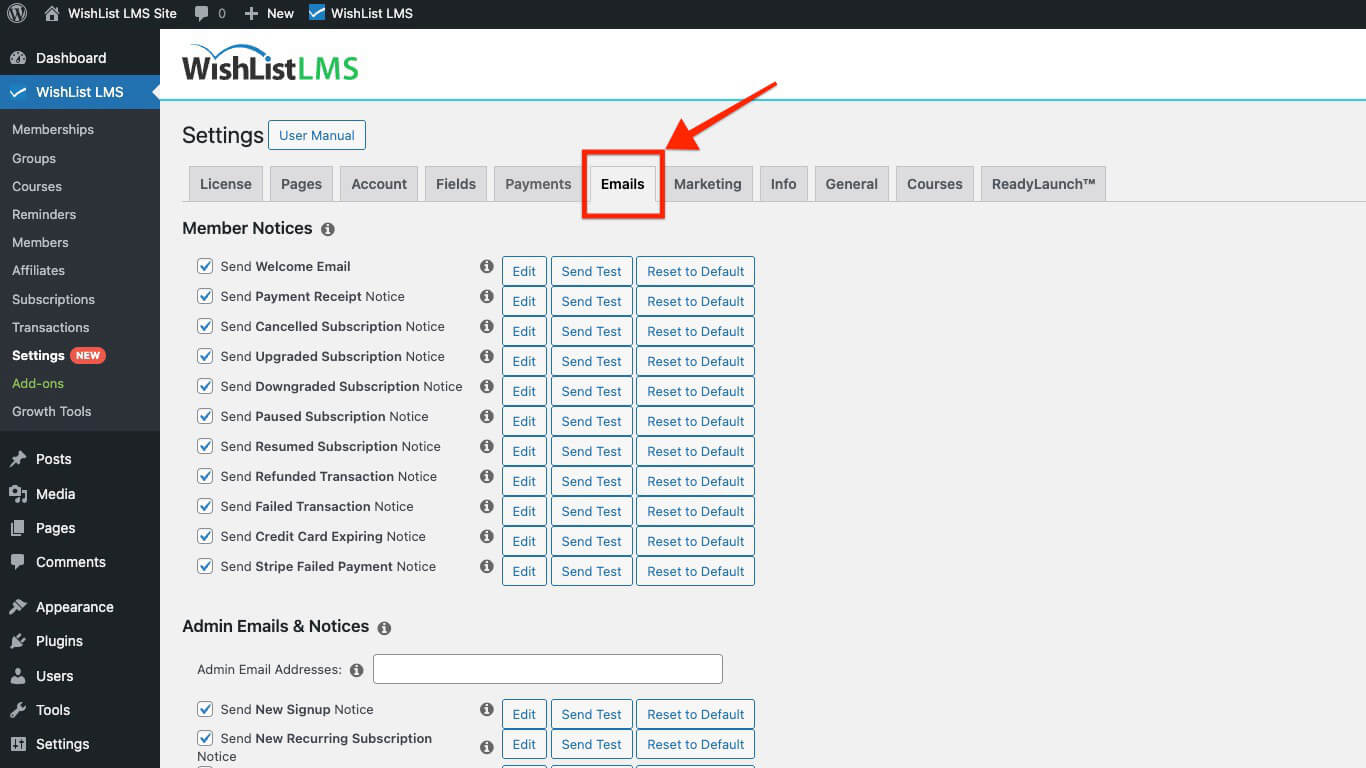
The WishList LMS Emails tab, on one hand, contains all the settings for automated email notifications. Moreover, you can easily configure these options to suit your preferences.
Member Notices
Member notifications keep users updated about their subscription status, payments, and membership changes. Each type of notification covers a specific membership event so that users can stay informed easily.
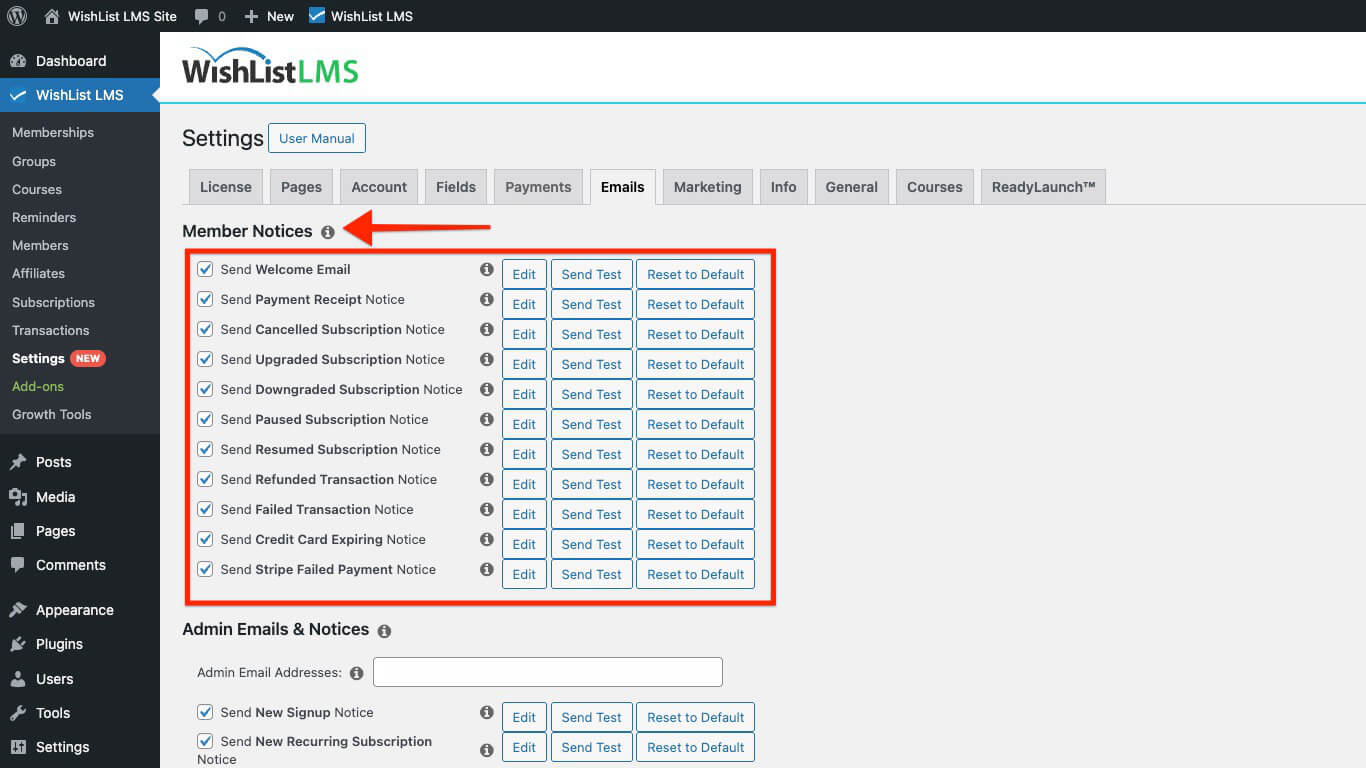
- Welcome Email: This email goes to new users right after they sign up. It is sent only once for each member. Even if they purchase more memberships, it remains the same.
Custom Field Slug Management
Create shorter, more manageable slugs:
- Create a new field with an abbreviated slug.
- Click Update to save the field.
- Edit the field name to display the full title.
- The slug remains abbreviated while the display name shows fully.
Customizing the Content of WishList LMS Emails
You can customize any WishList LMS email template content from the Emails tab.
To customize any email template, follow these steps:
- Click the Edit button next to each email.
- Update the Subject and Body fields in the template editor.
- Add or remove email parameters as needed.
- Save the template changes.
WishList LMS allows you to customize email styles. Therefore, you can easily change how emails look. This feature gives you complete control over email appearance. Additionally, you can adjust branding to match your needs.
The Emails tab includes options to control the global email font, font size, and base text color. For deeper customization, copy the email template files from /wp-content/plugins/wishlist-lms/app/emails/ into /wp-content/themes/your-theme/wishlist-lms/emails/ and edit the overrides in your theme.
Understanding the Parameters for WishList LMS Emails
WishList LMS uses parameters to include member-specific details in emails. When emails are sent, these parameters change to real user data.
These are some standard email parameters:
{$user_first_name}: Member’s first name;{$user_last_name}: Member’s last name;{$username}: Member’s username;{$user_email}: Member’s email address;{$blog_name}: WordPress site name;{$product_name}: Purchased membership name;{$transaction_total}: Payment amount;{$login_page}: Link to login page.
For example, the email template might be like this:
Hi {$user_first_name}, Welcome to the {$blog_name} membership area. Your {$product_name} subscription is now active.
Actual email sent to member “John”:
Here, the email delivered to the user whose name is John will look like this:
Hi John, Welcome to the Example Site membership area. Your Premium Membership subscription is now active.
Adding Custom Fields to WishList LMS Emails
You can include custom field data in emails using the {$usermeta:slug} format. Replace “slug” with the actual field slug.
You can find the custom field slugs following these steps:
- Navigate to Dashboard > WishList LMS > Settings > Fields tab.
- Locate the custom field.
- Note the field slug for parameter usage.
For a custom field with slug “wlms_office_phone“, use:
{$usermeta:wlms_office_phone}
Custom Field Slug Management
Create shorter, more manageable slugs:
- Create a new field with an abbreviated slug.
- Click Update to save the field.
- Edit the field name to display the full title.
- The slug remains abbreviated while the display name shows fully.
Third-Party Email Service Integration
WishList LMS can connect with various email services, such as SendGrid, Mandrill, MailGun, and Amazon SES. Consequently, these services help improve email deliverability and, in addition, offer advanced features for sending emails.
Customizing the Content of WishList LMS Emails
You can customize any WishList LMS email template content from the Emails tab.
To customize any email template, follow these steps:
- Click the Edit button next to each email.
- Update the Subject and Body fields in the template editor.
- Add or remove email parameters as needed.
- Save the template changes.
WishList LMS allows you to customize email styles. Therefore, you can easily change how emails look. This feature gives you complete control over email appearance. Additionally, you can adjust branding to match your needs.
The Emails tab includes options to control the global email font, font size, and base text color. For deeper customization, copy the email template files from /wp-content/plugins/wishlist-lms/app/emails/ into /wp-content/themes/your-theme/wishlist-lms/emails/ and edit the overrides in your theme.
Understanding the Parameters for WishList LMS Emails
WishList LMS uses parameters to include member-specific details in emails. When emails are sent, these parameters change to real user data.
These are some standard email parameters:
{$user_first_name}: Member’s first name;{$user_last_name}: Member’s last name;{$username}: Member’s username;{$user_email}: Member’s email address;{$blog_name}: WordPress site name;{$product_name}: Purchased membership name;{$transaction_total}: Payment amount;{$login_page}: Link to login page.
For example, the email template might be like this:
Hi {$user_first_name}, Welcome to the {$blog_name} membership area. Your {$product_name} subscription is now active.
Actual email sent to member “John”:
Here, the email delivered to the user whose name is John will look like this:
Hi John, Welcome to the Example Site membership area. Your Premium Membership subscription is now active.
Adding Custom Fields to WishList LMS Emails
You can include custom field data in emails using the {$usermeta:slug} format. Replace “slug” with the actual field slug.
You can find the custom field slugs following these steps:
- Navigate to Dashboard > WishList LMS > Settings > Fields tab.
- Locate the custom field.
- Note the field slug for parameter usage.
For a custom field with slug “wlms_office_phone“, use:
{$usermeta:wlms_office_phone}
Custom Field Slug Management
Create shorter, more manageable slugs:
- Create a new field with an abbreviated slug.
- Click Update to save the field.
- Edit the field name to display the full title.
- The slug remains abbreviated while the display name shows fully.
- Payment Receipt Notice: This notice is sent to users to confirm that their payment is complete;
- Cancelled Subscription Notice: This tells users when their subscriptions are ending;
- Upgraded Subscription Notice: This notifies users when their membership has been upgraded;
- Downgraded Subscription Notice: This notifies users when their membership has been downgraded;
- Paused Subscription Notice: This notifies users when their subscription is paused;
- Resumed Subscription Notice: This notice confirms when the user’s subscription has resumed.;
- Refunded Transaction Notice: This notice informs users about their refunded payments;
- Failed Transaction Notice: This alert notifies users when their transaction fails;
- Credit Card Expiring Notice: This notice warns users when their credit card is expiring.
Each notification can be enabled or disabled based on your communication preferences.
Admin Emails and Notices
Admin notifications, therefore, inform admins about member activities and site events. Consequently, they help keep track of membership operations effectively.
To configure the Admin Email Addresses:
- On the Emails tab, scroll down to the Admin Emails & Notices section
- Locate the Admin Email Addresses field.
- Enter email addresses separated by commas for multiple recipients.
- The default admin email comes from Dashboard > Settings > General.
Available Admin Notifications
Enable these admin notifications as needed:
- New–Signup Notice: This notice informs you when a new member registers;
- New One-Time Subscription Notice: This notice informs you when a user subscribes to a non-recurring membership;
- New Recurring Subscription Notice: This notice informs you when a user subscribes to a recurring membership;
- Payment Receipt Notice: This notice informs you when a payment is received;
- Cancelled Subscription Notice: This notice informs you when a user’s subscriptions have been cancelled.;
- Upgraded Subscription Notice: This notice informs you when a user membership upgrades;
- Downgraded Subscription Notice: This notice informs you when a user’s membership downgrades;
- Paused Subscription Notice: This notice alerts you when a member has paused subscriptions;
- Resumed Subscription Notice: This notifies you when a member has resumed subscriptions;
- Refunded Transaction Notice: This notice confirms when a member’s payments have been refunded;
- Failed Transaction Notice: This notice informs you when a member’s payment fails.;
- Credit Card Expiring Notice: This notice informs you when a user’s credit card is expiring.
Privacy Settings
By checking this option, you can include a link; consequently, this link will direct users to your site’s Privacy Policy page. Moreover, it will appear in all WishList LMS emails.
- Include Privacy Policy link.
Send Mail From
WishList LMS sends emails from a specific sender. First, you can set the sender’s name. Additionally, you can choose the sender’s email address. This way, all outgoing emails have consistent contact information.
To configure the sender’s information, follow these steps:
- On the Emails tab, scroll to the bottom of the page to locate the From Name field.
- Enter the name that appears as the email sender.
- Add your preferred email address in the From Email field.
Third-Party Email Service Integration
WishList LMS can connect with various email services, such as SendGrid, Mandrill, MailGun, and Amazon SES. Consequently, these services help improve email deliverability and, in addition, offer advanced features for sending emails.
Customizing the Content of WishList LMS Emails
You can customize any WishList LMS email template content from the Emails tab.
To customize any email template, follow these steps:
- Click the Edit button next to each email.
- Update the Subject and Body fields in the template editor.
- Add or remove email parameters as needed.
- Save the template changes.
WishList LMS allows you to customize email styles. Therefore, you can easily change how emails look. This feature gives you complete control over email appearance. Additionally, you can adjust branding to match your needs.
The Emails tab includes options to control the global email font, font size, and base text color. For deeper customization, copy the email template files from /wp-content/plugins/wishlist-lms/app/emails/ into /wp-content/themes/your-theme/wishlist-lms/emails/ and edit the overrides in your theme.
Understanding the Parameters for WishList LMS Emails
WishList LMS uses parameters to include member-specific details in emails. When emails are sent, these parameters change to real user data.
These are some standard email parameters:
{$user_first_name}: Member’s first name;{$user_last_name}: Member’s last name;{$username}: Member’s username;{$user_email}: Member’s email address;{$blog_name}: WordPress site name;{$product_name}: Purchased membership name;{$transaction_total}: Payment amount;{$login_page}: Link to login page.
For example, the email template might be like this:
Hi {$user_first_name}, Welcome to the {$blog_name} membership area. Your {$product_name} subscription is now active.
Actual email sent to member “John”:
Here, the email delivered to the user whose name is John will look like this:
Hi John, Welcome to the Example Site membership area. Your Premium Membership subscription is now active.
Adding Custom Fields to WishList LMS Emails
You can include custom field data in emails using the {$usermeta:slug} format. Replace “slug” with the actual field slug.
You can find the custom field slugs following these steps:
- Navigate to Dashboard > WishList LMS > Settings > Fields tab.
- Locate the custom field.
- Note the field slug for parameter usage.
For a custom field with slug “wlms_office_phone“, use:
{$usermeta:wlms_office_phone}
Custom Field Slug Management
Create shorter, more manageable slugs:
- Create a new field with an abbreviated slug.
- Click Update to save the field.
- Edit the field name to display the full title.
- The slug remains abbreviated while the display name shows fully.