WishList LMS has an offline payment gateway for membership payments. Specifically, members can pay using bank transfers, checks, or cash.
This document explains how to set up and use the offline payment system. It specifically covers making manual payments and customizing instructions.
Understanding Offline Payment Processing
Offline payment gateways create pending transactions that need to be completed manually. Unlike online gateways, offline payments are not processed automatically on your website.
When members choose offline payment during registration, WishList LMS creates a transaction that’s pending. Members can only access protected content after you manually complete the transaction.
Adding the Offline Payment Gateway
Configure the offline payment gateway through the WishList LMS payment settings:
- Navegue até Dashboard > WishList LMS > Settings > Payments tab.
- Selecione Adicionar método de pagamento at the bottom of the page.
- Escolha Offline Payment from the Portal menu suspenso.
- Configure the gateway settings according to your requirements.
- Selecione Opções de atualização to save your settings.
Offline Payment Gateway Configuration Settings
The offline payment gateway includes several configuration options that control how the payment method appears to members:
Basic Gateway Settings
- Nome – Enter a clear name for this payment method, like “Bank Transfer” ou “Check Payment.”
- Portal – This setting shows “Offline Payment” and is not visible on the frontend.
- ID – WishList LMS creates a unique ID for storing in the database. This ID is used when importing subscriptions for the gateway.
Display Options
- Show Payment Label – Turn this option on to show the gateway name on registration pages. Turn it off to hide the payment method name.
- Show Payment Icon – Enable this option to show payment icons next to the gateway name. Disable to show only text.
- Show Payment Description – Turn this on to show the gateway description on registration pages. Turn it off to hide more details.
Transaction Management Settings
- Admin Must Manually Complete Transactions – Turn this option on to approve offline transactions manually. They will stay Pending until you approve them.
- Send Welcome Email when “Admin Must Manually Complete Transactions” is Enabled – Turn on this option to send welcome emails right after registration, even if you need to complete some steps manually. This gives members quick confirmation and payment instructions.
- Do Not Cancel the Old Plan on Upgrades when “Admin Must Manually Complete Transactions” is Enabled – Keep this option turned on so members can keep their access during upgrades until their new payment goes through. This avoids any service interruptions while waiting for payment.
Payment Instructions
Descrição – Use this field to give members payment instructions, like:
- Bank account details for direct transfers;
- Mailing address for check payments;
- Payment reference numbers or codes;
- Processing timeframes and expectations.
The description can have line breaks to make instructions clearer. It shows below the payment option on registration pages.
Customizing Payment Instructions with Shortcodes
WishList LMS provides a shortcode for displaying gateway-specific instructions on any page or post:
Substituir “abc-123” with your real gateway ID from the settings. This will show the payment instructions you set in the description field.
You can use this shortcode to create payment pages or include payment info in emails.
Testing Your Offline Payment Gateway
Test the offline payment gateway before activating it for members:
- Log out of your WordPress dashboard.
- Visit a membership registration page as a regular visitor.
- Select your offline payment option during registration.
- Complete the registration process to verify the workflow.
- Check the transaction status in Painel de controle > Lista de desejos LMS > Transações.
If you enabled the Admin Must Manually Complete Transactions option, verify that transactions appear with Pending status.
Managing Offline Payments and Subscriptions
Offline payments have to be handled manually because it can’t connect to other payment systems. It’s important to know how offline payments and subscriptions work to manage them properly.
One-Time Subscriptions
One-time subscriptions are paid once when users sign up. They end after the payment runs out. Here’s how to handle offline payments:
- Navegue até Painel de controle > Lista de desejos LMS > Transações.
- Locate the pending transaction for the member.
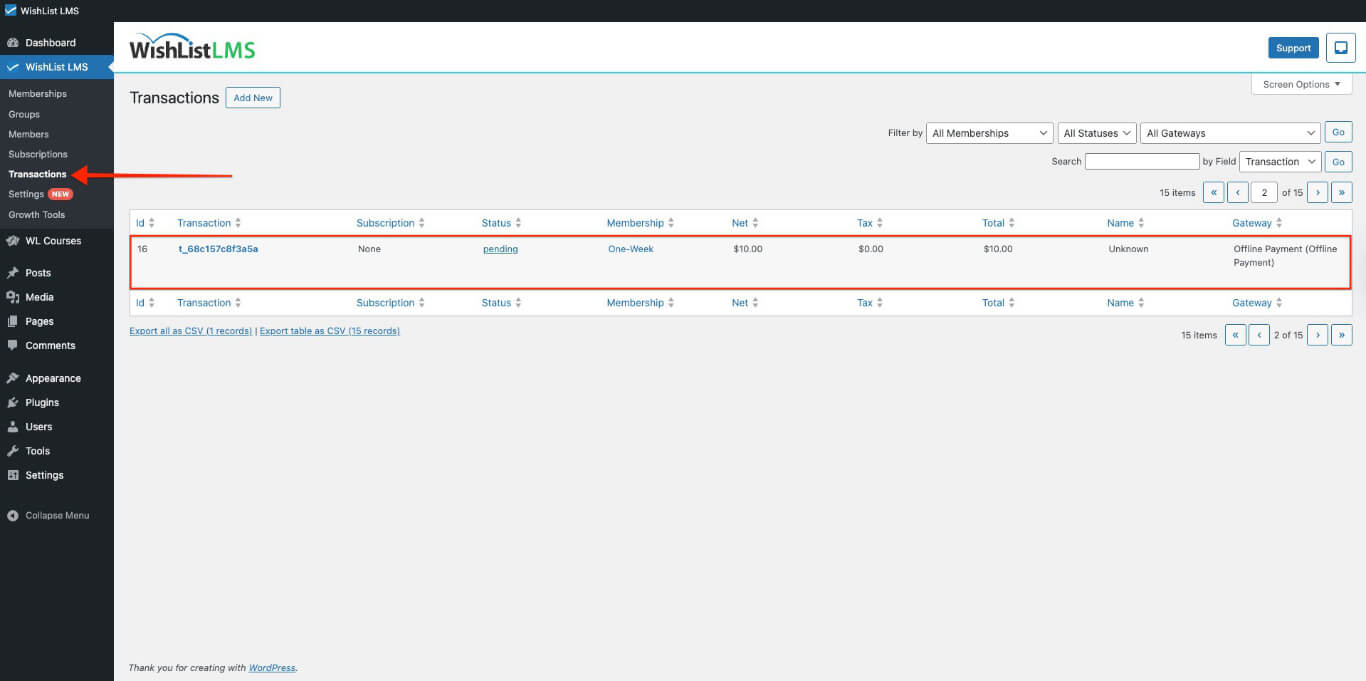
- Selecione o Status dropdown for the transaction.
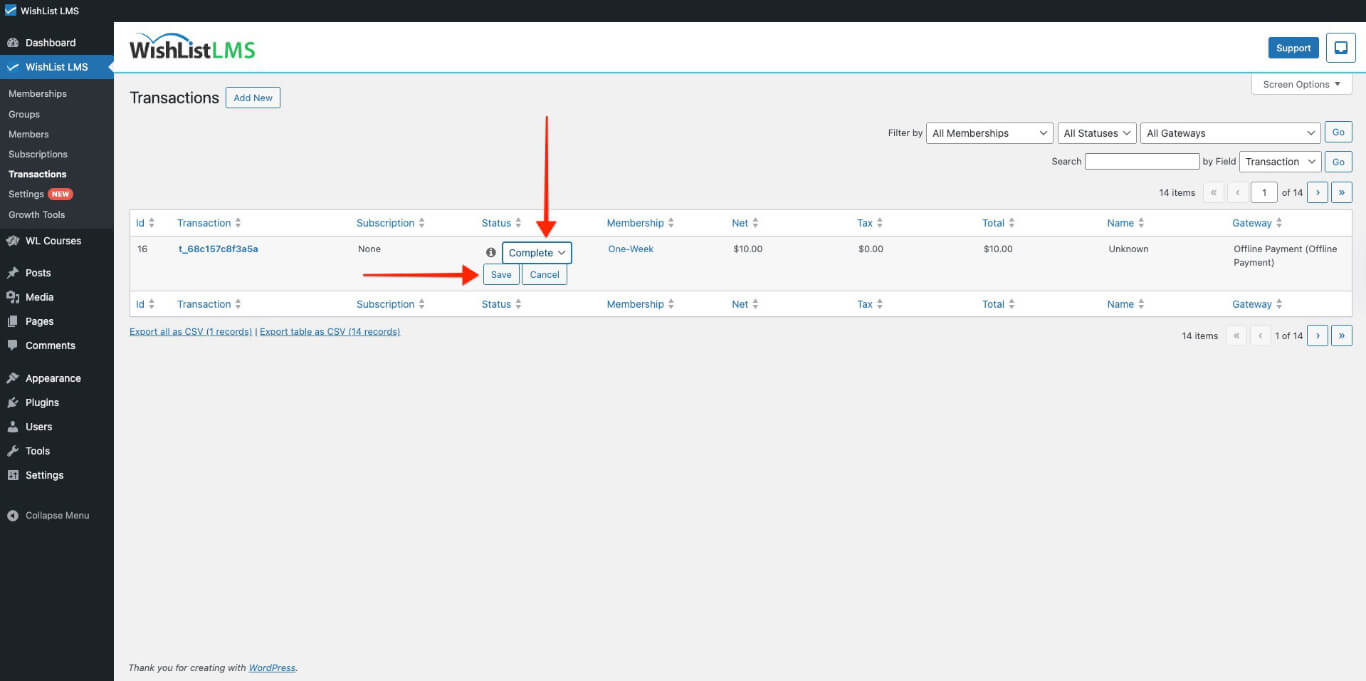
- Change the status from Pending to Completo.
- Selecione Save to activate the member’s subscription.
Recurring Subscriptions
Recurring subscriptions involve multiple payments. The first payment is when users sign up, and they pay again each time the subscription renews.
For recurring offline subscriptions, you must manually create renewal transactions:
- Collect the renewal payment from the member using your offline method.
- Navegue até Painel de controle > Lista de desejos LMS > Assinaturas.
- Locate the member’s subscription record.
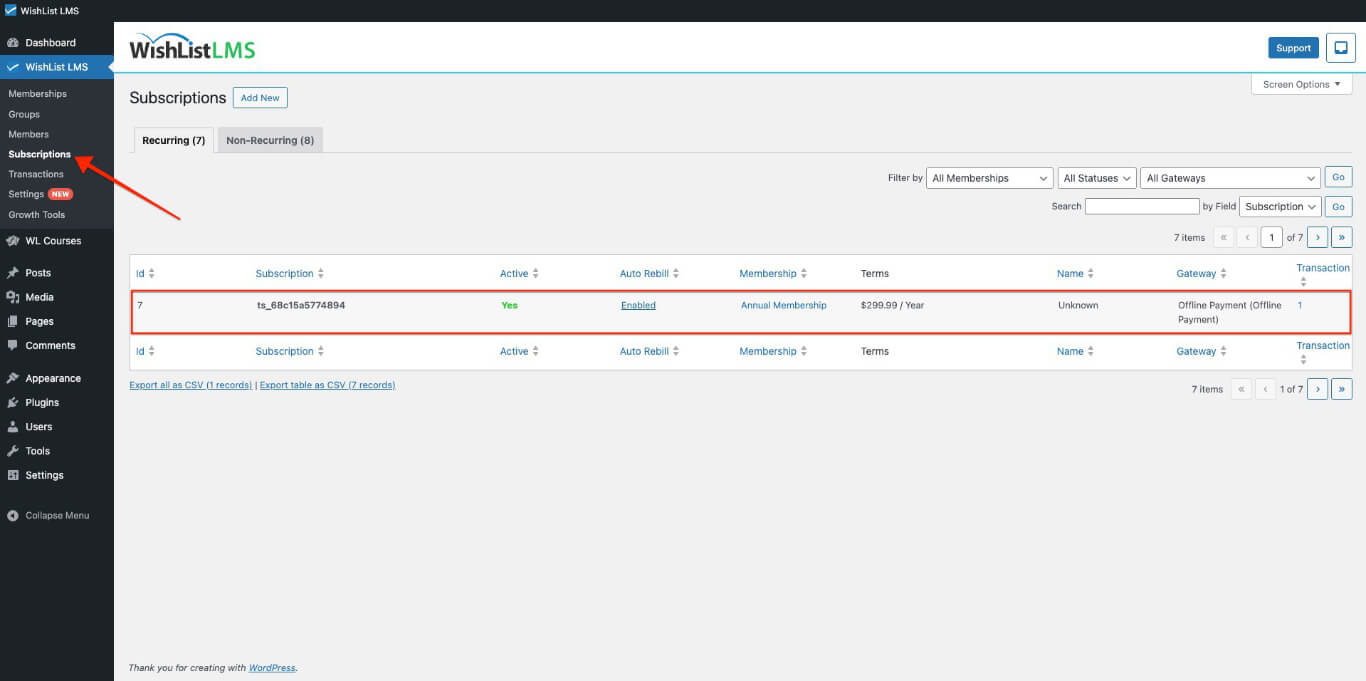
- Hover over the subscription record and click Add Txn to add a new transaction to extend the subscription period.
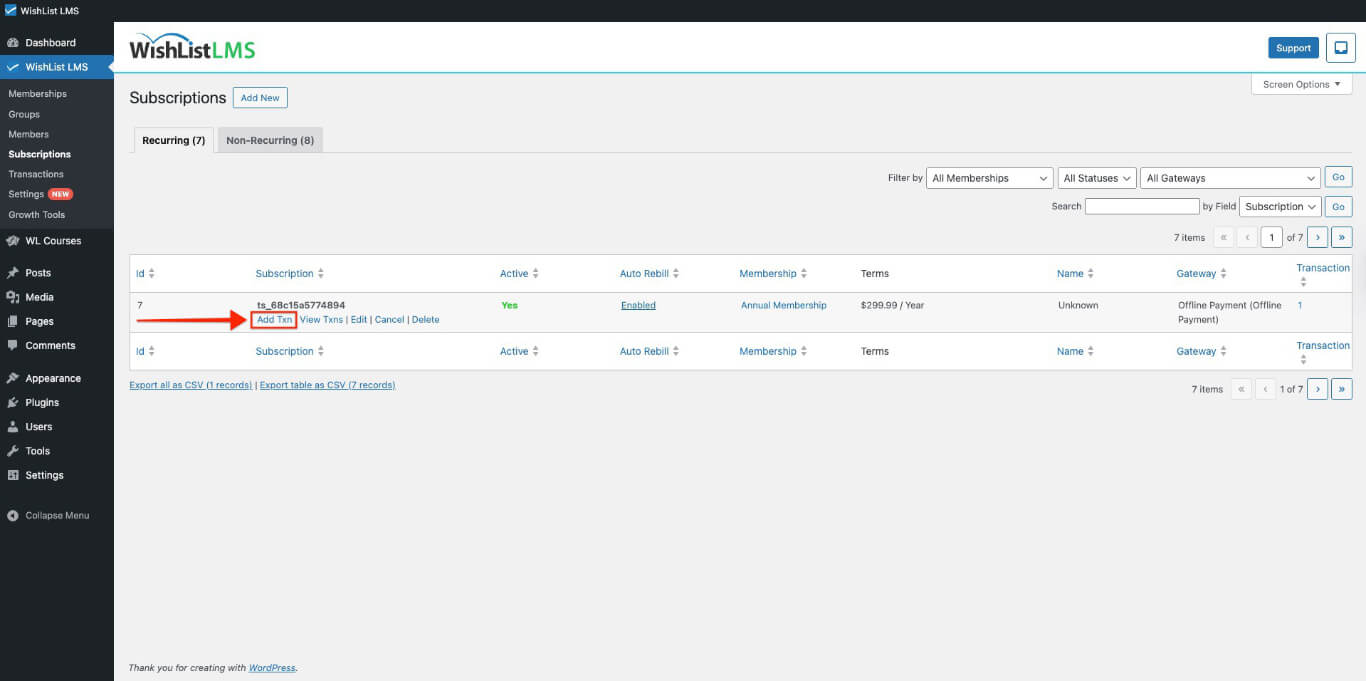
- Complete the transaction to maintain the member’s access.
Processing Refunds
To refund offline payments, refund through your chosen method outside WishList LMS and then update the transaction status as described below.
- Process the refund using your offline payment method.
- Navegue até Painel de controle > Lista de desejos LMS > Transações.
- Locate the transaction requiring a refund.
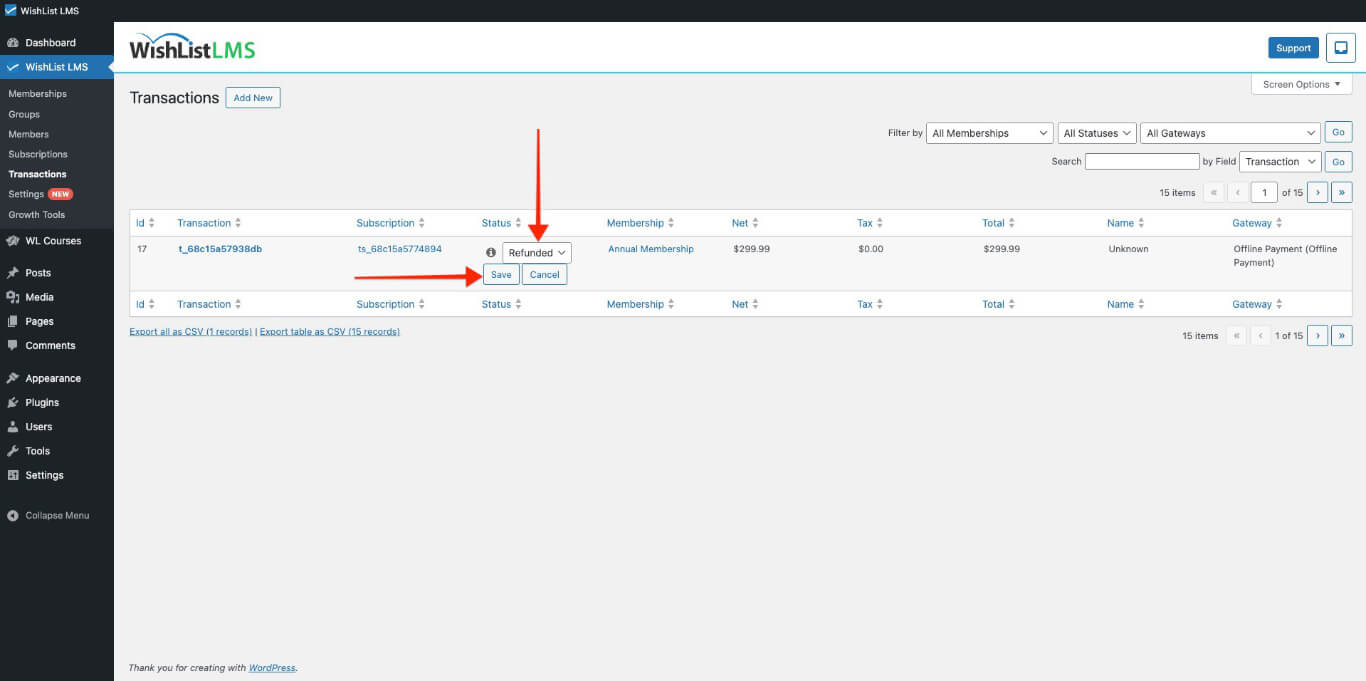
- Change the transaction Status to Reembolsado.
- Selecione Save to update the transaction record.
Gateway Issues Troubleshooting
If the Offline gateway behaves unexpectedly, work through the checks below before contacting support.
- Offline option missing from registration forms: Confirm the gateway is enabled at Dashboard > WishList LMS > Settings > Payments tab and assigned to the membership under Membership Options > Registration;
- Members lose access before payment arrives: Extend the grace period using the
wlms_grace_init_daysfilter, or set the transaction status to Pending manually until payment confirms; - Transaction status not updating: Edit the transaction at Painel de controle > Lista de desejos LMS > Transações, change the Status to Completo ou Reembolsado, and click Save;
- Custom instructions not displaying: Verify the
shortcode includes the correct gateway_id attribute matching the offline gateway in your settings; - Email notifications not sent: Confirm WordPress email delivery works on the site, then check email settings at Dashboard > WishList LMS > Settings > Emails tab.