Customizing the Appearance of the Login Page
This section explains how to customize the visual appearance of your WishList LMS login page. Here, you can use WishList LMS LaunchPad™ options or implement custom CSS.
LaunchPad™ is a tool designed to simplify the styling and customization of your login page using pre-built options.
Otherwise, you can disable LaunchPad™ and apply custom CSS to customize your WishList LMS login page:
- Ensure the LaunchPad™ template is disabled within the Dashboard > WishList LMS > Settings > LaunchPad™ tab.

- Next, you can style the page using custom CSS. Custom CSS can be added to the Theme Customizer or applied with a third-party plugin (e.g., YellowPencil).
WishList LMS Login Page Design Testing
To test the login page, you must be logged out of your website, as otherwise you’d be redirected. Therefore, to preview your login page design as a logged-in user without being redirected, you should follow these steps.
- Open your preferred web browser (e.g., Chrome, Mozilla Firefox, Safari, etc.).
- Access the WishList LMS login page using a private browsing window. Use Incognito mode in Chrome or Private Window in Firefox/Safari. This prevents automatic redirection.
Accessing the WishList LMS Login Page
Create a navigation menu item that links directly to your WishList LMS login page. This method is both common and user-friendly for providing access.
You have three options for adding your login page link:
- Direct Method: Add a link to the login page directly to your main menu (your site’s primary navigation);
- Shortcodes: Utilize the available login shortcodes on any page or post to add the login form directly into your content;
- PHP Template: You can also embed the login shortcode directly into a PHP file within your theme.
Linking a Login Menu Item to the Login Page
This is often the most common and user-friendly method for providing access to your login page. You can create a navigation menu item that links directly to your WishList LMS login page.
Follow the steps below to add a login menu item:
- Naviguez jusqu'à Tableau de bord > Apparence > Menus in your WordPress dashboard.
- Select the specific menu you wish to edit (e.g., your primary navigation menu).
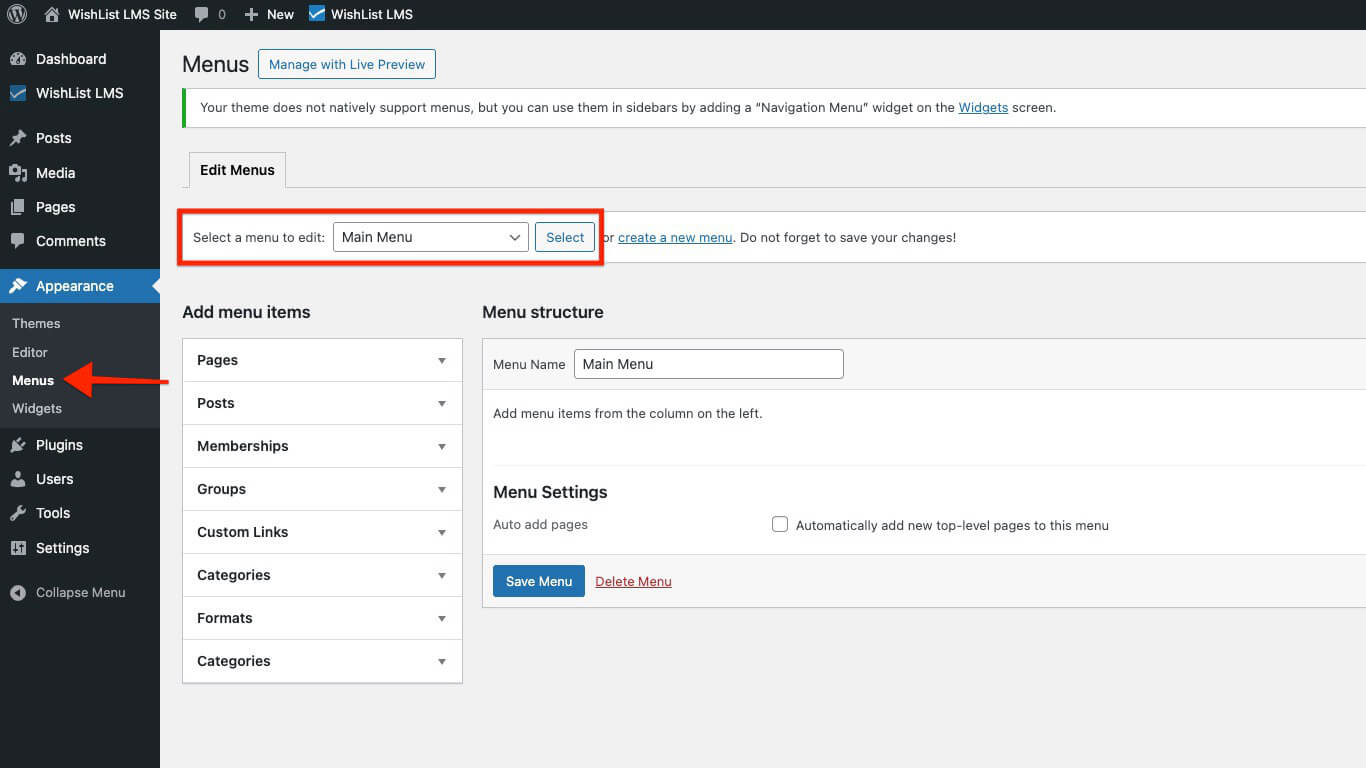
- In the Add menu items section on the left, locate the Pages box.
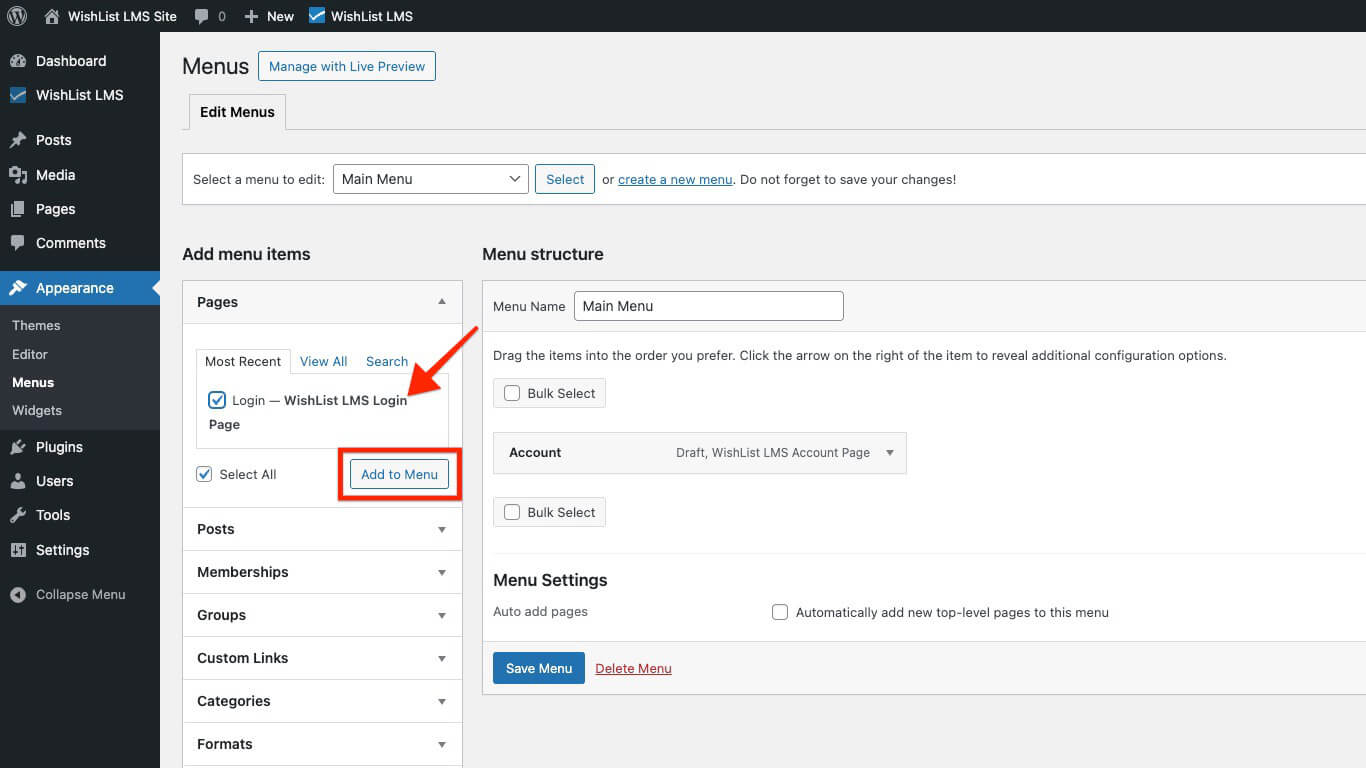
- Locate your WishList LMS Login Page. If you used the Auto Create New Page option, it’s typically titled “Connexion“. Check the box beside it.
- Cliquez sur le bouton Ajouter au menu bouton.
- The login page will now appear as a menu item on the right. You can drag and drop it to rearrange its position within the menu.
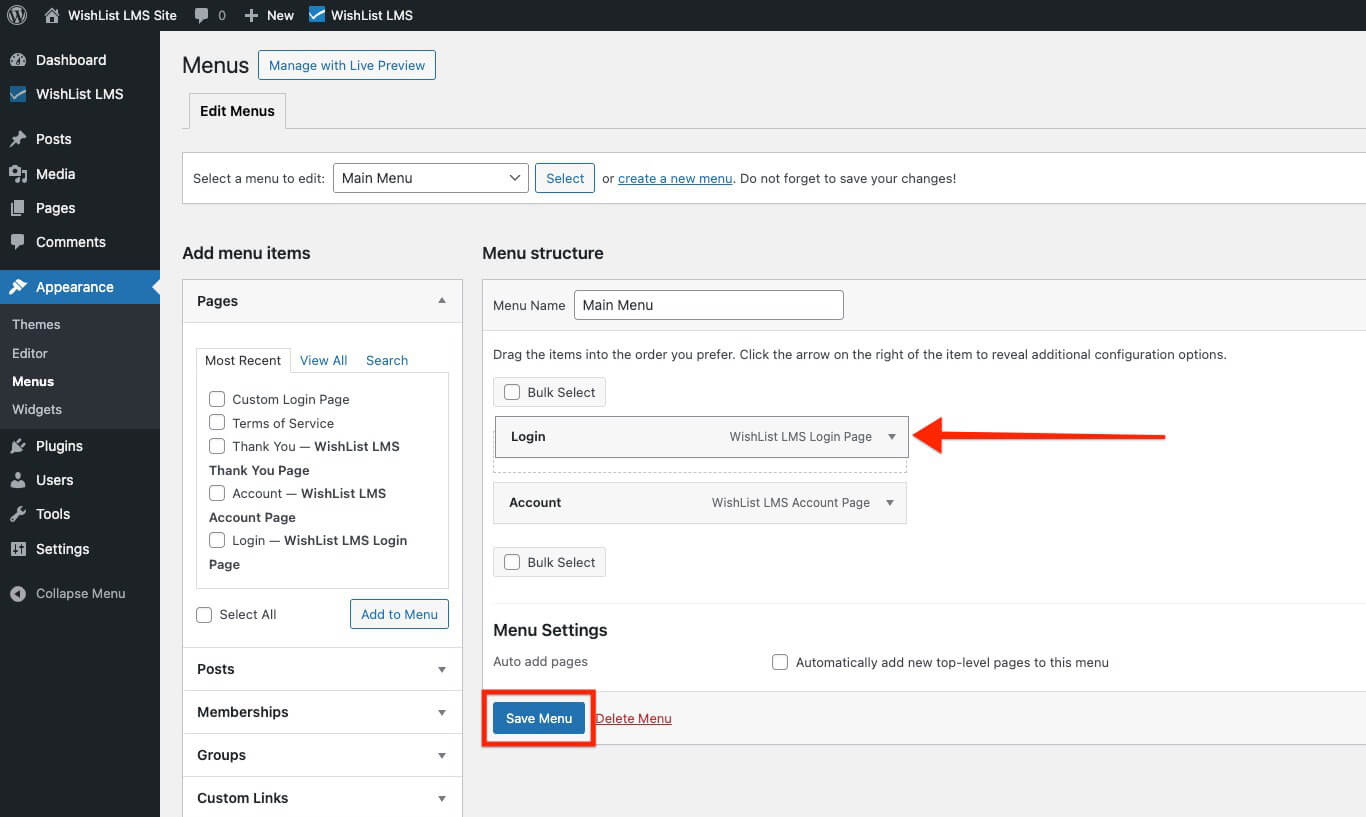
- Cliquez sur le bouton Save Menu button to apply your changes.
Users can access your login page by clicking on the “Connexion” menu item in your website’s navigation.
Integrate a Shortcode Into Posts or Pages
Shortcodes offer a flexible way to embed the login form directly within any post or page content. This allows you to add the login form as part of a larger page, instead of a standalone login page.
Follow the steps below to add a shortcode on a post or page:
- Start editing the post or page where you want to display the login form.
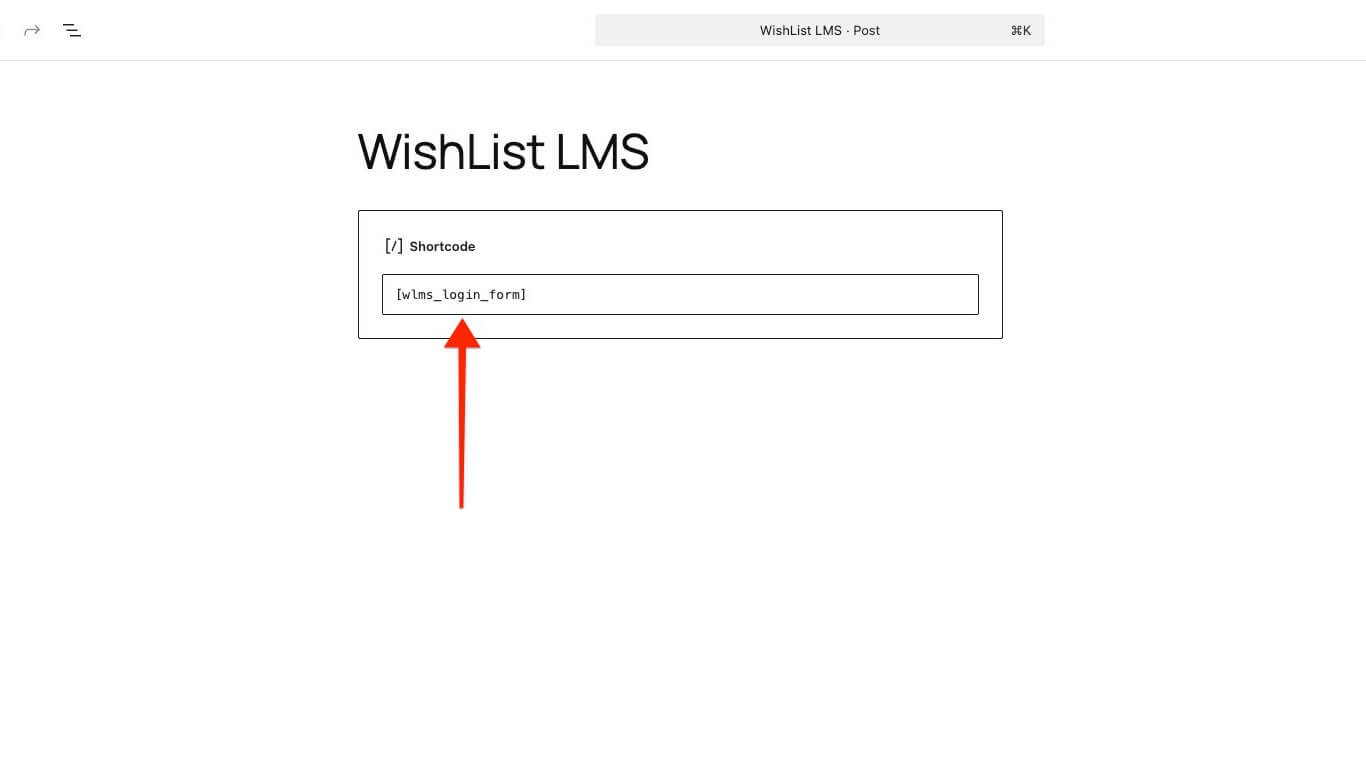
- Add a new Shortcode block to the WordPress editor (Gutenberg editor).
- Add the following shortcode to the Shortcode block:
- Cliquez sur le bouton Save button in the top-right corner.
The login form will now be displayed on that post or page where you placed the shortcode.
Embedding the Login Form Within a PHP Template
For more control, you can embed the login form directly into your WordPress child theme’s PHP files. This option, however, requires a basic understanding of PHP.
To embed the login form, place this code directly into your PHP template file. Ensure it’s in the exact location where you want the login form to display. When modifying a theme’s core files, it is advisable to create a child theme.
// WishList LMS Login Form Shortcode
<?php echo do_shortcode('
'); ?>
Alternatively, you can edit the login page like any other page using the Block editor and add custom content:
- Search for the Connexion page within Dashboard > Pages.
- Sélectionnez l'option Edit option for your login page.
- Add the content you need.
- Cliquez sur Update to apply changes.
Position Custom Content On the Login Page
Follow these steps to add your custom content either above or below the login form:
- Begin by editing the login page, then scroll down to the WishList LMS Settings section.
- Check the “Manually place the login form on the page” option. Enabling this option will reveal the following shortcode:
- Copy and paste this shortcode onto the page precisely where you wish the login form to appear. Position it between your custom content.
You can remove the use_redirect="true" part from the shortcode if you do not want to add redirection. It automatically redirects users to a set page after they log in. For example, it can send them directly to their dashboard. This redirection will be based on your global ou per-membership login redirect settings. Accordingly, the shortcode without a redirect would appear as:
Customizing the Appearance of the Login Page
This section explains how to customize the visual appearance of your WishList LMS login page. Here, you can use WishList LMS LaunchPad™ options or implement custom CSS.
LaunchPad™ is a tool designed to simplify the styling and customization of your login page using pre-built options.
Otherwise, you can disable LaunchPad™ and apply custom CSS to customize your WishList LMS login page:
- Ensure the LaunchPad™ template is disabled within the Dashboard > WishList LMS > Settings > LaunchPad™ tab.
- Next, you can style the page using custom CSS. Custom CSS can be added to the Theme Customizer or applied with a third-party plugin (e.g., YellowPencil).
WishList LMS Login Page Design Testing
To test the login page, you must be logged out of your website, as otherwise you’d be redirected. Therefore, to preview your login page design as a logged-in user without being redirected, you should follow these steps.
- Open your preferred web browser (e.g., Chrome, Mozilla Firefox, Safari, etc.).
- Access the WishList LMS login page using a private browsing window. Use Incognito mode in Chrome or Private Window in Firefox/Safari. This prevents automatic redirection.
Accessing the WishList LMS Login Page
Create a navigation menu item that links directly to your WishList LMS login page. This method is both common and user-friendly for providing access.
You have three options for adding your login page link:
- Direct Method: Add a link to the login page directly to your main menu (your site’s primary navigation);
- Shortcodes: Utilize the available login shortcodes on any page or post to add the login form directly into your content;
- PHP Template: You can also embed the login shortcode directly into a PHP file within your theme.
Linking a Login Menu Item to the Login Page
This is often the most common and user-friendly method for providing access to your login page. You can create a navigation menu item that links directly to your WishList LMS login page.
Follow the steps below to add a login menu item:
- Naviguez jusqu'à Tableau de bord > Apparence > Menus in your WordPress dashboard.
- Select the specific menu you wish to edit (e.g., your primary navigation menu).
- In the Add menu items section on the left, locate the Pages box.
- Locate your WishList LMS Login Page. If you used the Auto Create New Page option, it’s typically titled “Connexion“. Check the box beside it.
- Cliquez sur le bouton Ajouter au menu bouton.
- The login page will now appear as a menu item on the right. You can drag and drop it to rearrange its position within the menu.
- Cliquez sur le bouton Save Menu button to apply your changes.
Users can access your login page by clicking on the “Connexion” menu item in your website’s navigation.
Integrate a Shortcode Into Posts or Pages
Shortcodes offer a flexible way to embed the login form directly within any post or page content. This allows you to add the login form as part of a larger page, instead of a standalone login page.
Follow the steps below to add a shortcode on a post or page:
- Start editing the post or page where you want to display the login form.
- Add a new Shortcode block to the WordPress editor (Gutenberg editor).
- Add the following shortcode to the Shortcode block:
- Cliquez sur le bouton Save button in the top-right corner.
The login form will now be displayed on that post or page where you placed the shortcode.
Embedding the Login Form Within a PHP Template
For more control, you can embed the login form directly into your WordPress child theme’s PHP files. This option, however, requires a basic understanding of PHP.
To embed the login form, place this code directly into your PHP template file. Ensure it’s in the exact location where you want the login form to display. When modifying a theme’s core files, it is advisable to create a child theme.
// WishList LMS Login Form Shortcode
<?php echo do_shortcode('
'); ?>
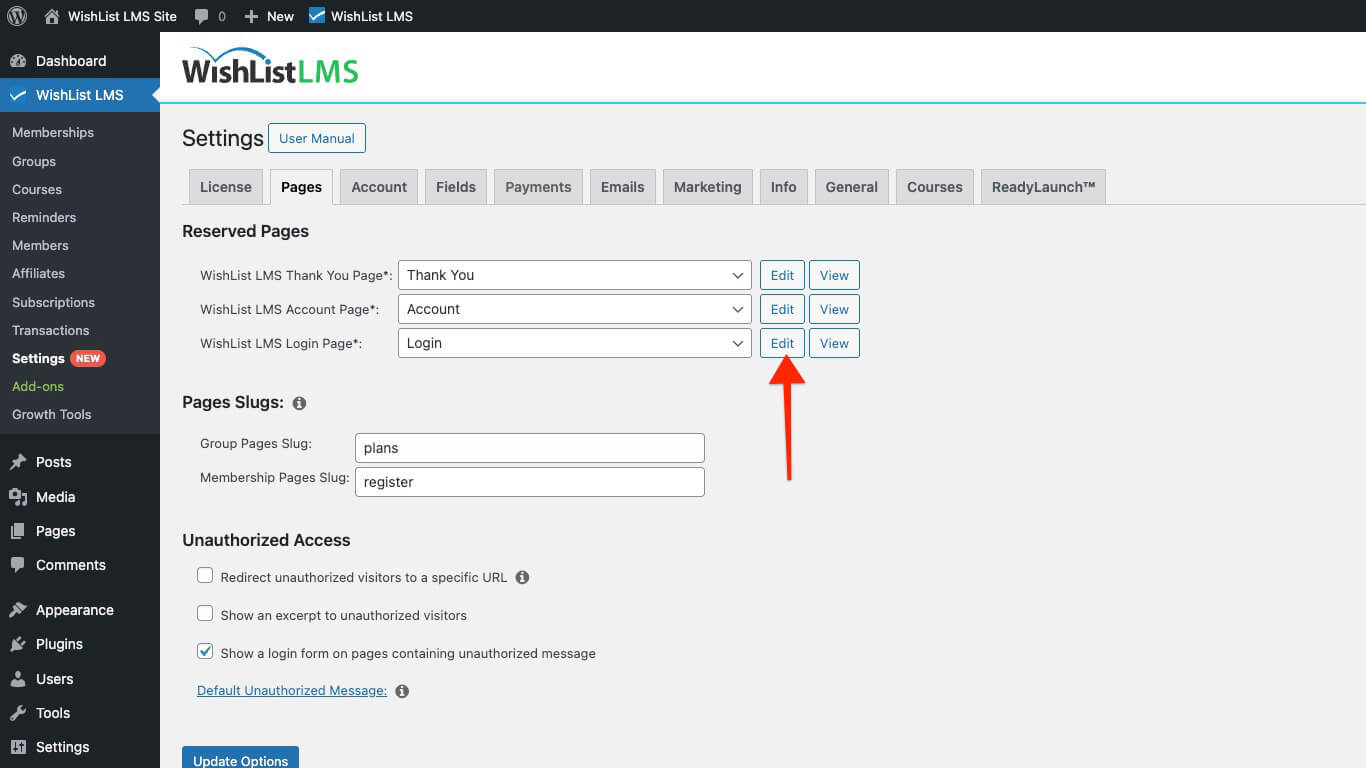
Selecting a Custom Page as Your Login Page
To select an alternative page, whether custom or existing, as the WishList LMS login page, follow these steps:
- Naviguez jusqu'à Dashboard > WishList LMS > Settings > Pages tab.
- Proceed to the Reserved Pages section.
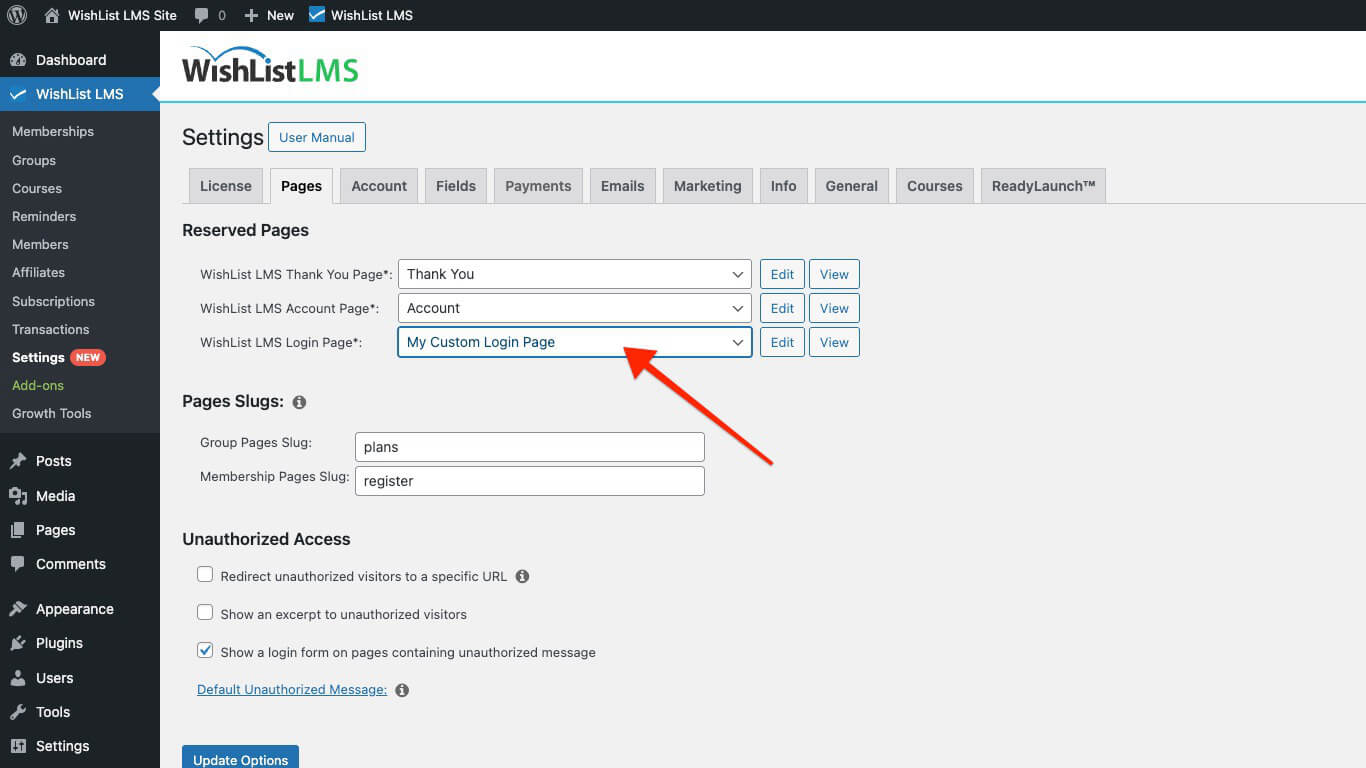
- Use the WishList LMS Login Page drop-down menu to select any existing page from your site.
- Cliquez sur le bouton Update Options button at the bottom of the page to apply your selection.
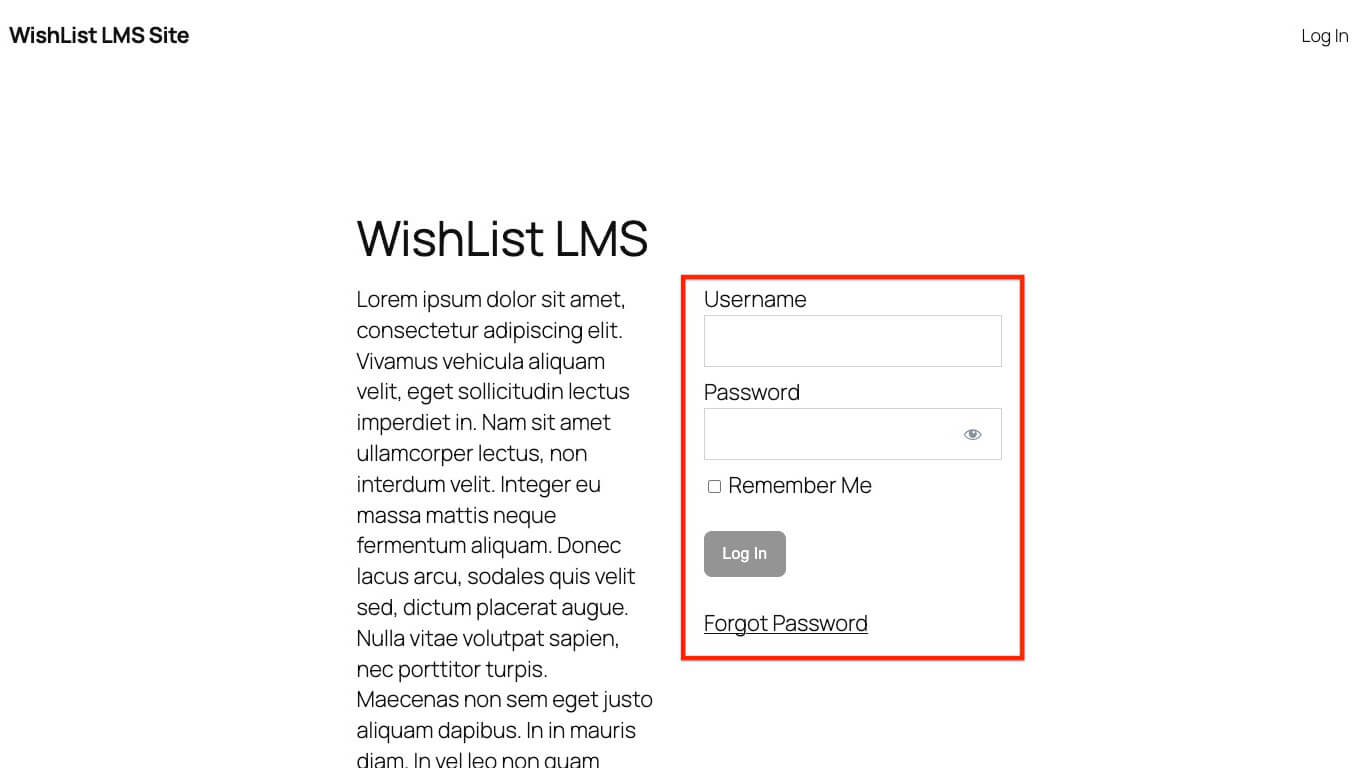
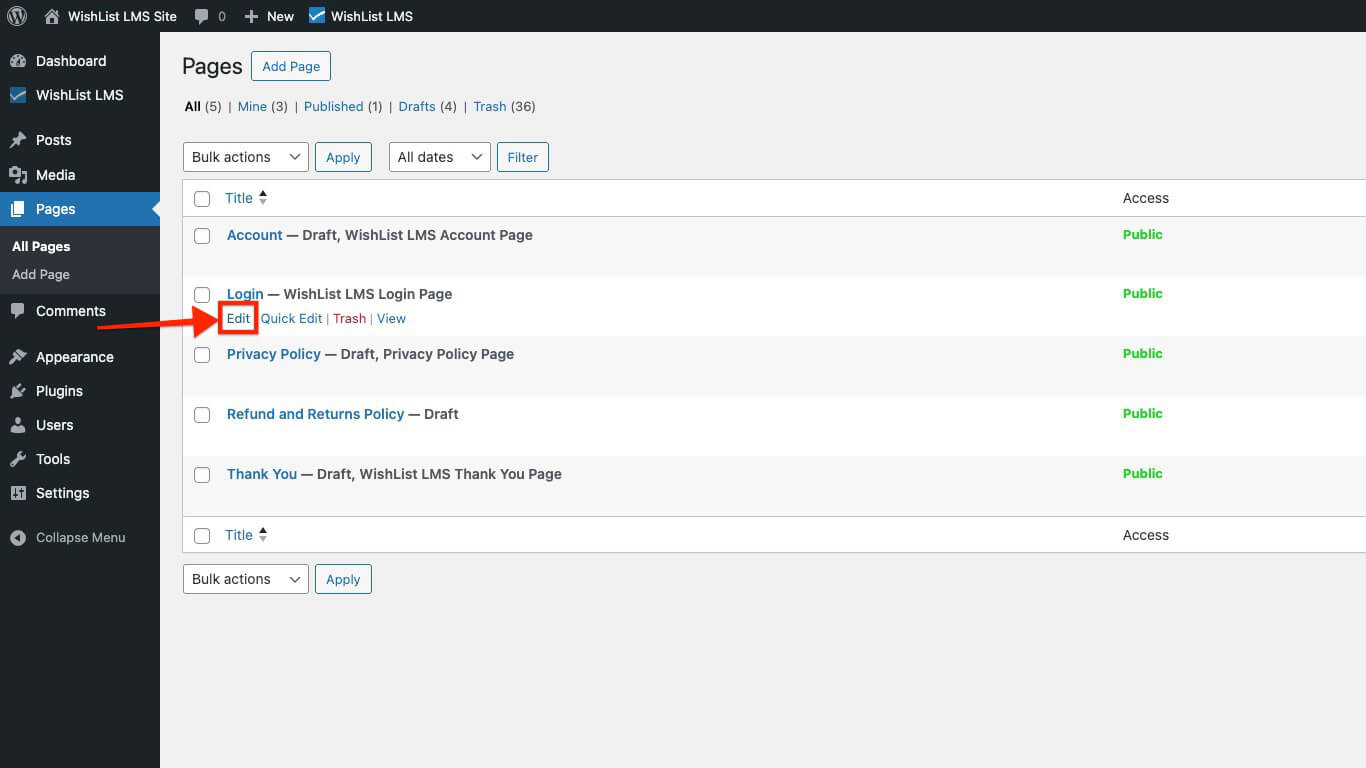
Editing the WishList LMS Login Page
You can personalize your WishList LMS login page by adding custom messages, helpful instructions, or additional content. These customizations can help guide your users effectively and improve their experience.
To edit your WishList LMS login page, please follow these steps:
- Naviguez jusqu'à Dashboard > WishList LMS > Settings > Pages tab.
- Proceed to the Reserved Pages section.
- Next to the WishList LMS Login Page option, click the Edit bouton.
Alternatively, you can edit the login page like any other page using the Block editor and add custom content:
- Search for the Connexion page within Dashboard > Pages.
- Sélectionnez l'option Edit option for your login page.
- Add the content you need.
- Cliquez sur Update to apply changes.
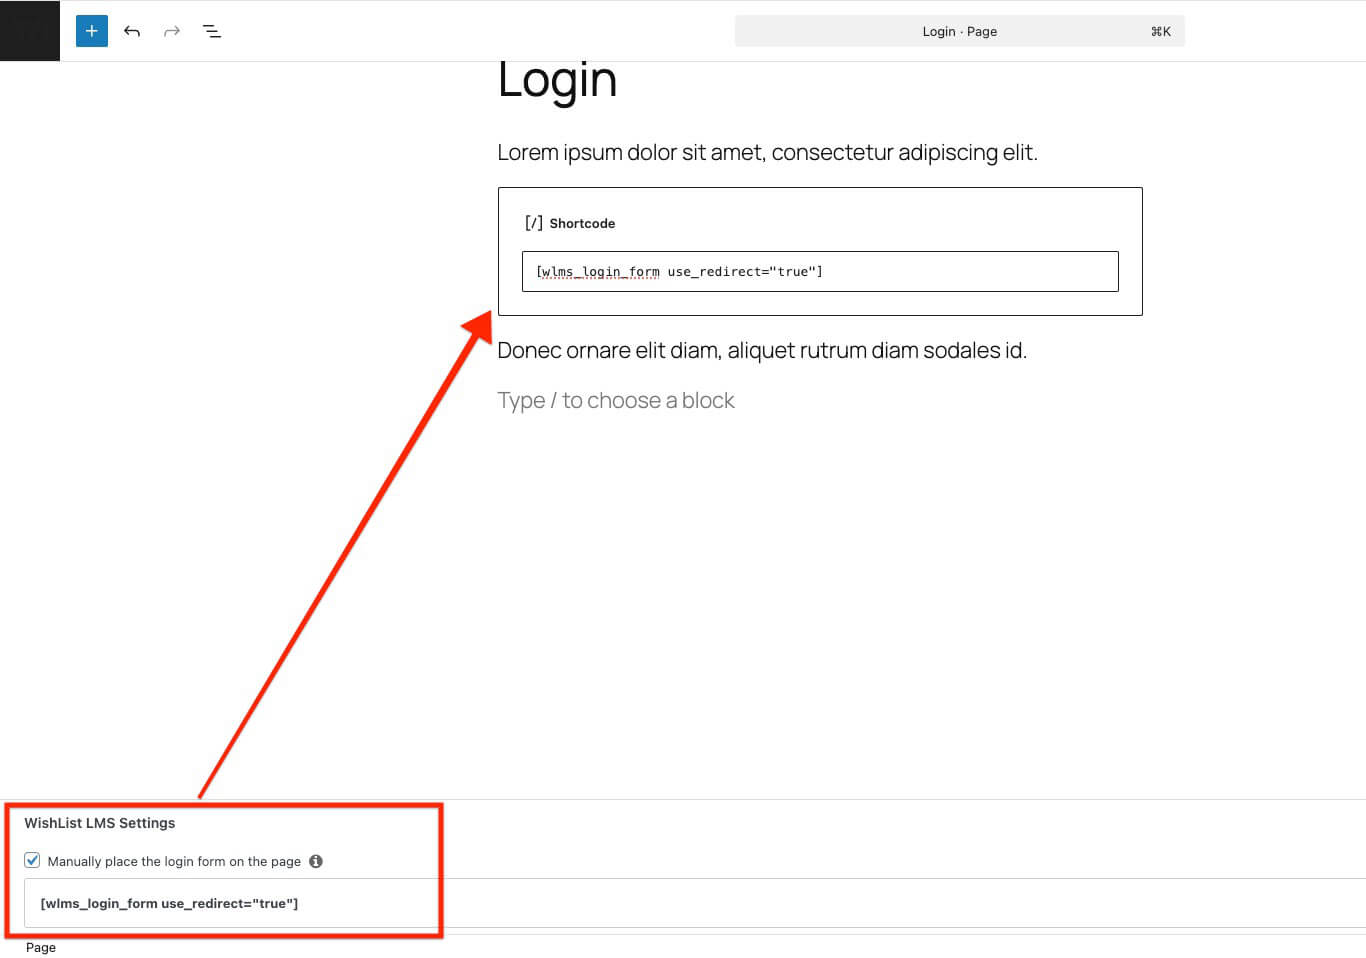
Position Custom Content On the Login Page
Follow these steps to add your custom content either above or below the login form:
- Begin by editing the login page, then scroll down to the WishList LMS Settings section.
- Check the “Manually place the login form on the page” option. Enabling this option will reveal the following shortcode:
- Copy and paste this shortcode onto the page precisely where you wish the login form to appear. Position it between your custom content.
You can remove the use_redirect="true" part from the shortcode if you do not want to add redirection. It automatically redirects users to a set page after they log in. For example, it can send them directly to their dashboard. This redirection will be based on your global ou per-membership login redirect settings. Accordingly, the shortcode without a redirect would appear as:
Customizing the Appearance of the Login Page
This section explains how to customize the visual appearance of your WishList LMS login page. Here, you can use WishList LMS LaunchPad™ options or implement custom CSS.
LaunchPad™ is a tool designed to simplify the styling and customization of your login page using pre-built options.
Otherwise, you can disable LaunchPad™ and apply custom CSS to customize your WishList LMS login page:
- Ensure the LaunchPad™ template is disabled within the Dashboard > WishList LMS > Settings > LaunchPad™ tab.
- Next, you can style the page using custom CSS. Custom CSS can be added to the Theme Customizer or applied with a third-party plugin (e.g., YellowPencil).
WishList LMS Login Page Design Testing
To test the login page, you must be logged out of your website, as otherwise you’d be redirected. Therefore, to preview your login page design as a logged-in user without being redirected, you should follow these steps.
- Open your preferred web browser (e.g., Chrome, Mozilla Firefox, Safari, etc.).
- Access the WishList LMS login page using a private browsing window. Use Incognito mode in Chrome or Private Window in Firefox/Safari. This prevents automatic redirection.
Accessing the WishList LMS Login Page
Create a navigation menu item that links directly to your WishList LMS login page. This method is both common and user-friendly for providing access.
You have three options for adding your login page link:
- Direct Method: Add a link to the login page directly to your main menu (your site’s primary navigation);
- Shortcodes: Utilize the available login shortcodes on any page or post to add the login form directly into your content;
- PHP Template: You can also embed the login shortcode directly into a PHP file within your theme.
Linking a Login Menu Item to the Login Page
This is often the most common and user-friendly method for providing access to your login page. You can create a navigation menu item that links directly to your WishList LMS login page.
Follow the steps below to add a login menu item:
- Naviguez jusqu'à Tableau de bord > Apparence > Menus in your WordPress dashboard.
- Select the specific menu you wish to edit (e.g., your primary navigation menu).
- In the Add menu items section on the left, locate the Pages box.
- Locate your WishList LMS Login Page. If you used the Auto Create New Page option, it’s typically titled “Connexion“. Check the box beside it.
- Cliquez sur le bouton Ajouter au menu bouton.
- The login page will now appear as a menu item on the right. You can drag and drop it to rearrange its position within the menu.
- Cliquez sur le bouton Save Menu button to apply your changes.
Users can access your login page by clicking on the “Connexion” menu item in your website’s navigation.
Integrate a Shortcode Into Posts or Pages
Shortcodes offer a flexible way to embed the login form directly within any post or page content. This allows you to add the login form as part of a larger page, instead of a standalone login page.
Follow the steps below to add a shortcode on a post or page:
- Start editing the post or page where you want to display the login form.
- Add a new Shortcode block to the WordPress editor (Gutenberg editor).
- Add the following shortcode to the Shortcode block:
- Cliquez sur le bouton Save button in the top-right corner.
The login form will now be displayed on that post or page where you placed the shortcode.
Embedding the Login Form Within a PHP Template
For more control, you can embed the login form directly into your WordPress child theme’s PHP files. This option, however, requires a basic understanding of PHP.
To embed the login form, place this code directly into your PHP template file. Ensure it’s in the exact location where you want the login form to display. When modifying a theme’s core files, it is advisable to create a child theme.
// WishList LMS Login Form Shortcode
<?php echo do_shortcode('
'); ?>
Selecting a Custom Page as Your Login Page
To select an alternative page, whether custom or existing, as the WishList LMS login page, follow these steps:
- Naviguez jusqu'à Dashboard > WishList LMS > Settings > Pages tab.
- Proceed to the Reserved Pages section.
- Use the WishList LMS Login Page drop-down menu to select any existing page from your site.
- Cliquez sur le bouton Update Options button at the bottom of the page to apply your selection.
Editing the WishList LMS Login Page
You can personalize your WishList LMS login page by adding custom messages, helpful instructions, or additional content. These customizations can help guide your users effectively and improve their experience.
To edit your WishList LMS login page, please follow these steps:
- Naviguez jusqu'à Dashboard > WishList LMS > Settings > Pages tab.
- Proceed to the Reserved Pages section.
- Next to the WishList LMS Login Page option, click the Edit bouton.
Alternatively, you can edit the login page like any other page using the Block editor and add custom content:
- Search for the Connexion page within Dashboard > Pages.
- Sélectionnez l'option Edit option for your login page.
- Add the content you need.
- Cliquez sur Update to apply changes.
Position Custom Content On the Login Page
Follow these steps to add your custom content either above or below the login form:
- Begin by editing the login page, then scroll down to the WishList LMS Settings section.
- Check the “Manually place the login form on the page” option. Enabling this option will reveal the following shortcode:
- Copy and paste this shortcode onto the page precisely where you wish the login form to appear. Position it between your custom content.
You can remove the use_redirect="true" part from the shortcode if you do not want to add redirection. It automatically redirects users to a set page after they log in. For example, it can send them directly to their dashboard. This redirection will be based on your global ou per-membership login redirect settings. Accordingly, the shortcode without a redirect would appear as:
Customizing the Appearance of the Login Page
This section explains how to customize the visual appearance of your WishList LMS login page. Here, you can use WishList LMS LaunchPad™ options or implement custom CSS.
LaunchPad™ is a tool designed to simplify the styling and customization of your login page using pre-built options.
Otherwise, you can disable LaunchPad™ and apply custom CSS to customize your WishList LMS login page:
- Ensure the LaunchPad™ template is disabled within the Dashboard > WishList LMS > Settings > LaunchPad™ tab.
- Next, you can style the page using custom CSS. Custom CSS can be added to the Theme Customizer or applied with a third-party plugin (e.g., YellowPencil).
WishList LMS Login Page Design Testing
To test the login page, you must be logged out of your website, as otherwise you’d be redirected. Therefore, to preview your login page design as a logged-in user without being redirected, you should follow these steps.
- Open your preferred web browser (e.g., Chrome, Mozilla Firefox, Safari, etc.).
- Access the WishList LMS login page using a private browsing window. Use Incognito mode in Chrome or Private Window in Firefox/Safari. This prevents automatic redirection.
Accessing the WishList LMS Login Page
Create a navigation menu item that links directly to your WishList LMS login page. This method is both common and user-friendly for providing access.
You have three options for adding your login page link:
- Direct Method: Add a link to the login page directly to your main menu (your site’s primary navigation);
- Shortcodes: Utilize the available login shortcodes on any page or post to add the login form directly into your content;
- PHP Template: You can also embed the login shortcode directly into a PHP file within your theme.
Linking a Login Menu Item to the Login Page
This is often the most common and user-friendly method for providing access to your login page. You can create a navigation menu item that links directly to your WishList LMS login page.
Follow the steps below to add a login menu item:
- Naviguez jusqu'à Tableau de bord > Apparence > Menus in your WordPress dashboard.
- Select the specific menu you wish to edit (e.g., your primary navigation menu).
- In the Add menu items section on the left, locate the Pages box.
- Locate your WishList LMS Login Page. If you used the Auto Create New Page option, it’s typically titled “Connexion“. Check the box beside it.
- Cliquez sur le bouton Ajouter au menu bouton.
- The login page will now appear as a menu item on the right. You can drag and drop it to rearrange its position within the menu.
- Cliquez sur le bouton Save Menu button to apply your changes.
Users can access your login page by clicking on the “Connexion” menu item in your website’s navigation.
Integrate a Shortcode Into Posts or Pages
Shortcodes offer a flexible way to embed the login form directly within any post or page content. This allows you to add the login form as part of a larger page, instead of a standalone login page.
Follow the steps below to add a shortcode on a post or page:
- Start editing the post or page where you want to display the login form.
- Add a new Shortcode block to the WordPress editor (Gutenberg editor).
- Add the following shortcode to the Shortcode block:
- Cliquez sur le bouton Save button in the top-right corner.
The login form will now be displayed on that post or page where you placed the shortcode.
Embedding the Login Form Within a PHP Template
For more control, you can embed the login form directly into your WordPress child theme’s PHP files. This option, however, requires a basic understanding of PHP.
To embed the login form, place this code directly into your PHP template file. Ensure it’s in the exact location where you want the login form to display. When modifying a theme’s core files, it is advisable to create a child theme.
// WishList LMS Login Form Shortcode
<?php echo do_shortcode('
'); ?>
Selecting a Custom Page as Your Login Page
To select an alternative page, whether custom or existing, as the WishList LMS login page, follow these steps:
- Naviguez jusqu'à Dashboard > WishList LMS > Settings > Pages tab.
- Proceed to the Reserved Pages section.
- Use the WishList LMS Login Page drop-down menu to select any existing page from your site.
- Cliquez sur le bouton Update Options button at the bottom of the page to apply your selection.
Editing the WishList LMS Login Page
You can personalize your WishList LMS login page by adding custom messages, helpful instructions, or additional content. These customizations can help guide your users effectively and improve their experience.
To edit your WishList LMS login page, please follow these steps:
- Naviguez jusqu'à Dashboard > WishList LMS > Settings > Pages tab.
- Proceed to the Reserved Pages section.
- Next to the WishList LMS Login Page option, click the Edit bouton.
Alternatively, you can edit the login page like any other page using the Block editor and add custom content:
- Search for the Connexion page within Dashboard > Pages.
- Sélectionnez l'option Edit option for your login page.
- Add the content you need.
- Cliquez sur Update to apply changes.
Position Custom Content On the Login Page
Follow these steps to add your custom content either above or below the login form:
- Begin by editing the login page, then scroll down to the WishList LMS Settings section.
- Check the “Manually place the login form on the page” option. Enabling this option will reveal the following shortcode:
- Copy and paste this shortcode onto the page precisely where you wish the login form to appear. Position it between your custom content.
You can remove the use_redirect="true" part from the shortcode if you do not want to add redirection. It automatically redirects users to a set page after they log in. For example, it can send them directly to their dashboard. This redirection will be based on your global ou per-membership login redirect settings. Accordingly, the shortcode without a redirect would appear as:
Customizing the Appearance of the Login Page
This section explains how to customize the visual appearance of your WishList LMS login page. Here, you can use WishList LMS LaunchPad™ options or implement custom CSS.
LaunchPad™ is a tool designed to simplify the styling and customization of your login page using pre-built options.
Otherwise, you can disable LaunchPad™ and apply custom CSS to customize your WishList LMS login page:
- Ensure the LaunchPad™ template is disabled within the Dashboard > WishList LMS > Settings > LaunchPad™ tab.
- Next, you can style the page using custom CSS. Custom CSS can be added to the Theme Customizer or applied with a third-party plugin (e.g., YellowPencil).
WishList LMS Login Page Design Testing
To test the login page, you must be logged out of your website, as otherwise you’d be redirected. Therefore, to preview your login page design as a logged-in user without being redirected, you should follow these steps.
- Open your preferred web browser (e.g., Chrome, Mozilla Firefox, Safari, etc.).
- Access the WishList LMS login page using a private browsing window. Use Incognito mode in Chrome or Private Window in Firefox/Safari. This prevents automatic redirection.
Accessing the WishList LMS Login Page
Create a navigation menu item that links directly to your WishList LMS login page. This method is both common and user-friendly for providing access.
You have three options for adding your login page link:
- Direct Method: Add a link to the login page directly to your main menu (your site’s primary navigation);
- Shortcodes: Utilize the available login shortcodes on any page or post to add the login form directly into your content;
- PHP Template: You can also embed the login shortcode directly into a PHP file within your theme.
Linking a Login Menu Item to the Login Page
This is often the most common and user-friendly method for providing access to your login page. You can create a navigation menu item that links directly to your WishList LMS login page.
Follow the steps below to add a login menu item:
- Naviguez jusqu'à Tableau de bord > Apparence > Menus in your WordPress dashboard.
- Select the specific menu you wish to edit (e.g., your primary navigation menu).
- In the Add menu items section on the left, locate the Pages box.
- Locate your WishList LMS Login Page. If you used the Auto Create New Page option, it’s typically titled “Connexion“. Check the box beside it.
- Cliquez sur le bouton Ajouter au menu bouton.
- The login page will now appear as a menu item on the right. You can drag and drop it to rearrange its position within the menu.
- Cliquez sur le bouton Save Menu button to apply your changes.
Users can access your login page by clicking on the “Connexion” menu item in your website’s navigation.
Integrate a Shortcode Into Posts or Pages
Shortcodes offer a flexible way to embed the login form directly within any post or page content. This allows you to add the login form as part of a larger page, instead of a standalone login page.
Follow the steps below to add a shortcode on a post or page:
- Start editing the post or page where you want to display the login form.
- Add a new Shortcode block to the WordPress editor (Gutenberg editor).
- Add the following shortcode to the Shortcode block:
- Cliquez sur le bouton Save button in the top-right corner.
The login form will now be displayed on that post or page where you placed the shortcode.
Embedding the Login Form Within a PHP Template
For more control, you can embed the login form directly into your WordPress child theme’s PHP files. This option, however, requires a basic understanding of PHP.
To embed the login form, place this code directly into your PHP template file. Ensure it’s in the exact location where you want the login form to display. When modifying a theme’s core files, it is advisable to create a child theme.
// WishList LMS Login Form Shortcode
<?php echo do_shortcode('
'); ?>
Selecting a Custom Page as Your Login Page
To select an alternative page, whether custom or existing, as the WishList LMS login page, follow these steps:
- Naviguez jusqu'à Dashboard > WishList LMS > Settings > Pages tab.
- Proceed to the Reserved Pages section.
- Use the WishList LMS Login Page drop-down menu to select any existing page from your site.
- Cliquez sur le bouton Update Options button at the bottom of the page to apply your selection.
Editing the WishList LMS Login Page
You can personalize your WishList LMS login page by adding custom messages, helpful instructions, or additional content. These customizations can help guide your users effectively and improve their experience.
To edit your WishList LMS login page, please follow these steps:
- Naviguez jusqu'à Dashboard > WishList LMS > Settings > Pages tab.
- Proceed to the Reserved Pages section.
- Next to the WishList LMS Login Page option, click the Edit bouton.
Alternatively, you can edit the login page like any other page using the Block editor and add custom content:
- Search for the Connexion page within Dashboard > Pages.
- Sélectionnez l'option Edit option for your login page.
- Add the content you need.
- Cliquez sur Update to apply changes.
Position Custom Content On the Login Page
Follow these steps to add your custom content either above or below the login form:
- Begin by editing the login page, then scroll down to the WishList LMS Settings section.
- Check the “Manually place the login form on the page” option. Enabling this option will reveal the following shortcode:
- Copy and paste this shortcode onto the page precisely where you wish the login form to appear. Position it between your custom content.
You can remove the use_redirect="true" part from the shortcode if you do not want to add redirection. It automatically redirects users to a set page after they log in. For example, it can send them directly to their dashboard. This redirection will be based on your global ou per-membership login redirect settings. Accordingly, the shortcode without a redirect would appear as:
Customizing the Appearance of the Login Page
This section explains how to customize the visual appearance of your WishList LMS login page. Here, you can use WishList LMS LaunchPad™ options or implement custom CSS.
LaunchPad™ is a tool designed to simplify the styling and customization of your login page using pre-built options.
Otherwise, you can disable LaunchPad™ and apply custom CSS to customize your WishList LMS login page:
- Ensure the LaunchPad™ template is disabled within the Dashboard > WishList LMS > Settings > LaunchPad™ tab.
- Next, you can style the page using custom CSS. Custom CSS can be added to the Theme Customizer or applied with a third-party plugin (e.g., YellowPencil).
WishList LMS Login Page Design Testing
To test the login page, you must be logged out of your website, as otherwise you’d be redirected. Therefore, to preview your login page design as a logged-in user without being redirected, you should follow these steps.
- Open your preferred web browser (e.g., Chrome, Mozilla Firefox, Safari, etc.).
- Access the WishList LMS login page using a private browsing window. Use Incognito mode in Chrome or Private Window in Firefox/Safari. This prevents automatic redirection.
Accessing the WishList LMS Login Page
Create a navigation menu item that links directly to your WishList LMS login page. This method is both common and user-friendly for providing access.
You have three options for adding your login page link:
- Direct Method: Add a link to the login page directly to your main menu (your site’s primary navigation);
- Shortcodes: Utilize the available login shortcodes on any page or post to add the login form directly into your content;
- PHP Template: You can also embed the login shortcode directly into a PHP file within your theme.
Linking a Login Menu Item to the Login Page
This is often the most common and user-friendly method for providing access to your login page. You can create a navigation menu item that links directly to your WishList LMS login page.
Follow the steps below to add a login menu item:
- Naviguez jusqu'à Tableau de bord > Apparence > Menus in your WordPress dashboard.
- Select the specific menu you wish to edit (e.g., your primary navigation menu).
- In the Add menu items section on the left, locate the Pages box.
- Locate your WishList LMS Login Page. If you used the Auto Create New Page option, it’s typically titled “Connexion“. Check the box beside it.
- Cliquez sur le bouton Ajouter au menu bouton.
- The login page will now appear as a menu item on the right. You can drag and drop it to rearrange its position within the menu.
- Cliquez sur le bouton Save Menu button to apply your changes.
Users can access your login page by clicking on the “Connexion” menu item in your website’s navigation.
Integrate a Shortcode Into Posts or Pages
Shortcodes offer a flexible way to embed the login form directly within any post or page content. This allows you to add the login form as part of a larger page, instead of a standalone login page.
Follow the steps below to add a shortcode on a post or page:
- Start editing the post or page where you want to display the login form.
- Add a new Shortcode block to the WordPress editor (Gutenberg editor).
- Add the following shortcode to the Shortcode block:
- Cliquez sur le bouton Save button in the top-right corner.
The login form will now be displayed on that post or page where you placed the shortcode.
Embedding the Login Form Within a PHP Template
For more control, you can embed the login form directly into your WordPress child theme’s PHP files. This option, however, requires a basic understanding of PHP.
To embed the login form, place this code directly into your PHP template file. Ensure it’s in the exact location where you want the login form to display. When modifying a theme’s core files, it is advisable to create a child theme.
// WishList LMS Login Form Shortcode
<?php echo do_shortcode('
'); ?>
Alternatively, you can edit the login page like any other page using the Block editor and add custom content:
- Search for the Connexion page within Dashboard > Pages.
- Sélectionnez l'option Edit option for your login page.
- Add the content you need.
- Cliquez sur Update to apply changes.
Position Custom Content On the Login Page
Follow these steps to add your custom content either above or below the login form:
- Begin by editing the login page, then scroll down to the WishList LMS Settings section.
- Check the “Manually place the login form on the page” option. Enabling this option will reveal the following shortcode:
- Copy and paste this shortcode onto the page precisely where you wish the login form to appear. Position it between your custom content.
You can remove the use_redirect="true" part from the shortcode if you do not want to add redirection. It automatically redirects users to a set page after they log in. For example, it can send them directly to their dashboard. This redirection will be based on your global ou per-membership login redirect settings. Accordingly, the shortcode without a redirect would appear as:
Customizing the Appearance of the Login Page
This section explains how to customize the visual appearance of your WishList LMS login page. Here, you can use WishList LMS LaunchPad™ options or implement custom CSS.
LaunchPad™ is a tool designed to simplify the styling and customization of your login page using pre-built options.
Otherwise, you can disable LaunchPad™ and apply custom CSS to customize your WishList LMS login page:
- Ensure the LaunchPad™ template is disabled within the Dashboard > WishList LMS > Settings > LaunchPad™ tab.
- Next, you can style the page using custom CSS. Custom CSS can be added to the Theme Customizer or applied with a third-party plugin (e.g., YellowPencil).
WishList LMS Login Page Design Testing
To test the login page, you must be logged out of your website, as otherwise you’d be redirected. Therefore, to preview your login page design as a logged-in user without being redirected, you should follow these steps.
- Open your preferred web browser (e.g., Chrome, Mozilla Firefox, Safari, etc.).
- Access the WishList LMS login page using a private browsing window. Use Incognito mode in Chrome or Private Window in Firefox/Safari. This prevents automatic redirection.
Accessing the WishList LMS Login Page
Create a navigation menu item that links directly to your WishList LMS login page. This method is both common and user-friendly for providing access.
You have three options for adding your login page link:
- Direct Method: Add a link to the login page directly to your main menu (your site’s primary navigation);
- Shortcodes: Utilize the available login shortcodes on any page or post to add the login form directly into your content;
- PHP Template: You can also embed the login shortcode directly into a PHP file within your theme.
Linking a Login Menu Item to the Login Page
This is often the most common and user-friendly method for providing access to your login page. You can create a navigation menu item that links directly to your WishList LMS login page.
Follow the steps below to add a login menu item:
- Naviguez jusqu'à Tableau de bord > Apparence > Menus in your WordPress dashboard.
- Select the specific menu you wish to edit (e.g., your primary navigation menu).
- In the Add menu items section on the left, locate the Pages box.
- Locate your WishList LMS Login Page. If you used the Auto Create New Page option, it’s typically titled “Connexion“. Check the box beside it.
- Cliquez sur le bouton Ajouter au menu bouton.
- The login page will now appear as a menu item on the right. You can drag and drop it to rearrange its position within the menu.
- Cliquez sur le bouton Save Menu button to apply your changes.
Users can access your login page by clicking on the “Connexion” menu item in your website’s navigation.
Integrate a Shortcode Into Posts or Pages
Shortcodes offer a flexible way to embed the login form directly within any post or page content. This allows you to add the login form as part of a larger page, instead of a standalone login page.
Follow the steps below to add a shortcode on a post or page:
- Start editing the post or page where you want to display the login form.
- Add a new Shortcode block to the WordPress editor (Gutenberg editor).
- Add the following shortcode to the Shortcode block:
- Cliquez sur le bouton Save button in the top-right corner.
The login form will now be displayed on that post or page where you placed the shortcode.
Embedding the Login Form Within a PHP Template
For more control, you can embed the login form directly into your WordPress child theme’s PHP files. This option, however, requires a basic understanding of PHP.
To embed the login form, place this code directly into your PHP template file. Ensure it’s in the exact location where you want the login form to display. When modifying a theme’s core files, it is advisable to create a child theme.
// WishList LMS Login Form Shortcode
<?php echo do_shortcode('
'); ?>
Selecting a Custom Page as Your Login Page
To select an alternative page, whether custom or existing, as the WishList LMS login page, follow these steps:
- Naviguez jusqu'à Dashboard > WishList LMS > Settings > Pages tab.
- Proceed to the Reserved Pages section.
- Use the WishList LMS Login Page drop-down menu to select any existing page from your site.
- Cliquez sur le bouton Update Options button at the bottom of the page to apply your selection.
Editing the WishList LMS Login Page
You can personalize your WishList LMS login page by adding custom messages, helpful instructions, or additional content. These customizations can help guide your users effectively and improve their experience.
To edit your WishList LMS login page, please follow these steps:
- Naviguez jusqu'à Dashboard > WishList LMS > Settings > Pages tab.
- Proceed to the Reserved Pages section.
- Next to the WishList LMS Login Page option, click the Edit bouton.
Alternatively, you can edit the login page like any other page using the Block editor and add custom content:
- Search for the Connexion page within Dashboard > Pages.
- Sélectionnez l'option Edit option for your login page.
- Add the content you need.
- Cliquez sur Update to apply changes.
Position Custom Content On the Login Page
Follow these steps to add your custom content either above or below the login form:
- Begin by editing the login page, then scroll down to the WishList LMS Settings section.
- Check the “Manually place the login form on the page” option. Enabling this option will reveal the following shortcode:
- Copy and paste this shortcode onto the page precisely where you wish the login form to appear. Position it between your custom content.
You can remove the use_redirect="true" part from the shortcode if you do not want to add redirection. It automatically redirects users to a set page after they log in. For example, it can send them directly to their dashboard. This redirection will be based on your global ou per-membership login redirect settings. Accordingly, the shortcode without a redirect would appear as:
Customizing the Appearance of the Login Page
This section explains how to customize the visual appearance of your WishList LMS login page. Here, you can use WishList LMS LaunchPad™ options or implement custom CSS.
LaunchPad™ is a tool designed to simplify the styling and customization of your login page using pre-built options.
Otherwise, you can disable LaunchPad™ and apply custom CSS to customize your WishList LMS login page:
- Ensure the LaunchPad™ template is disabled within the Dashboard > WishList LMS > Settings > LaunchPad™ tab.
- Next, you can style the page using custom CSS. Custom CSS can be added to the Theme Customizer or applied with a third-party plugin (e.g., YellowPencil).
WishList LMS Login Page Design Testing
To test the login page, you must be logged out of your website, as otherwise you’d be redirected. Therefore, to preview your login page design as a logged-in user without being redirected, you should follow these steps.
- Open your preferred web browser (e.g., Chrome, Mozilla Firefox, Safari, etc.).
- Access the WishList LMS login page using a private browsing window. Use Incognito mode in Chrome or Private Window in Firefox/Safari. This prevents automatic redirection.
Accessing the WishList LMS Login Page
Create a navigation menu item that links directly to your WishList LMS login page. This method is both common and user-friendly for providing access.
You have three options for adding your login page link:
- Direct Method: Add a link to the login page directly to your main menu (your site’s primary navigation);
- Shortcodes: Utilize the available login shortcodes on any page or post to add the login form directly into your content;
- PHP Template: You can also embed the login shortcode directly into a PHP file within your theme.
Linking a Login Menu Item to the Login Page
This is often the most common and user-friendly method for providing access to your login page. You can create a navigation menu item that links directly to your WishList LMS login page.
Follow the steps below to add a login menu item:
- Naviguez jusqu'à Tableau de bord > Apparence > Menus in your WordPress dashboard.
- Select the specific menu you wish to edit (e.g., your primary navigation menu).
- In the Add menu items section on the left, locate the Pages box.
- Locate your WishList LMS Login Page. If you used the Auto Create New Page option, it’s typically titled “Connexion“. Check the box beside it.
- Cliquez sur le bouton Ajouter au menu bouton.
- The login page will now appear as a menu item on the right. You can drag and drop it to rearrange its position within the menu.
- Cliquez sur le bouton Save Menu button to apply your changes.
Users can access your login page by clicking on the “Connexion” menu item in your website’s navigation.
Integrate a Shortcode Into Posts or Pages
Shortcodes offer a flexible way to embed the login form directly within any post or page content. This allows you to add the login form as part of a larger page, instead of a standalone login page.
Follow the steps below to add a shortcode on a post or page:
- Start editing the post or page where you want to display the login form.
- Add a new Shortcode block to the WordPress editor (Gutenberg editor).
- Add the following shortcode to the Shortcode block:
- Cliquez sur le bouton Save button in the top-right corner.
The login form will now be displayed on that post or page where you placed the shortcode.
Embedding the Login Form Within a PHP Template
For more control, you can embed the login form directly into your WordPress child theme’s PHP files. This option, however, requires a basic understanding of PHP.
To embed the login form, place this code directly into your PHP template file. Ensure it’s in the exact location where you want the login form to display. When modifying a theme’s core files, it is advisable to create a child theme.
// WishList LMS Login Form Shortcode
<?php echo do_shortcode('
'); ?>
Alternatively, you can edit the login page like any other page using the Block editor and add custom content:
- Search for the Connexion page within Dashboard > Pages.
- Sélectionnez l'option Edit option for your login page.
- Add the content you need.
- Cliquez sur Update to apply changes.
Position Custom Content On the Login Page
Follow these steps to add your custom content either above or below the login form:
- Begin by editing the login page, then scroll down to the WishList LMS Settings section.
- Check the “Manually place the login form on the page” option. Enabling this option will reveal the following shortcode:
- Copy and paste this shortcode onto the page precisely where you wish the login form to appear. Position it between your custom content.
You can remove the use_redirect="true" part from the shortcode if you do not want to add redirection. It automatically redirects users to a set page after they log in. For example, it can send them directly to their dashboard. This redirection will be based on your global ou per-membership login redirect settings. Accordingly, the shortcode without a redirect would appear as:
Customizing the Appearance of the Login Page
This section explains how to customize the visual appearance of your WishList LMS login page. Here, you can use WishList LMS LaunchPad™ options or implement custom CSS.
LaunchPad™ is a tool designed to simplify the styling and customization of your login page using pre-built options.
Otherwise, you can disable LaunchPad™ and apply custom CSS to customize your WishList LMS login page:
- Ensure the LaunchPad™ template is disabled within the Dashboard > WishList LMS > Settings > LaunchPad™ tab.
- Next, you can style the page using custom CSS. Custom CSS can be added to the Theme Customizer or applied with a third-party plugin (e.g., YellowPencil).
WishList LMS Login Page Design Testing
To test the login page, you must be logged out of your website, as otherwise you’d be redirected. Therefore, to preview your login page design as a logged-in user without being redirected, you should follow these steps.
- Open your preferred web browser (e.g., Chrome, Mozilla Firefox, Safari, etc.).
- Access the WishList LMS login page using a private browsing window. Use Incognito mode in Chrome or Private Window in Firefox/Safari. This prevents automatic redirection.
Accessing the WishList LMS Login Page
Create a navigation menu item that links directly to your WishList LMS login page. This method is both common and user-friendly for providing access.
You have three options for adding your login page link:
- Direct Method: Add a link to the login page directly to your main menu (your site’s primary navigation);
- Shortcodes: Utilize the available login shortcodes on any page or post to add the login form directly into your content;
- PHP Template: You can also embed the login shortcode directly into a PHP file within your theme.
Linking a Login Menu Item to the Login Page
This is often the most common and user-friendly method for providing access to your login page. You can create a navigation menu item that links directly to your WishList LMS login page.
Follow the steps below to add a login menu item:
- Naviguez jusqu'à Tableau de bord > Apparence > Menus in your WordPress dashboard.
- Select the specific menu you wish to edit (e.g., your primary navigation menu).
- In the Add menu items section on the left, locate the Pages box.
- Locate your WishList LMS Login Page. If you used the Auto Create New Page option, it’s typically titled “Connexion“. Check the box beside it.
- Cliquez sur le bouton Ajouter au menu bouton.
- The login page will now appear as a menu item on the right. You can drag and drop it to rearrange its position within the menu.
- Cliquez sur le bouton Save Menu button to apply your changes.
Users can access your login page by clicking on the “Connexion” menu item in your website’s navigation.
Integrate a Shortcode Into Posts or Pages
Shortcodes offer a flexible way to embed the login form directly within any post or page content. This allows you to add the login form as part of a larger page, instead of a standalone login page.
Follow the steps below to add a shortcode on a post or page:
- Start editing the post or page where you want to display the login form.
- Add a new Shortcode block to the WordPress editor (Gutenberg editor).
- Add the following shortcode to the Shortcode block:
- Cliquez sur le bouton Save button in the top-right corner.
The login form will now be displayed on that post or page where you placed the shortcode.
Embedding the Login Form Within a PHP Template
For more control, you can embed the login form directly into your WordPress child theme’s PHP files. This option, however, requires a basic understanding of PHP.
To embed the login form, place this code directly into your PHP template file. Ensure it’s in the exact location where you want the login form to display. When modifying a theme’s core files, it is advisable to create a child theme.
// WishList LMS Login Form Shortcode
<?php echo do_shortcode('
'); ?>
Selecting a Custom Page as Your Login Page
To select an alternative page, whether custom or existing, as the WishList LMS login page, follow these steps:
- Naviguez jusqu'à Dashboard > WishList LMS > Settings > Pages tab.
- Proceed to the Reserved Pages section.
- Use the WishList LMS Login Page drop-down menu to select any existing page from your site.
- Cliquez sur le bouton Update Options button at the bottom of the page to apply your selection.
Editing the WishList LMS Login Page
You can personalize your WishList LMS login page by adding custom messages, helpful instructions, or additional content. These customizations can help guide your users effectively and improve their experience.
To edit your WishList LMS login page, please follow these steps:
- Naviguez jusqu'à Dashboard > WishList LMS > Settings > Pages tab.
- Proceed to the Reserved Pages section.
- Next to the WishList LMS Login Page option, click the Edit bouton.
Alternatively, you can edit the login page like any other page using the Block editor and add custom content:
- Search for the Connexion page within Dashboard > Pages.
- Sélectionnez l'option Edit option for your login page.
- Add the content you need.
- Cliquez sur Update to apply changes.
Position Custom Content On the Login Page
Follow these steps to add your custom content either above or below the login form:
- Begin by editing the login page, then scroll down to the WishList LMS Settings section.
- Check the “Manually place the login form on the page” option. Enabling this option will reveal the following shortcode:
- Copy and paste this shortcode onto the page precisely where you wish the login form to appear. Position it between your custom content.
You can remove the use_redirect="true" part from the shortcode if you do not want to add redirection. It automatically redirects users to a set page after they log in. For example, it can send them directly to their dashboard. This redirection will be based on your global ou per-membership login redirect settings. Accordingly, the shortcode without a redirect would appear as:
Customizing the Appearance of the Login Page
This section explains how to customize the visual appearance of your WishList LMS login page. Here, you can use WishList LMS LaunchPad™ options or implement custom CSS.
LaunchPad™ is a tool designed to simplify the styling and customization of your login page using pre-built options.
Otherwise, you can disable LaunchPad™ and apply custom CSS to customize your WishList LMS login page:
- Ensure the LaunchPad™ template is disabled within the Dashboard > WishList LMS > Settings > LaunchPad™ tab.
- Next, you can style the page using custom CSS. Custom CSS can be added to the Theme Customizer or applied with a third-party plugin (e.g., YellowPencil).
WishList LMS Login Page Design Testing
To test the login page, you must be logged out of your website, as otherwise you’d be redirected. Therefore, to preview your login page design as a logged-in user without being redirected, you should follow these steps.
- Open your preferred web browser (e.g., Chrome, Mozilla Firefox, Safari, etc.).
- Access the WishList LMS login page using a private browsing window. Use Incognito mode in Chrome or Private Window in Firefox/Safari. This prevents automatic redirection.
Accessing the WishList LMS Login Page
Create a navigation menu item that links directly to your WishList LMS login page. This method is both common and user-friendly for providing access.
You have three options for adding your login page link:
- Direct Method: Add a link to the login page directly to your main menu (your site’s primary navigation);
- Shortcodes: Utilize the available login shortcodes on any page or post to add the login form directly into your content;
- PHP Template: You can also embed the login shortcode directly into a PHP file within your theme.
Linking a Login Menu Item to the Login Page
This is often the most common and user-friendly method for providing access to your login page. You can create a navigation menu item that links directly to your WishList LMS login page.
Follow the steps below to add a login menu item:
- Naviguez jusqu'à Tableau de bord > Apparence > Menus in your WordPress dashboard.
- Select the specific menu you wish to edit (e.g., your primary navigation menu).
- In the Add menu items section on the left, locate the Pages box.
- Locate your WishList LMS Login Page. If you used the Auto Create New Page option, it’s typically titled “Connexion“. Check the box beside it.
- Cliquez sur le bouton Ajouter au menu bouton.
- The login page will now appear as a menu item on the right. You can drag and drop it to rearrange its position within the menu.
- Cliquez sur le bouton Save Menu button to apply your changes.
Users can access your login page by clicking on the “Connexion” menu item in your website’s navigation.
Integrate a Shortcode Into Posts or Pages
Shortcodes offer a flexible way to embed the login form directly within any post or page content. This allows you to add the login form as part of a larger page, instead of a standalone login page.
Follow the steps below to add a shortcode on a post or page:
- Start editing the post or page where you want to display the login form.
- Add a new Shortcode block to the WordPress editor (Gutenberg editor).
- Add the following shortcode to the Shortcode block:
- Cliquez sur le bouton Save button in the top-right corner.
The login form will now be displayed on that post or page where you placed the shortcode.
Embedding the Login Form Within a PHP Template
For more control, you can embed the login form directly into your WordPress child theme’s PHP files. This option, however, requires a basic understanding of PHP.
To embed the login form, place this code directly into your PHP template file. Ensure it’s in the exact location where you want the login form to display. When modifying a theme’s core files, it is advisable to create a child theme.
// WishList LMS Login Form Shortcode
<?php echo do_shortcode('
'); ?>
Customizing the Appearance of the Login Page
This section explains how to customize the visual appearance of your WishList LMS login page. Here, you can use WishList LMS LaunchPad™ options or implement custom CSS.
LaunchPad™ is a tool designed to simplify the styling and customization of your login page using pre-built options.
Otherwise, you can disable LaunchPad™ and apply custom CSS to customize your WishList LMS login page:
- Ensure the LaunchPad™ template is disabled within the Dashboard > WishList LMS > Settings > LaunchPad™ tab.
- Next, you can style the page using custom CSS. Custom CSS can be added to the Theme Customizer or applied with a third-party plugin (e.g., YellowPencil).
WishList LMS Login Page Design Testing
To test the login page, you must be logged out of your website, as otherwise you’d be redirected. Therefore, to preview your login page design as a logged-in user without being redirected, you should follow these steps.
- Open your preferred web browser (e.g., Chrome, Mozilla Firefox, Safari, etc.).
- Access the WishList LMS login page using a private browsing window. Use Incognito mode in Chrome or Private Window in Firefox/Safari. This prevents automatic redirection.
Accessing the WishList LMS Login Page
Create a navigation menu item that links directly to your WishList LMS login page. This method is both common and user-friendly for providing access.
You have three options for adding your login page link:
- Direct Method: Add a link to the login page directly to your main menu (your site’s primary navigation);
- Shortcodes: Utilize the available login shortcodes on any page or post to add the login form directly into your content;
- PHP Template: You can also embed the login shortcode directly into a PHP file within your theme.
Linking a Login Menu Item to the Login Page
This is often the most common and user-friendly method for providing access to your login page. You can create a navigation menu item that links directly to your WishList LMS login page.
Follow the steps below to add a login menu item:
- Naviguez jusqu'à Tableau de bord > Apparence > Menus in your WordPress dashboard.
- Select the specific menu you wish to edit (e.g., your primary navigation menu).
- In the Add menu items section on the left, locate the Pages box.
- Locate your WishList LMS Login Page. If you used the Auto Create New Page option, it’s typically titled “Connexion“. Check the box beside it.
- Cliquez sur le bouton Ajouter au menu bouton.
- The login page will now appear as a menu item on the right. You can drag and drop it to rearrange its position within the menu.
- Cliquez sur le bouton Save Menu button to apply your changes.
Users can access your login page by clicking on the “Connexion” menu item in your website’s navigation.
Integrate a Shortcode Into Posts or Pages
Shortcodes offer a flexible way to embed the login form directly within any post or page content. This allows you to add the login form as part of a larger page, instead of a standalone login page.
Follow the steps below to add a shortcode on a post or page:
- Start editing the post or page where you want to display the login form.
- Add a new Shortcode block to the WordPress editor (Gutenberg editor).
- Add the following shortcode to the Shortcode block:
- Cliquez sur le bouton Save button in the top-right corner.
The login form will now be displayed on that post or page where you placed the shortcode.
Embedding the Login Form Within a PHP Template
For more control, you can embed the login form directly into your WordPress child theme’s PHP files. This option, however, requires a basic understanding of PHP.
To embed the login form, place this code directly into your PHP template file. Ensure it’s in the exact location where you want the login form to display. When modifying a theme’s core files, it is advisable to create a child theme.
// WishList LMS Login Form Shortcode
<?php echo do_shortcode('
'); ?>
Alternatively, you can edit the login page like any other page using the Block editor and add custom content:
- Search for the Connexion page within Dashboard > Pages.
- Sélectionnez l'option Edit option for your login page.
- Add the content you need.
- Cliquez sur Update to apply changes.
Position Custom Content On the Login Page
Follow these steps to add your custom content either above or below the login form:
- Begin by editing the login page, then scroll down to the WishList LMS Settings section.
- Check the “Manually place the login form on the page” option. Enabling this option will reveal the following shortcode:
- Copy and paste this shortcode onto the page precisely where you wish the login form to appear. Position it between your custom content.
You can remove the use_redirect="true" part from the shortcode if you do not want to add redirection. It automatically redirects users to a set page after they log in. For example, it can send them directly to their dashboard. This redirection will be based on your global ou per-membership login redirect settings. Accordingly, the shortcode without a redirect would appear as:
Customizing the Appearance of the Login Page
This section explains how to customize the visual appearance of your WishList LMS login page. Here, you can use WishList LMS LaunchPad™ options or implement custom CSS.
LaunchPad™ is a tool designed to simplify the styling and customization of your login page using pre-built options.
Otherwise, you can disable LaunchPad™ and apply custom CSS to customize your WishList LMS login page:
- Ensure the LaunchPad™ template is disabled within the Dashboard > WishList LMS > Settings > LaunchPad™ tab.
- Next, you can style the page using custom CSS. Custom CSS can be added to the Theme Customizer or applied with a third-party plugin (e.g., YellowPencil).
WishList LMS Login Page Design Testing
To test the login page, you must be logged out of your website, as otherwise you’d be redirected. Therefore, to preview your login page design as a logged-in user without being redirected, you should follow these steps.
- Open your preferred web browser (e.g., Chrome, Mozilla Firefox, Safari, etc.).
- Access the WishList LMS login page using a private browsing window. Use Incognito mode in Chrome or Private Window in Firefox/Safari. This prevents automatic redirection.
Accessing the WishList LMS Login Page
Create a navigation menu item that links directly to your WishList LMS login page. This method is both common and user-friendly for providing access.
You have three options for adding your login page link:
- Direct Method: Add a link to the login page directly to your main menu (your site’s primary navigation);
- Shortcodes: Utilize the available login shortcodes on any page or post to add the login form directly into your content;
- PHP Template: You can also embed the login shortcode directly into a PHP file within your theme.
Linking a Login Menu Item to the Login Page
This is often the most common and user-friendly method for providing access to your login page. You can create a navigation menu item that links directly to your WishList LMS login page.
Follow the steps below to add a login menu item:
- Naviguez jusqu'à Tableau de bord > Apparence > Menus in your WordPress dashboard.
- Select the specific menu you wish to edit (e.g., your primary navigation menu).
- In the Add menu items section on the left, locate the Pages box.
- Locate your WishList LMS Login Page. If you used the Auto Create New Page option, it’s typically titled “Connexion“. Check the box beside it.
- Cliquez sur le bouton Ajouter au menu bouton.
- The login page will now appear as a menu item on the right. You can drag and drop it to rearrange its position within the menu.
- Cliquez sur le bouton Save Menu button to apply your changes.
Users can access your login page by clicking on the “Connexion” menu item in your website’s navigation.
Integrate a Shortcode Into Posts or Pages
Shortcodes offer a flexible way to embed the login form directly within any post or page content. This allows you to add the login form as part of a larger page, instead of a standalone login page.
Follow the steps below to add a shortcode on a post or page:
- Start editing the post or page where you want to display the login form.
- Add a new Shortcode block to the WordPress editor (Gutenberg editor).
- Add the following shortcode to the Shortcode block:
- Cliquez sur le bouton Save button in the top-right corner.
The login form will now be displayed on that post or page where you placed the shortcode.
Embedding the Login Form Within a PHP Template
For more control, you can embed the login form directly into your WordPress child theme’s PHP files. This option, however, requires a basic understanding of PHP.
To embed the login form, place this code directly into your PHP template file. Ensure it’s in the exact location where you want the login form to display. When modifying a theme’s core files, it is advisable to create a child theme.
// WishList LMS Login Form Shortcode
<?php echo do_shortcode('
'); ?>
Selecting a Custom Page as Your Login Page
To select an alternative page, whether custom or existing, as the WishList LMS login page, follow these steps:
- Naviguez jusqu'à Dashboard > WishList LMS > Settings > Pages tab.
- Proceed to the Reserved Pages section.
- Use the WishList LMS Login Page drop-down menu to select any existing page from your site.
- Cliquez sur le bouton Update Options button at the bottom of the page to apply your selection.
Editing the WishList LMS Login Page
You can personalize your WishList LMS login page by adding custom messages, helpful instructions, or additional content. These customizations can help guide your users effectively and improve their experience.
To edit your WishList LMS login page, please follow these steps:
- Naviguez jusqu'à Dashboard > WishList LMS > Settings > Pages tab.
- Proceed to the Reserved Pages section.
- Next to the WishList LMS Login Page option, click the Edit bouton.
Alternatively, you can edit the login page like any other page using the Block editor and add custom content:
- Search for the Connexion page within Dashboard > Pages.
- Sélectionnez l'option Edit option for your login page.
- Add the content you need.
- Cliquez sur Update to apply changes.
Position Custom Content On the Login Page
Follow these steps to add your custom content either above or below the login form:
- Begin by editing the login page, then scroll down to the WishList LMS Settings section.
- Check the “Manually place the login form on the page” option. Enabling this option will reveal the following shortcode:
- Copy and paste this shortcode onto the page precisely where you wish the login form to appear. Position it between your custom content.
You can remove the use_redirect="true" part from the shortcode if you do not want to add redirection. It automatically redirects users to a set page after they log in. For example, it can send them directly to their dashboard. This redirection will be based on your global ou per-membership login redirect settings. Accordingly, the shortcode without a redirect would appear as:
Customizing the Appearance of the Login Page
This section explains how to customize the visual appearance of your WishList LMS login page. Here, you can use WishList LMS LaunchPad™ options or implement custom CSS.
LaunchPad™ is a tool designed to simplify the styling and customization of your login page using pre-built options.
Otherwise, you can disable LaunchPad™ and apply custom CSS to customize your WishList LMS login page:
- Ensure the LaunchPad™ template is disabled within the Dashboard > WishList LMS > Settings > LaunchPad™ tab.
- Next, you can style the page using custom CSS. Custom CSS can be added to the Theme Customizer or applied with a third-party plugin (e.g., YellowPencil).
WishList LMS Login Page Design Testing
To test the login page, you must be logged out of your website, as otherwise you’d be redirected. Therefore, to preview your login page design as a logged-in user without being redirected, you should follow these steps.
- Open your preferred web browser (e.g., Chrome, Mozilla Firefox, Safari, etc.).
- Access the WishList LMS login page using a private browsing window. Use Incognito mode in Chrome or Private Window in Firefox/Safari. This prevents automatic redirection.
Accessing the WishList LMS Login Page
Create a navigation menu item that links directly to your WishList LMS login page. This method is both common and user-friendly for providing access.
You have three options for adding your login page link:
- Direct Method: Add a link to the login page directly to your main menu (your site’s primary navigation);
- Shortcodes: Utilize the available login shortcodes on any page or post to add the login form directly into your content;
- PHP Template: You can also embed the login shortcode directly into a PHP file within your theme.
Linking a Login Menu Item to the Login Page
This is often the most common and user-friendly method for providing access to your login page. You can create a navigation menu item that links directly to your WishList LMS login page.
Follow the steps below to add a login menu item:
- Naviguez jusqu'à Tableau de bord > Apparence > Menus in your WordPress dashboard.
- Select the specific menu you wish to edit (e.g., your primary navigation menu).
- In the Add menu items section on the left, locate the Pages box.
- Locate your WishList LMS Login Page. If you used the Auto Create New Page option, it’s typically titled “Connexion“. Check the box beside it.
- Cliquez sur le bouton Ajouter au menu bouton.
- The login page will now appear as a menu item on the right. You can drag and drop it to rearrange its position within the menu.
- Cliquez sur le bouton Save Menu button to apply your changes.
Users can access your login page by clicking on the “Connexion” menu item in your website’s navigation.
Integrate a Shortcode Into Posts or Pages
Shortcodes offer a flexible way to embed the login form directly within any post or page content. This allows you to add the login form as part of a larger page, instead of a standalone login page.
Follow the steps below to add a shortcode on a post or page:
- Start editing the post or page where you want to display the login form.
- Add a new Shortcode block to the WordPress editor (Gutenberg editor).
- Add the following shortcode to the Shortcode block:
- Cliquez sur le bouton Save button in the top-right corner.
The login form will now be displayed on that post or page where you placed the shortcode.
Embedding the Login Form Within a PHP Template
For more control, you can embed the login form directly into your WordPress child theme’s PHP files. This option, however, requires a basic understanding of PHP.
To embed the login form, place this code directly into your PHP template file. Ensure it’s in the exact location where you want the login form to display. When modifying a theme’s core files, it is advisable to create a child theme.
// WishList LMS Login Form Shortcode
<?php echo do_shortcode('
'); ?>
The WishList LMS login page acts as a secure gateway to your members’ area and protected content. Setting it up well is essential. Doing so protects your content, ensures a smooth user experience, and applies your branding effectively.
This document guides you on creating your WishList LMS login page. It also shows how to customize and integrate it into your website.
Creating the Login Page
WishList LMS provides two methods for setting up your login page. You can use its auto-page-creation system or select an existing page. The chosen page will display username and password fields by default. It also includes a password reset option.
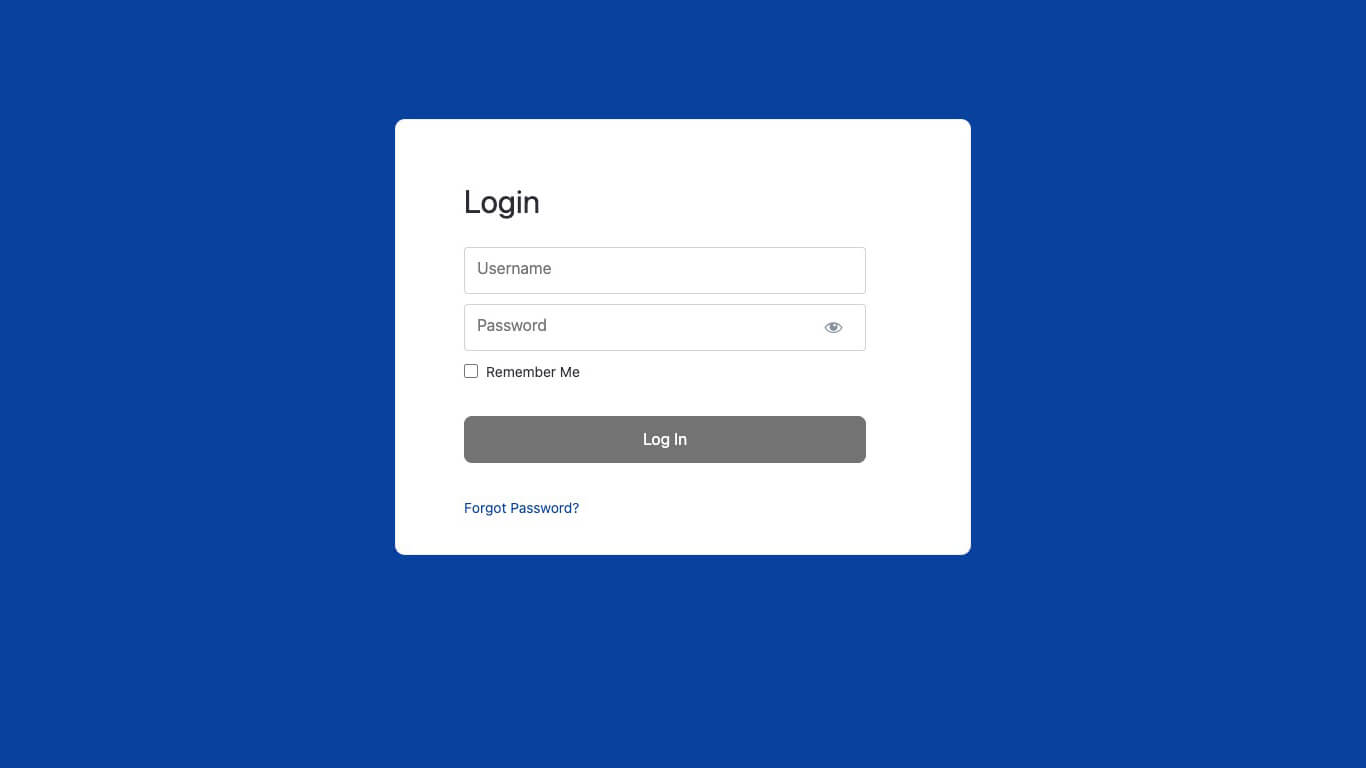
To create your WishList LMS login page, follow these steps:
- Naviguez jusqu'à Dashboard > WishList LMS > Settings > Pages tab.
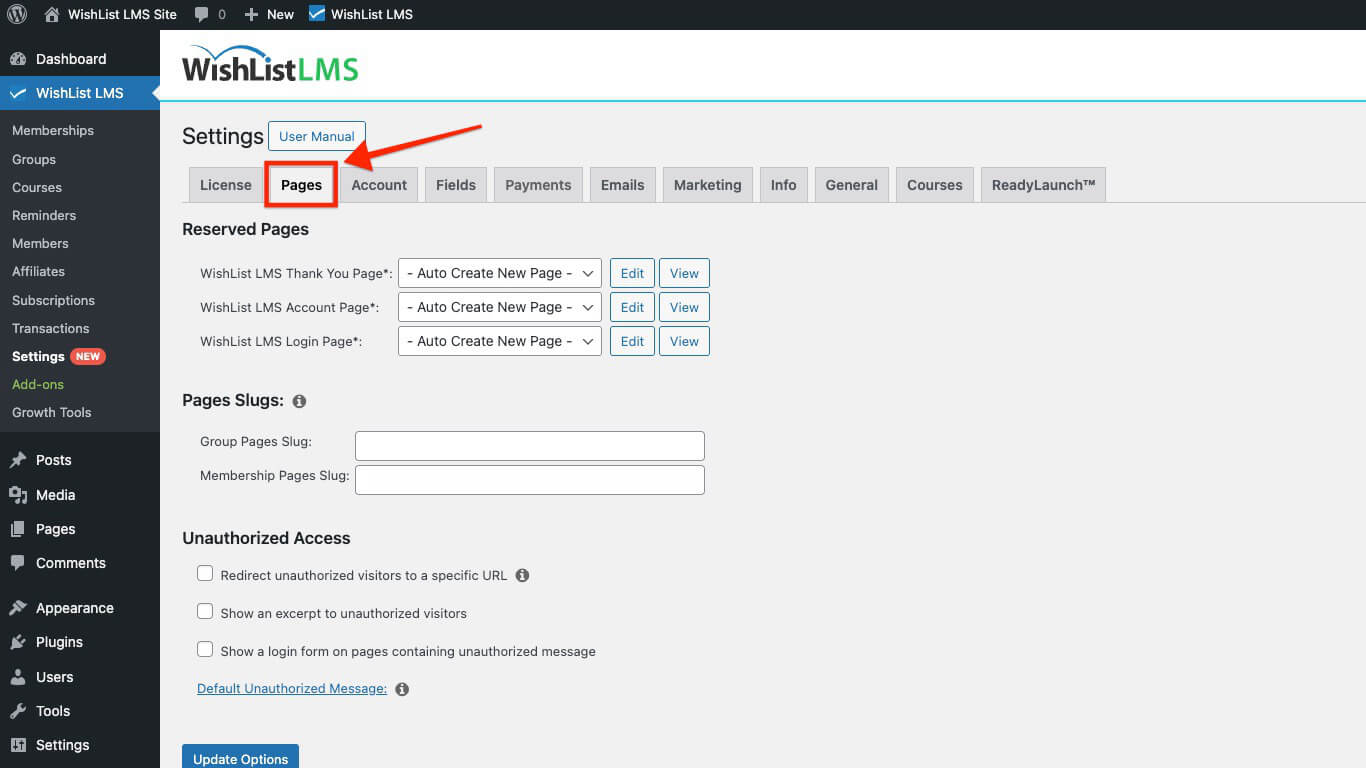
- Click on the WishList LMS Login Page drop-down menu at the top of the page.
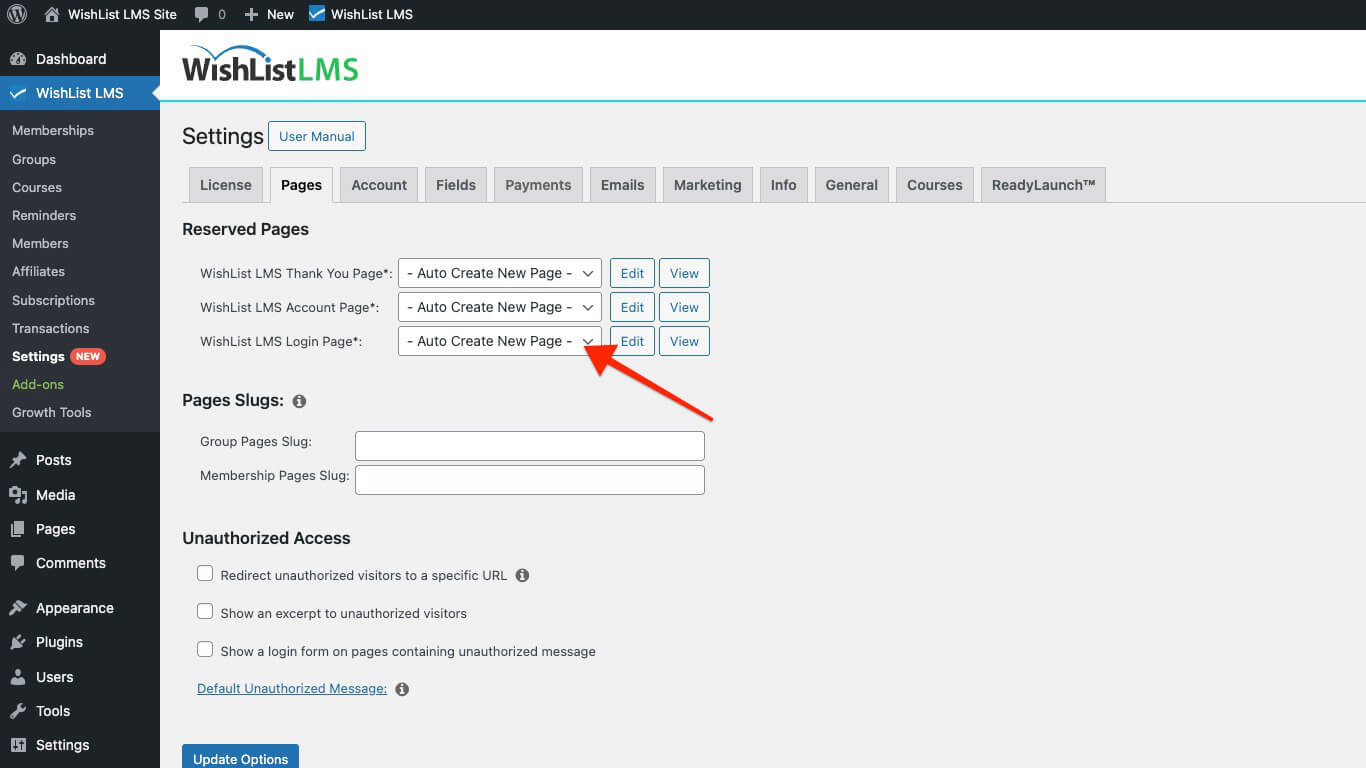
- Select “Auto Create New Page” from the drop-down.
- Cliquez sur le bouton Update Options button at the bottom of the page to save your changes.
WishList LMS Login Page Design Testing
To test the login page, you must be logged out of your website, as otherwise you’d be redirected. Therefore, to preview your login page design as a logged-in user without being redirected, you should follow these steps.
- Open your preferred web browser (e.g., Chrome, Mozilla Firefox, Safari, etc.).
- Access the WishList LMS login page using a private browsing window. Use Incognito mode in Chrome or Private Window in Firefox/Safari. This prevents automatic redirection.
Accessing the WishList LMS Login Page
Create a navigation menu item that links directly to your WishList LMS login page. This method is both common and user-friendly for providing access.
You have three options for adding your login page link:
- Direct Method: Add a link to the login page directly to your main menu (your site’s primary navigation);
- Shortcodes: Utilize the available login shortcodes on any page or post to add the login form directly into your content;
- PHP Template: You can also embed the login shortcode directly into a PHP file within your theme.
Linking a Login Menu Item to the Login Page
This is often the most common and user-friendly method for providing access to your login page. You can create a navigation menu item that links directly to your WishList LMS login page.
Follow the steps below to add a login menu item:
- Naviguez jusqu'à Tableau de bord > Apparence > Menus in your WordPress dashboard.
- Select the specific menu you wish to edit (e.g., your primary navigation menu).
- In the Add menu items section on the left, locate the Pages box.
- Locate your WishList LMS Login Page. If you used the Auto Create New Page option, it’s typically titled “Connexion“. Check the box beside it.
- Cliquez sur le bouton Ajouter au menu bouton.
- The login page will now appear as a menu item on the right. You can drag and drop it to rearrange its position within the menu.
- Cliquez sur le bouton Save Menu button to apply your changes.
Users can access your login page by clicking on the “Connexion” menu item in your website’s navigation.
Integrate a Shortcode Into Posts or Pages
Shortcodes offer a flexible way to embed the login form directly within any post or page content. This allows you to add the login form as part of a larger page, instead of a standalone login page.
Follow the steps below to add a shortcode on a post or page:
- Start editing the post or page where you want to display the login form.
- Add a new Shortcode block to the WordPress editor (Gutenberg editor).
- Add the following shortcode to the Shortcode block:
- Cliquez sur le bouton Save button in the top-right corner.
The login form will now be displayed on that post or page where you placed the shortcode.
Embedding the Login Form Within a PHP Template
For more control, you can embed the login form directly into your WordPress child theme’s PHP files. This option, however, requires a basic understanding of PHP.
To embed the login form, place this code directly into your PHP template file. Ensure it’s in the exact location where you want the login form to display. When modifying a theme’s core files, it is advisable to create a child theme.
// WishList LMS Login Form Shortcode
<?php echo do_shortcode('
'); ?>
Customizing the Appearance of the Login Page
This section explains how to customize the visual appearance of your WishList LMS login page. Here, you can use WishList LMS LaunchPad™ options or implement custom CSS.
LaunchPad™ is a tool designed to simplify the styling and customization of your login page using pre-built options.
Otherwise, you can disable LaunchPad™ and apply custom CSS to customize your WishList LMS login page:
- Ensure the LaunchPad™ template is disabled within the Dashboard > WishList LMS > Settings > LaunchPad™ tab.
- Next, you can style the page using custom CSS. Custom CSS can be added to the Theme Customizer or applied with a third-party plugin (e.g., YellowPencil).
WishList LMS Login Page Design Testing
To test the login page, you must be logged out of your website, as otherwise you’d be redirected. Therefore, to preview your login page design as a logged-in user without being redirected, you should follow these steps.
- Open your preferred web browser (e.g., Chrome, Mozilla Firefox, Safari, etc.).
- Access the WishList LMS login page using a private browsing window. Use Incognito mode in Chrome or Private Window in Firefox/Safari. This prevents automatic redirection.
Accessing the WishList LMS Login Page
Create a navigation menu item that links directly to your WishList LMS login page. This method is both common and user-friendly for providing access.
You have three options for adding your login page link:
- Direct Method: Add a link to the login page directly to your main menu (your site’s primary navigation);
- Shortcodes: Utilize the available login shortcodes on any page or post to add the login form directly into your content;
- PHP Template: You can also embed the login shortcode directly into a PHP file within your theme.
Linking a Login Menu Item to the Login Page
This is often the most common and user-friendly method for providing access to your login page. You can create a navigation menu item that links directly to your WishList LMS login page.
Follow the steps below to add a login menu item:
- Naviguez jusqu'à Tableau de bord > Apparence > Menus in your WordPress dashboard.
- Select the specific menu you wish to edit (e.g., your primary navigation menu).
- In the Add menu items section on the left, locate the Pages box.
- Locate your WishList LMS Login Page. If you used the Auto Create New Page option, it’s typically titled “Connexion“. Check the box beside it.
- Cliquez sur le bouton Ajouter au menu bouton.
- The login page will now appear as a menu item on the right. You can drag and drop it to rearrange its position within the menu.
- Cliquez sur le bouton Save Menu button to apply your changes.
Users can access your login page by clicking on the “Connexion” menu item in your website’s navigation.
Integrate a Shortcode Into Posts or Pages
Shortcodes offer a flexible way to embed the login form directly within any post or page content. This allows you to add the login form as part of a larger page, instead of a standalone login page.
Follow the steps below to add a shortcode on a post or page:
- Start editing the post or page where you want to display the login form.
- Add a new Shortcode block to the WordPress editor (Gutenberg editor).
- Add the following shortcode to the Shortcode block:
- Cliquez sur le bouton Save button in the top-right corner.
The login form will now be displayed on that post or page where you placed the shortcode.
Embedding the Login Form Within a PHP Template
For more control, you can embed the login form directly into your WordPress child theme’s PHP files. This option, however, requires a basic understanding of PHP.
To embed the login form, place this code directly into your PHP template file. Ensure it’s in the exact location where you want the login form to display. When modifying a theme’s core files, it is advisable to create a child theme.
// WishList LMS Login Form Shortcode
<?php echo do_shortcode('
'); ?>
Alternatively, you can edit the login page like any other page using the Block editor and add custom content:
- Search for the Connexion page within Dashboard > Pages.
- Sélectionnez l'option Edit option for your login page.
- Add the content you need.
- Cliquez sur Update to apply changes.
Position Custom Content On the Login Page
Follow these steps to add your custom content either above or below the login form:
- Begin by editing the login page, then scroll down to the WishList LMS Settings section.
- Check the “Manually place the login form on the page” option. Enabling this option will reveal the following shortcode:
- Copy and paste this shortcode onto the page precisely where you wish the login form to appear. Position it between your custom content.
You can remove the use_redirect="true" part from the shortcode if you do not want to add redirection. It automatically redirects users to a set page after they log in. For example, it can send them directly to their dashboard. This redirection will be based on your global ou per-membership login redirect settings. Accordingly, the shortcode without a redirect would appear as:
Customizing the Appearance of the Login Page
This section explains how to customize the visual appearance of your WishList LMS login page. Here, you can use WishList LMS LaunchPad™ options or implement custom CSS.
LaunchPad™ is a tool designed to simplify the styling and customization of your login page using pre-built options.
Otherwise, you can disable LaunchPad™ and apply custom CSS to customize your WishList LMS login page:
- Ensure the LaunchPad™ template is disabled within the Dashboard > WishList LMS > Settings > LaunchPad™ tab.
- Next, you can style the page using custom CSS. Custom CSS can be added to the Theme Customizer or applied with a third-party plugin (e.g., YellowPencil).
WishList LMS Login Page Design Testing
To test the login page, you must be logged out of your website, as otherwise you’d be redirected. Therefore, to preview your login page design as a logged-in user without being redirected, you should follow these steps.
- Open your preferred web browser (e.g., Chrome, Mozilla Firefox, Safari, etc.).
- Access the WishList LMS login page using a private browsing window. Use Incognito mode in Chrome or Private Window in Firefox/Safari. This prevents automatic redirection.
Accessing the WishList LMS Login Page
Create a navigation menu item that links directly to your WishList LMS login page. This method is both common and user-friendly for providing access.
You have three options for adding your login page link:
- Direct Method: Add a link to the login page directly to your main menu (your site’s primary navigation);
- Shortcodes: Utilize the available login shortcodes on any page or post to add the login form directly into your content;
- PHP Template: You can also embed the login shortcode directly into a PHP file within your theme.
Linking a Login Menu Item to the Login Page
This is often the most common and user-friendly method for providing access to your login page. You can create a navigation menu item that links directly to your WishList LMS login page.
Follow the steps below to add a login menu item:
- Naviguez jusqu'à Tableau de bord > Apparence > Menus in your WordPress dashboard.
- Select the specific menu you wish to edit (e.g., your primary navigation menu).
- In the Add menu items section on the left, locate the Pages box.
- Locate your WishList LMS Login Page. If you used the Auto Create New Page option, it’s typically titled “Connexion“. Check the box beside it.
- Cliquez sur le bouton Ajouter au menu bouton.
- The login page will now appear as a menu item on the right. You can drag and drop it to rearrange its position within the menu.
- Cliquez sur le bouton Save Menu button to apply your changes.
Users can access your login page by clicking on the “Connexion” menu item in your website’s navigation.
Integrate a Shortcode Into Posts or Pages
Shortcodes offer a flexible way to embed the login form directly within any post or page content. This allows you to add the login form as part of a larger page, instead of a standalone login page.
Follow the steps below to add a shortcode on a post or page:
- Start editing the post or page where you want to display the login form.
- Add a new Shortcode block to the WordPress editor (Gutenberg editor).
- Add the following shortcode to the Shortcode block:
- Cliquez sur le bouton Save button in the top-right corner.
The login form will now be displayed on that post or page where you placed the shortcode.
Embedding the Login Form Within a PHP Template
For more control, you can embed the login form directly into your WordPress child theme’s PHP files. This option, however, requires a basic understanding of PHP.
To embed the login form, place this code directly into your PHP template file. Ensure it’s in the exact location where you want the login form to display. When modifying a theme’s core files, it is advisable to create a child theme.
// WishList LMS Login Form Shortcode
<?php echo do_shortcode('
'); ?>
Selecting a Custom Page as Your Login Page
To select an alternative page, whether custom or existing, as the WishList LMS login page, follow these steps:
- Naviguez jusqu'à Dashboard > WishList LMS > Settings > Pages tab.
- Proceed to the Reserved Pages section.
- Use the WishList LMS Login Page drop-down menu to select any existing page from your site.
- Cliquez sur le bouton Update Options button at the bottom of the page to apply your selection.
Editing the WishList LMS Login Page
You can personalize your WishList LMS login page by adding custom messages, helpful instructions, or additional content. These customizations can help guide your users effectively and improve their experience.
To edit your WishList LMS login page, please follow these steps:
- Naviguez jusqu'à Dashboard > WishList LMS > Settings > Pages tab.
- Proceed to the Reserved Pages section.
- Next to the WishList LMS Login Page option, click the Edit bouton.
Alternatively, you can edit the login page like any other page using the Block editor and add custom content:
- Search for the Connexion page within Dashboard > Pages.
- Sélectionnez l'option Edit option for your login page.
- Add the content you need.
- Cliquez sur Update to apply changes.
Position Custom Content On the Login Page
Follow these steps to add your custom content either above or below the login form:
- Begin by editing the login page, then scroll down to the WishList LMS Settings section.
- Check the “Manually place the login form on the page” option. Enabling this option will reveal the following shortcode:
- Copy and paste this shortcode onto the page precisely where you wish the login form to appear. Position it between your custom content.
You can remove the use_redirect="true" part from the shortcode if you do not want to add redirection. It automatically redirects users to a set page after they log in. For example, it can send them directly to their dashboard. This redirection will be based on your global ou per-membership login redirect settings. Accordingly, the shortcode without a redirect would appear as:
Customizing the Appearance of the Login Page
This section explains how to customize the visual appearance of your WishList LMS login page. Here, you can use WishList LMS LaunchPad™ options or implement custom CSS.
LaunchPad™ is a tool designed to simplify the styling and customization of your login page using pre-built options.
Otherwise, you can disable LaunchPad™ and apply custom CSS to customize your WishList LMS login page:
- Ensure the LaunchPad™ template is disabled within the Dashboard > WishList LMS > Settings > LaunchPad™ tab.
- Next, you can style the page using custom CSS. Custom CSS can be added to the Theme Customizer or applied with a third-party plugin (e.g., YellowPencil).
WishList LMS Login Page Design Testing
To test the login page, you must be logged out of your website, as otherwise you’d be redirected. Therefore, to preview your login page design as a logged-in user without being redirected, you should follow these steps.
- Open your preferred web browser (e.g., Chrome, Mozilla Firefox, Safari, etc.).
- Access the WishList LMS login page using a private browsing window. Use Incognito mode in Chrome or Private Window in Firefox/Safari. This prevents automatic redirection.
Accessing the WishList LMS Login Page
Create a navigation menu item that links directly to your WishList LMS login page. This method is both common and user-friendly for providing access.
You have three options for adding your login page link:
- Direct Method: Add a link to the login page directly to your main menu (your site’s primary navigation);
- Shortcodes: Utilize the available login shortcodes on any page or post to add the login form directly into your content;
- PHP Template: You can also embed the login shortcode directly into a PHP file within your theme.
Linking a Login Menu Item to the Login Page
This is often the most common and user-friendly method for providing access to your login page. You can create a navigation menu item that links directly to your WishList LMS login page.
Follow the steps below to add a login menu item:
- Naviguez jusqu'à Tableau de bord > Apparence > Menus in your WordPress dashboard.
- Select the specific menu you wish to edit (e.g., your primary navigation menu).
- In the Add menu items section on the left, locate the Pages box.
- Locate your WishList LMS Login Page. If you used the Auto Create New Page option, it’s typically titled “Connexion“. Check the box beside it.
- Cliquez sur le bouton Ajouter au menu bouton.
- The login page will now appear as a menu item on the right. You can drag and drop it to rearrange its position within the menu.
- Cliquez sur le bouton Save Menu button to apply your changes.
Users can access your login page by clicking on the “Connexion” menu item in your website’s navigation.
Integrate a Shortcode Into Posts or Pages
Shortcodes offer a flexible way to embed the login form directly within any post or page content. This allows you to add the login form as part of a larger page, instead of a standalone login page.
Follow the steps below to add a shortcode on a post or page:
- Start editing the post or page where you want to display the login form.
- Add a new Shortcode block to the WordPress editor (Gutenberg editor).
- Add the following shortcode to the Shortcode block:
- Cliquez sur le bouton Save button in the top-right corner.
The login form will now be displayed on that post or page where you placed the shortcode.
Embedding the Login Form Within a PHP Template
For more control, you can embed the login form directly into your WordPress child theme’s PHP files. This option, however, requires a basic understanding of PHP.
To embed the login form, place this code directly into your PHP template file. Ensure it’s in the exact location where you want the login form to display. When modifying a theme’s core files, it is advisable to create a child theme.
// WishList LMS Login Form Shortcode
<?php echo do_shortcode('
'); ?>