Konbini is a Japanese convenience store. You can use Konbini to pay for things with cash. Customers can buy memberships, get a voucher, and pay at any store that accepts Konbini.
WishList LMS with Stripe supports Konbini payments. This guide explains how to set up Konbini payments using Stripe and WishList LMS.
Voraussetzungen
To enable this payment method on your WishList LMS site, make sure the Konbini setup is complete.
- First, connect Stripe to your website’s WishList LMS. Make sure it works before setting up Konbini;
- Next, make sure you set your Stripe account to Japan, because only Japanese Stripe accounts can process Konbini payments;
- Additionally, set the currency to JPY in the WishList LMS settings. Use Japanese Yen only for Konbini transactions;
- Finally, turn on Konbini as a payment method in your WishList LMS.
Enabling Konbini in WishList LMS
First, enable Konbini in your Stripe Dashboard before activating it in WishList LMS:
- Log in to your Stripe Dashboard.
- Gehe zu Settings > Payment Methods.
- Suchen Sie Konbini and click Einschalten.
- Complete any verification steps Stripe requires.
Next, activate the option in WishList LMS. Once you’re ready, turn on Konbini for your WishList LMS registration forms:
- Navigieren Sie zu Dashboard > WishList LMS > Settings > Payments tab.
- Locate your connected Stripe gateway.
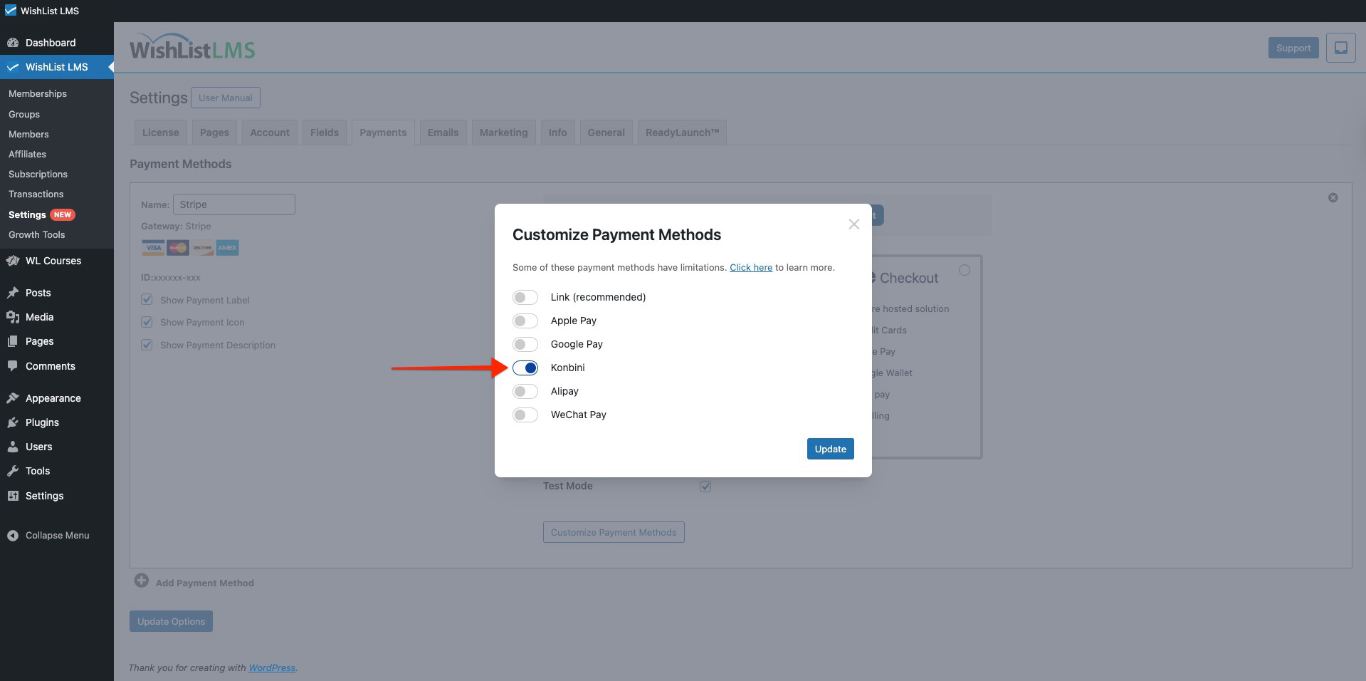
- Klicken Sie auf die Customize Payment Methods Taste.
- Schalten Sie die Konbini Option.
- Klicken Sie auf die Update button in the pop-up to save the settings.
Please check more details on setting this up in the “How To Enable Payment Methods With Stripe and WishList LMS” document.
As a result, your registration forms will show Konbini as a payment option. It will be available on both Stripe Zur Kasse und Stripe Elemente.
How Konbini Payments Work
When users fill out the registration form and choose Konbini, they consequently receive a voucher with a payment code and confirmation number. Subsequently, they need to take this voucher to a store and pay in cash to finish the payment.
These Japanese convenience stores accept Konbini payments.
- 7-Eleven;
- FamilyMart;
- Lawson;
- Ministop;
- Seicomart.
If the recipient doesn’t pay the voucher within 3 days, it expires, and Stripe sends an alert for the failed payment.
Konbini Limitations
The Konbini payment option only shows up when certain conditions are met. There are also rules set by both Konbini and Stripe that apply to the integration.
First, note that Konbini is only for one-time payments. This registration page does not display this payment method for recurring memberships.
Furthermore, konbini does not support deferred payments. Because of this, it can’t be used for membership levels that offer free or trial periods.
Transaction Amount Limits
Konbini transactions must fall within specific monetary ranges:
- Minimum accepted amount: ¥120;
- Maximum accepted amount: ¥300,000.
Geographic and Currency Requirements
Vouchers can only be paid in cash in Japanese Yen at stores accepting Konbini payments, so this option is only for Japan-based customers. Check that the currency in WishList LMS settings is set to JPY.
In addition, your Stripe account must be set to Japan to accept Konbini payments.
Payment Processing Delays
Since users pay in-store physically, the payment notification is delayed. This is different from instant online payments.
Grace Period Considerations
WishList LMS normally gives users access to content immediately after subscribing, but they only have 24 hours before their access expires. This is to account for payment processing time.
The grace period can be changed for Konbini payments.
Increase the grace period to 3 days so users can use the voucher until it expires or is paid.
To do this, you would need to add the following code snippet to your site:
add_filter('wlms_grace_init_days', function() {
   return 14;
});
This code sets a 14-day grace period. You can change the number of days by editing the line below.
return 14;
If you use the mentioned payment methods for your renewals, the same issue might happen; therefore, you need to add a second code snippet to extend the grace period on renewals.
add_filter('wlms_grace_expire_days',  function($days) {
   return 1;
});
Change the grace period duration for this code, as you did before for the first code.
After updating the grace period in both code snippets, you should then add them to your website’s functions.php file or, alternatively, use the WPCode plugin.